We've independently reviewed this article to make sure it's as accurate as we can make it.
To find out more about our article creation and review process, check out our editorial guidelines.
Is your washer spinning slower than a toddler at Gymboree?
If so, you’re not alone. Slow spinning is a common issue many homeowners face and can be frustrating. But don’t worry; I have some stellar tips to help you fix that sluggish spinner and get your laundry days back on track.
Together, we’ll explore the most common reasons for a washer spinning too slowly and how you can fix it yourself.
In short, you can fix a washer spinning too slowly by:
- Checking the load balance.
- Inspecting the motor coupler.
- Examining the drive belt.
- Looking for a worn clutch assembly.
- Assessing the lid switch.
- Testing the motor.
- Evaluating the transmission.
- Inspecting the drive pulley.
- Examining the timer.
Tools You’ll Need for This Project:
- A multimeter
- A screwdriver
- A flashlight
- Tech manual
Ready to conquer your washer’s spinning woes? Then let’s dive in!
Why trust us? This article was written by Craig Anderson and James Blackford.
Craig has helped thousands of other homeowners repair their appliances since 2016.
James is one of our resident appliance experts with over 16 years of experience. He currently works as a Master Technician for SquareTrade, and runs his own appliance repair business.
Washer Spinning Too Slow? Let’s Fix It In 10 Steps
#1 Unplug and Familiarize Yourself with Your Washer
First, unplug your washer to ensure your safety during our appliance adventure. Then, take a moment to get to know your washer.
To get started on repairing your washer, you’ll need your Tech Manual. The Tech Manual is different from the user manual, as it’s written for appliance technicians and covers how to repair your washer.
Feel free to check out our free guide to finding manuals online. Or, if you prefer, you can consider buying access to a tech manual library like appliancetechmanuals.com
#2 Check the Drive Belt
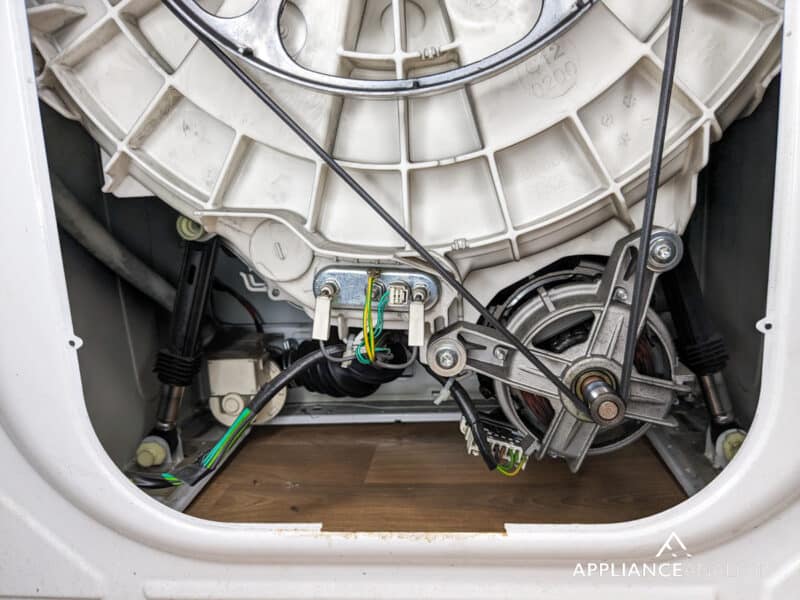
Your washer’s drive belt is like the “conveyor belt” that helps your washer drum spin. To find the belt, you’ll need to remove your washer’s back or front panel, depending on your model. Once you’ve removed the panel, look for a belt looping around a pulley system.
Next, inspect the belt for wear, tear, or slackness. If the belt has lost its groove, it’s time to replace it. Ensure the belt is not greasy; you can clean it with a paper towel if it is.
The greasiness may indicate a problem with the transmission, and you’ll need to call a professional.

#3 Inspect the Rotor Assembly
When your washer is spinning too slowly, checking the rotor assembly is key, as it plays a crucial role in transferring power from the motor to the drum, enabling it to spin. Unplug your washer and remove the rear access panel to locate the rotor assembly.
The rotor assembly should be visible and connected to the bottom of the tub and the motor’s shaft.
Check the rotor assembly for signs of damage, such as cracks, wear, or broken magnets. Replacing the rotor assembly to restore your washer’s spinning speed might be necessary.
Also, ensure that the rotor assembly is securely attached and that there are no loose bolts or screws, as loose bolts or screws can also impact the spinning efficiency.
#4 Investigate the Clutch and Shifter Assembly
The clutch is a small plastic piece mounted to the shifter assembly on modern washers. The shifter assembly, which includes the clutch, is responsible for shifting the washer’s gears between agitate and spin cycles.
If the clutch or shifter assembly is malfunctioning, it can cause your washer to spin too slowly.
To inspect the shifter assembly and clutch, follow the steps below:
- Unplug your washer and move it away from the wall to access the rear panel.
- Remove the rear access panel by unscrewing the bolts or screws holding it. Keep track of the screws to reassemble the panel later.
- Locate the shifter assembly, typically mounted to the transmission’s side or the tub’s bottom.
- Inspect the shifter assembly and the small plastic clutch piece for any signs of wear, damage, or broken components. If you notice any issues, the shifter assembly and the clutch may need to be replaced.
- If everything appears in good condition, ensure that the shifter assembly is securely attached and that there are no loose connections.
#5 Inspect the Lid Lock Assembly
If your washer is still spinning too slowly, I’d recommend checking the lid lock assembly, as it serves multiple functions, such as detecting the lid’s position and ensuring it’s locked before the washer starts spinning.
The lid lock assembly prevents accidents and injuries if the washer’s door opens during a cycle. To check the lid lock assembly, follow the steps below:
- Unplug your washer and move it away from the wall to access the top or back panels, depending on your washer’s model.
- Remove the panel by unscrewing the bolts or screws that hold it in place. Keep track of the screws to reassemble the panel later.
- Locate the lid lock assembly, typically found beneath the lid or at the back of the washer. The lid lock may appear as a small plastic component connected to a wiring harness.
- Visually inspect the lid lock assembly for any signs of wear or damage. If you notice any issues, the lid lock assembly must be replaced.
- Ensure the wiring connections are secure and the lid lock assembly is positioned correctly.
Please note that the lid lock assembly often can’t be tested for continuity due to its multiple functions.
Therefore, if you suspect the lid lock assembly is malfunctioning and don’t feel comfortable handling the appliance, my usual advice is to contact a professional technician to avoid any potential damage to the washer or personal injury.
#6 Test the Motor
A malfunctioning motor could leave your washer spinning too slowly or not spinning at all. To test the motor, follow your tech manual’s directions to locate it near the bottom of your washer.
The motor looks like a cylindrical metal component with wires connected to it. Use a multimeter to check the motor’s terminals for continuity. You’ll need to do an Ohm’s check and voltage check on the connector if the motor isn’t spinning fast.
#7 Evaluate the Transmission
Your washer’s transmission regulates its spinning speed, so if it’s on the fritz, it would explain why your washer is spinning too slowly.
Access the transmission by removing your washer’s outer casing and locating it beneath the drum. From what I’ve seen over the years, the transmission resembles a large, cylindrical metal component with various gears inside.
Check for signs of wear or damage, such as leaking oil or unusual noises during use. If your transmission is slipping, it’s time for a replacement.
#8 Inspect the Suspension Rods
Your washer’s suspension rods are crucial in keeping the drum stable during spin cycles. If the rods are worn or damaged, your washer might spin at a different speed or vibrate excessively.
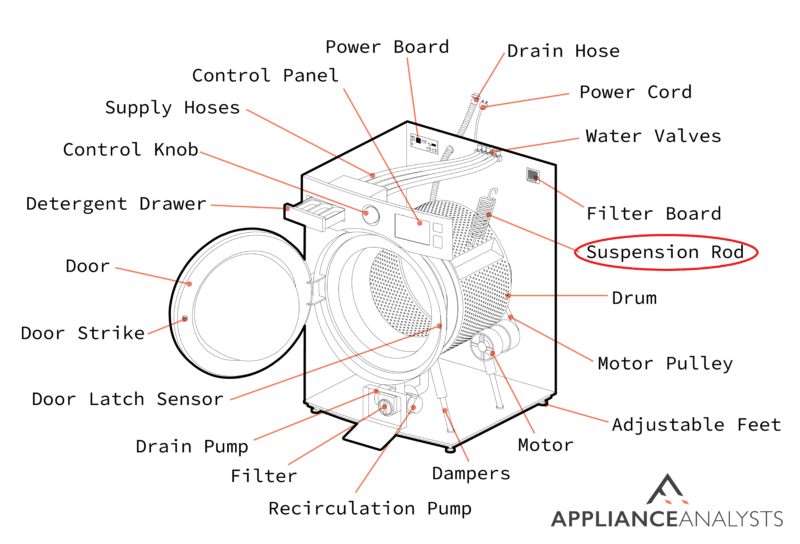
To check the suspension rods, follow the simple steps below:
- Open the washer lid and locate the drum inside.
- Press down on the drum with your hands and let go.
- Observe the movement of the drum. If the drum bounces more than once, it indicates that the suspension rods need replacement.
Please note that replacing suspension rods requires technical expertise and specific tools. If you don’t feel comfortable handling the appliance, it’s best to consult a professional technician to avoid any potential damage to the washer or personal injury.
#9 Check the Drum Bearings
Your washer’s drum bearings ensure smooth spinning by reducing friction. Worn-out washer drum bearings could explain why your washer is spinning too slowly.
Accessing and assessing the drum bearings requires removing the drum from your washer, which is best left to a professional technician.
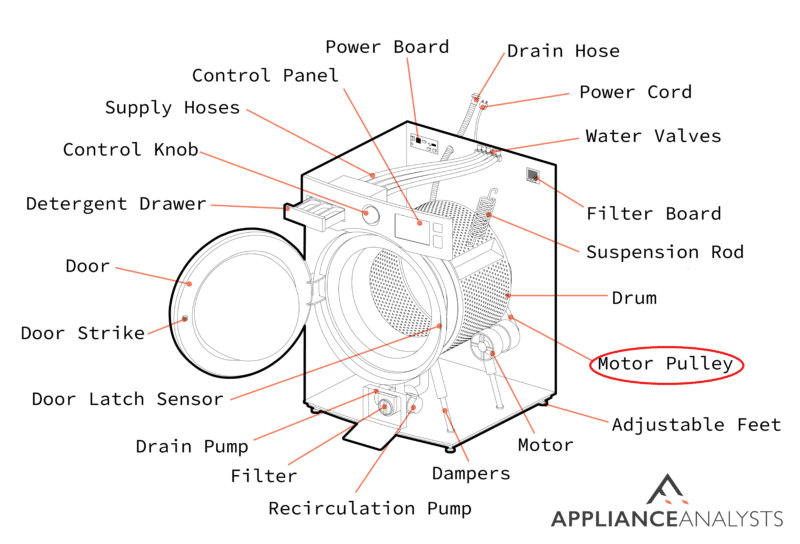
#10 Investigate the Drive Pulley
Your washer’s drive pulley connects the drive belt to the drum and helps control your washer’s spinning speed. If the pulley is damaged or worn, it could cause the belt to slip, resulting in slower spinning.
Inspecting and replacing the drive pulley requires technical expertise, so it’s best to call a professional technician to handle the issue. By seeking professional help, you’ll ensure your washer returns to spinning like a champ in no time.
Conclusion
Now that we’ve gone through all the potential culprits, your washer should be spinning again. But if you’ve followed the abovementioned steps and are still experiencing issues, it’s a good time to call a professional appliance repair technician.
Thank you for reading; I hope you’ve found this guide helpful.
If you’re still hungry for more washer wisdom, don’t hesitate to check out our related articles below and consider subscribing to our newsletter.
Have a great day!
-Craig.
Frequently Asked Questions
What Causes a Washer Drive Belt to Wear Out?
Over the years, washer driver belts wear out due to normal use. However, factors such as the washer being unbalanced can cause the drive belt to break or lose tension much sooner.
Can Overloading a Washer Cause Slow Spinning?
Yes. Every washer has a maximum load capacity recommended by the manufacturer.
If you exceed the load limit, the washer will have a hard time during the wash cycle, resulting in slow spinning and accelerated wear on its internal components.
Is It Worth Repairing a Washer That Spins Slowly?
The answer to the question depends on the cost of repairs vs the price of the washer. My usual advice for these situations is that if the cost of repairs is over 50% of the original price of the washer, you’re better off replacing the washer altogether.


Designing Modern Living Rooms from Iconic Movies

7 Tips for Heating a Room with High Ceilings (On A Budget)