
We've independently reviewed this article to make sure it's as accurate as we can make it.
To find out more about our article creation and review process, check out our editorial guidelines.
Is your Whirlpool ice maker not working?
You’re not alone! I’ll guide you through the reset process to get your ice maker working in no time.
To reset your Whirlpool ice maker, adjust the feeling arm, press the On/Off switch, or unplug the unit, wait a few minutes, and plug it back in.
Ready to learn more about how to reset Whirlpool ice makers? Let’s dive in!
Why trust us? This article was written by Craig Anderson and Andy Fulenchek.
Craig has helped thousands of other homeowners repair their appliances since 2016.
Andy is one of our resident appliance repair experts with over a decade of experience. He currently runs his appliance repair company with a team of trusted technicians.
How to Reset A Whirlpool Ice Maker (In Under 5 Minutes)
Is your Whirlpool ice maker not working? Performing a simple reset should solve your problem. To do it, you’ll need to:
#1 Adjust the Feeler Arm
You’ll need to adjust the feeler arm to reset your Whirlpool ice maker and get it working again.
The feeler arm is the sensor inside the ice maker that stops it from making too much ice. It alerts the ice maker when the ice tray is full.
By adjusting the feeler arm, you’ll manipulate the ice maker’s control system, causing it to reset.
I know that adjusting the feeler arm can sound challenging. But trust me, it’s simpler than it sounds. You’ll just need to lift or lower it.
Keep in mind that the ice maker will stop producing ice if you lift it to the “Off” position, and it will resume ice production if you lower it back down into the “On” position.
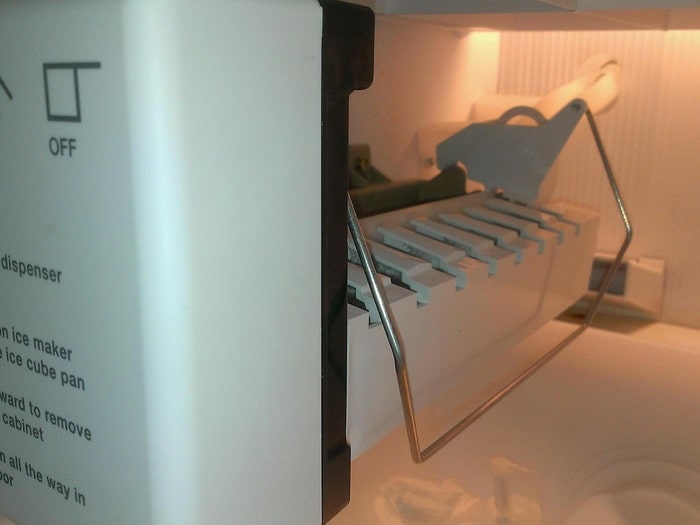
While adjusting the feeler arm, make sure it moves freely. If it’s stuck, it won’t be able to adjust itself according to the ice level in the tray and cause multiple issues.
The feeler arm could be stuck because it froze, or the tension spring is misaligned or stuck in place.
So what can you do if the feeler arm is frozen or the spring is stuck? Try to clear any ice under the arm, and then manually push down on the feeler arm to break the ice away from the arm. Push the feeler arm down repeatedly to loosen up the spring if it has gotten stuck.
You’ll know adjusting the feeler arm has worked if you can hear the water valve begin to fill the ice maker. If the feeler arm is misaligned or stuck, the ice maker will remain in the OFF position and not make any ice.
#2 Press the Reset Button
I’ve seen that some Whirlpool models have a reset button on the ice maker itself, so it’s worth checking for it.
If you don’t know where the reset button is, look at the bottom of the ice maker or check above or underneath the ice tray. If you still can’t find it, please read the manufacturer’s manual or visit Whirlpool’s site.

Once you have located the reset button, press and hold it for ten seconds or until you hear a beep inside the unit.
#3 Press the On/Off Switch
In my experience, pressing the On/Off switch button can also help you reset your ice maker and solve different performance issues.
Looking for the Whirlpool refrigerator ice maker On/Off switch location? You should be able to find it in one of two places:
- Underneath the ice tray.
- Underneath the ice tray and cover plate. (For some Whirlpool ice maker models, you have to remove both)
Once you have located the On/Off switch, follow these instructions to perform the Whirlpool refrigerator ice maker reset:
- Remove the ice tray and cover plate (or just the ice tray) by simply pulling on them.
- Turn the switch from on to off.
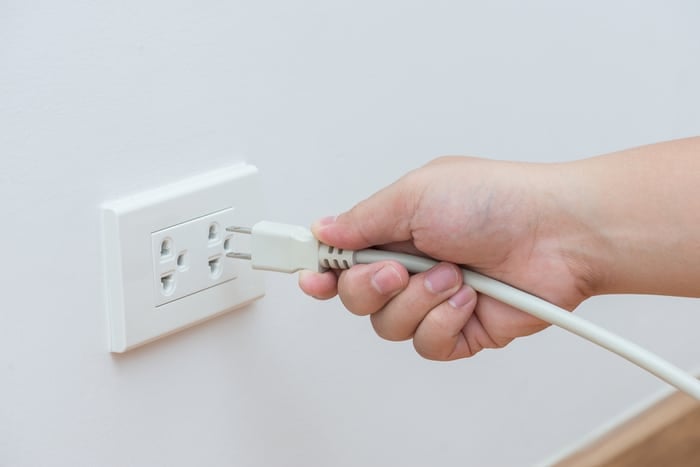
- Remove power from the ice maker by unplugging the refrigerator.
- Wait 10 minutes.
- Restore power by plugging it back in
- Turn the switch from Off to On.
- Replace the ice tray and the cover plate as necessary. Your ice maker should be reset.
#4 Unplug the Appliance
If you are having trouble locating the reset button or the On/Off switch on the ice maker, unplug the appliance to perform a reset.
Once you have unplugged the appliance, I recommend waiting ten minutes and plugging it back in. Then, push on the feeler arm a couple of times to force water to pour into the ice maker, which will cool and form ice.
What Should You Do if the Ice Maker Still Won’t Reset?
If your ice maker is still not working, it will probably need more than a simple reset to fix it.
Take a look at the table I’ve prepared to learn how to fix some of the most common ice maker issues:
| Problem | How to Fix It |
| A Mechanical or Electrical Problem | If the problem concerns the ice maker’s mechanics or electronics, I recommend calling a professional. Attempting to fix the ice maker on your own could void your warranty. |
| A Damaged Part | If the problem is with the feeler arm, removable ice tray, or cover plate, you can fix it by replacing any damaged component. But, if the problem lies with one of the internal parts, you must call a professional. |

What should you do if you can’t tell which category the problem falls into? Consult your user manual, as it typically has a troubleshooting section. You can also try contacting Whirlpool directly for more help.
If the tips above haven’t helped – don’t worry. There are other quick fixes you can try.
We’re fortunate enough to have a lot of readers on our website, but unfortunately, I can’t answer everyone’s questions personally. To help, we’ve teamed up with JustAnswer to connect you to a qualified Appliance expert.
You can connect with an appliance expert below, who will help you solve your specific issue. They do charge a small trial fee, so just remember to cancel the trial once you get your ice maker working again.

Wrapping Up: Your Guide to Resetting Whirlpool Ice Makers
Hopefully, now you know how to reset Whirlpool ice makers.
Remember that if your Whirlpool ice maker is not working, you’ll need to perform a reset by adjusting the feeler arm, pressing the reset button or the On/Off switch, or unplugging your appliance.
Thank you so much for reading! Please check out our other related posts if you found this guide helpful. You could even sign up for our email list!
Have a great day!
-Craig


Designing Modern Living Rooms from Iconic Movies

7 Tips for Heating a Room with High Ceilings (On A Budget)