We've independently reviewed this article to make sure it's as accurate as we can make it.
To find out more about our article creation and review process, check out our editorial guidelines.
Stuck trying to figure out why your Ryobi battery is dead?
Sadly, this is a very common issue. I know how annoying it can be to have this happen, especially when you’re in the middle of an important project, and you completely rely on your tools.
But, don’t worry. You’ve come to the right place to fix this issue.
If your Ryobi battery is dead, check the charging temperature, clean the terminals, and check if it’s in sleep mode. If so, use ‘mini-charges’ – slot the battery into the charger for a few secs, remove before the lights flash. Repeat up to 30 min until it has enough charge to ‘revive’ itself.
Ready to fix this Ryobi battery? Then let’s dive in!
How to Fix a Dead Ryobi Battery? 6 Simple Ways
I know how annoying it can be to have a dead Ryobi battery. Luckily, there are multiple ways to fix this issue.
I’ve ordered them from the quickest & easiest to the longest & most complex. If you try each one in order, this should get you back to full power the fastest.
#1 Check the Charging Temperature
The easiest thing to check is your charging temperature, as we often take batteries for granted, but they’re not invincible.
Lithium-ion batteries are made to be charged between 41oF and 113oF (5oC and 45oC).
Dead batteries that have just been removed from a tool are usually too warm to take charge immediately. This could cause the temperature light to flash when you place the battery on the charger.
To address this, I recommend waiting until the battery has cooled down to room temperature before attempting to charge it again.
Bear in mind that if your battery has been exposed to extreme temperatures for a long time, it may have suffered permanent damage.
#2 Check the Terminals
Second easiest. How clean are the contacts on both the battery and the charger?
If it’s covered in gunk or rusted, you’re not going to be passing any charge through it!
So, if you have dirty contacts, please give them a good wipe down with a wire brush or an alcohol-soaked wipe. Make sure it’s dry before trying again.
If the contacts are rusted, grab some old sandpaper and give it a good scrubbing. You shouldn’t need to do this too hard – just until you’re working with clear contacts again.
Bear in mind that the contacts are usually some form of copper, so you shouldn’t use any pointed tools, such as a flat-tipped screwdriver, to remove any dirt or debris from the terminals.
Remember to check this for both the battery and the charger.
#3 Check if It’s in Sleep Mode
If we’re not careful, lithium-ion batteries can fall into hibernation.
And I’m not even kidding.
It’s because of a thing called ‘Sleep Mode’. Typically, this happens when a battery is used up until it’s normally dead. Then it’s left on a shelf for a long time, where it slowly loses even more power.
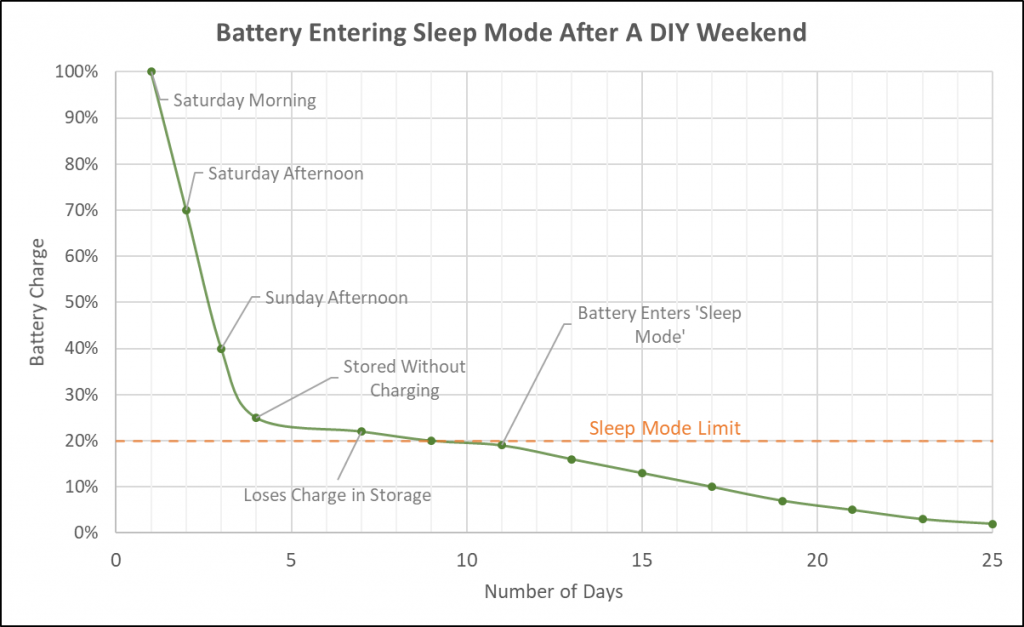
At this point, the battery can’t tell if it’s healthy or not. So to prevent damage or abuse, it enters ‘Sleep Mode’ and can’t be charged.
This is one of the most common causes of so-called ‘defective’ Ryobi battery cases.
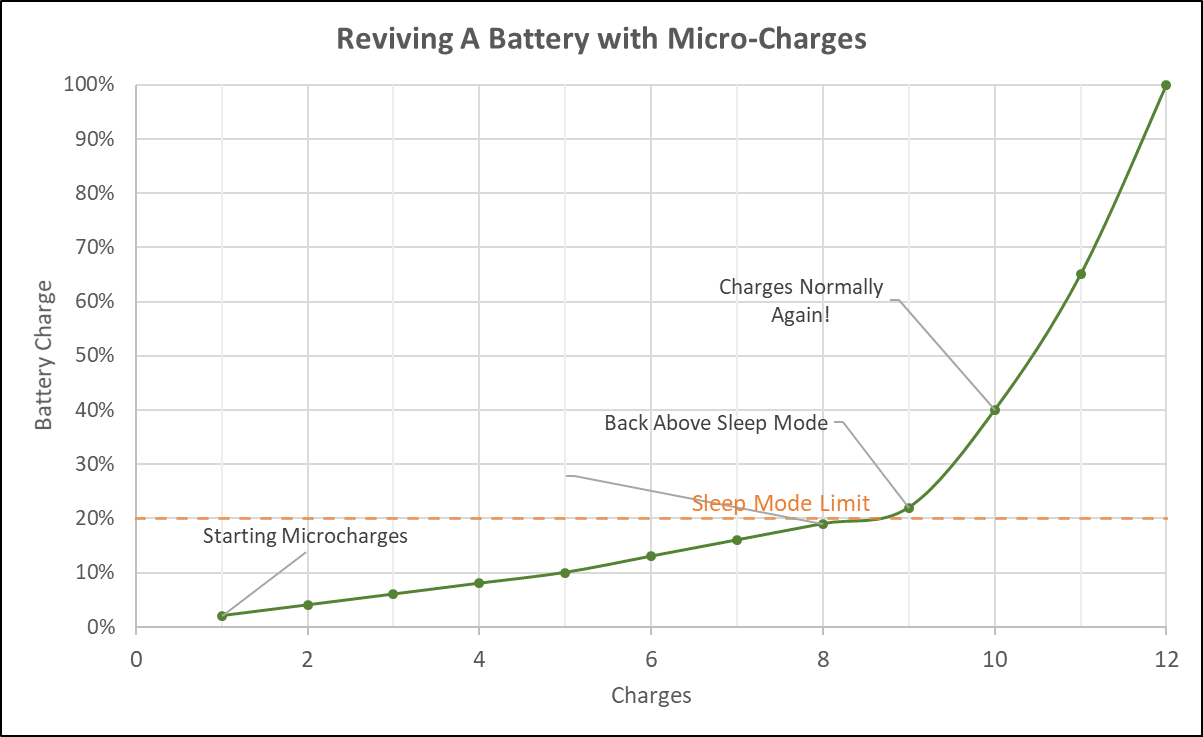
Don’t worry, though. You can easily fix a Ryobi battery that is in sleep mode by giving it tiny charge boosts.
When you connect it to a power source, there’s 2–3 seconds of charging before it says “stop, I’m asleep!”. Those couple of seconds are how we bring it back to life.
By doing this enough times (it can take up to half an hour) we bring the battery back up above the low threshold. Making it realize that it’s safe to be charged.
All you have to do is place the battery into the charger, count to 2, then take it out again. You should be taking it out just before the green and red lights come on. Then, repeat this for up yo 30 minutes.
Eventually, the battery should give you the green lights as normal. Meaning it’s got enough charge back in it to realize it’s healthy.
I know it sounds crazy, but it works. Here’s one of a few testimonials we’ve already received for this method:

#4 Connect the Battery to a Power Source: Alternative Fix Method
For the more confident electricians out there, we can do this in one move by connecting the battery to a power source.
This can either be another battery (ideally of the same model), or a DC power source.
Simply connect the contacts positive-positive and negative-negative. Do not get this wrong! It must be P-P and N-N or you’ll damage your battery.
As above, this should be enough time to get the battery above the small % of charge it needs to work properly again.
#5 Test the Battery With a Multimeter
For any DIY-ers, being able to check the voltage can often confirm the problem for us.
First, test your charger. We should be looking at 18V or higher at a minimum.
All good? Then test the battery.
The voltage will increase as it gets fuller. In my experience, you need around 7 volts before it should charge fully again.
Try testing the battery voltage, then doing quick ‘mini-charges’. Then test the battery again.
The voltage should rise every time. And you should be good to go when it’s above 7 volts.
#6 Take It to a Store
If all else fails, the quickest answer can be found at your nearest Ryobi distributor. I recommend you take your battery and charger, then test both.
Try charging the battery on another charger. It works? Your charger is faulty.
Then, try charging a different battery on your charger? It works? It’s your charger’s fine.
This may not solve your problem, but it’s always good to be certain where a problem lies.
The store staff may be able to take a look at the battery for you, and potentially help you fix it. However, there’s a good chance they’ll get dollar-sign eyes and try to sell you a whole new set.
So it’s important that you do a bit research before going to the store.
First off, consider if your warranty is still good. Ryobi batteries all come with a three-year warranty as standard.
Chances are that you may still be able to get a replacement from the manufacturer.
Bear in mind that some major home improvement retailers, such as Home Depot or Lowe’s may require you to ship the battery back to the manufacturer.
After 3 or 4 years, you shouldn’t expect your batteries to last much longer.
Next up, check the price online.
Don’t let a silver-tongued salesman land you for a double-priced deal. A quick search on Amazon and other retailers will let you know what you should be paying if you choose to buy in store.
- Extreme weather performance to withstand frigid weather conditions
- Delivers fade-free power for maximum performance
- Lightweight design for reduced user fatigue
Throwing Your Old Battery Away?
Please do it responsibly.
It’s easy to recycle batteries at any large store. Here’s a video from Ryobi covering how.
Conclusion
A defective battery can be super frustrating.
While there’s no way to revive a truly broken battery, I hope these tips have at least given you a few things to try.
If even one person gets their battery back to life, then it’s been worth writing!
(If it’s helped you out, I’d love to hear from you! Let me know via the comments or contact page!)
At Appliance Analysts, we’re trying to become a super helpful resource for anything related to the home and garden.
If we’ve helped you, please consider supporting us by checking out some of our related articles or signing up to our e-mail list below.
Thanks for reading! Have a great day.
-Craig


Designing Modern Living Rooms from Iconic Movies

7 Tips for Heating a Room with High Ceilings (On A Budget)