We've independently reviewed this article to make sure it's as accurate as we can make it.
To find out more about our article creation and review process, check out our editorial guidelines.
Is your freezer freezing over?
You’re not alone! Having frost and ice buildup can be super frustrating, especially when you don’t know how to fix the issue.
But don’t worry; I’m here to help!
To fix a freezer that’s frozen over, remove food and shelves, unplug it, and let it sit for a few hours before plugging it back in. For faster defrosting, place a bowl of hot water inside. If you often need to defrost, there could be an internal problem, such as airflow issues and a clogged defrost line.
Keep reading to fix your over frozen freezer!
Why trust us? This article was written by Craig Anderson and Andy Fulenchek.
Craig has helped thousands of other homeowners repair their appliances since 2016.
Andy is one of our resident appliance repair experts with over a decade of experience. He currently runs his appliance repair company with a team of trusted technicians.
6 Steps To Clear a Freezer That’s Frozen Over
Do you need to manually defrost your freezer because it doesn’t have an Auto Defrost feature? Don’t worry! In this section, I’ll guide you through the different steps you must follow to remove the ice from a freezer that has frozen over.
Keep in mind that you’ll need a wooden spoon or spatula, warm water, gloves, and plenty of towels to protect your floor.
If you’re constantly struggling with a frozen freezer, it’s important to identify the underlying cause of the issue. For further guidance, please refer to the next section since this part only covers how to get rid of frost buildup.
#1 Remove Everything from the Freezer
The first step in the manual defrost process is to remove everything from the freezer since the door will be open for an extended period, and you don’t want your food to spoil.
You can move your food to the refrigerator instead; just make sure you put all the freezer food together. Putting your food in the fridge will not entirely stop the thawing-out process but will slow it down.
I also recommend using a cooler with plenty of ice and freezer packs to maintain the food’s temperature.
After you have removed all the food, you are ready to start the manual defrosting process.
#2 Unplug the Freezer
To manually defrost your frozen freezer, you’ll need to unplug it from the power source.
My usual advice is to have someone help you slightly move the freezer out of the slot until you can see the cord. By asking for help, you can reduce the chances of hurting yourself.
As the freezer ice starts to melt, it can overflow. So, please consider placing towels beneath the freezer to prevent water damage on your floors. If necessary, remove the ice bin to manage the situation better.
During defrosting, you should also leave the door open to allow warm air to enter the unit. If you close the door, the freezer is going to stay cold for longer.
While the freezer is warming up, follow the next steps.
#3 Remove the Shelves
During the defrosting process of an over frozen freezer, I always remove the shelves because they’re typically dirty and need to be cleaned.
It is easier to clean the shelves if they are not in the freezer. So, please take them out and place them in the sink to prevent water from going all over your floor.
Note: Please be careful not to drop the glass shelves, as they can be expensive. Sometimes, they’re not securely attached to the shelf you’re moving, so make sure that you hold on to the glass more than the shelf frame while moving them.
Then, clean the shelves with soap and water to remove dust, dirt, food, and debris. Let the shelves dry completely before returning them to the freezer.
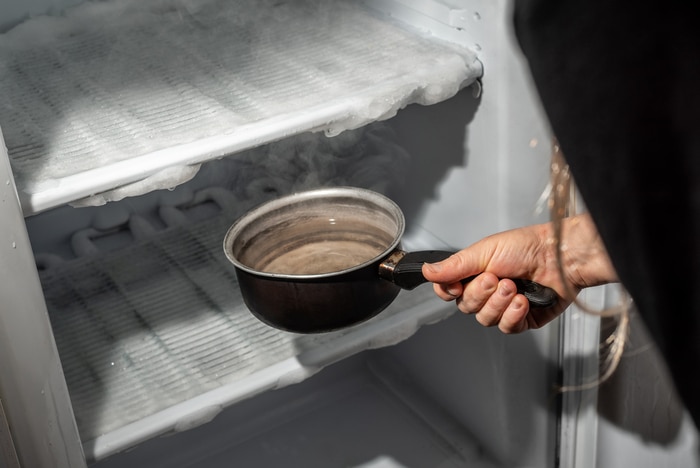
# 4 Let the Freezer Sit
Once you’ve followed the steps above, please let your frozen freezer sit for a few hours to allow the ice to melt.
I find that placing a bowl or saucepan with hot water inside the freezer can help speed up the process. You can also put the hot water in a spray bottle and spray down the interior.
I also like using a plastic spatula or a wooden spoon because it’s one of the fastest ways to remove frost from the inside of the freezer. All you have to do is hold the utensil in your hand and dig into the ice, knocking it off the edges. Then, scrape it out of the freezer into a bucket.
You have to make sure the ice doesn’t land on the floor. Continue using this process until most of the ice has been removed.
Important note: If you’re trying to defrost the evaporator, avoid using a chisel or manually chipping away ice. The evaporator is a sealed system and is made of aluminum, making it highly susceptible to damage. If it’s harmed, your freezer can become irreparable. You should never use sharp objects to remove ice from your freezer.
#5 Clean the Inside of the Freezer
Once the ice has melted, you must clean the rest of your freezer.
I usually prepare my own cleaning solution by mixing equal parts of warm water and vinegar. You can also mix one tablespoon of dish soap with four cups of water.
To clean your freezer, take a clean rag and dip it into the solution. Please use the rag to wipe down the entirety of the unit.
Once you’ve cleaned your freezer, use paper towels or allow it to air dry to prevent mold and unpleasant smells.
I don’t recommend using strong chemicals in your freezer, as your food and ice can easily absorb odors.
#6 Plug in the Freezer and Restock it Once Cool
Once the defrosting process has finished, it’s time to plug your freezer back in.
Keep in mind that it will take a while for the freezer to cool down. Therefore, you should not immediately return all the items to your freezer. The more time the freezer doors open, the more time it will take to cool down again.
Depending on the size of your freezer, the power of the motor, and the health/age of the compressor, it could take anywhere from 12–24 hours to reach the desired temperature.
You can put an external thermostat in the freezer to keep track of the temperature as it drops. Place your items back inside once the freezer has gotten cold again. Your freezer should be set to 0 °F (ca. -18 °C),
Persistent Frost Issues? Here’s What Could Be Wrong
If you constantly have to defrost your freezer manually, then there’s probably an issue with one of the internal components.
Your freezer can freeze over due to the following:
- An open door: If the door seals are damaged, humid air will enter your freezer and contact the cold surfaces. As a result, it will condense and then freeze, leading to frost buildup. Clean your door seals and replace them if you notice any signs of damage. Avoid leaving the door open for extended periods.
- Airflow problems: Blocked vents can cause uneven frost patterns on the evaporator coils. So, please ensure that nothing is blocking the vents and that the fans function properly.
- Clogged defrost line: The defrost drain line can get clogged, leading to ice buildup on the freezer floor or beneath the crisper trays. To address the issue, use a turkey baster and warm water (not hot) to thaw the defrost drain line.
- Defrost issues: If you have a modern freezer that has an automatic defrost system but keeps freezing over, you’ll need to check the control board, sensor, heater, and safety high-limit thermostat. If one of the components of the defrost system malfunctions, you’ll notice excessive frost on the freezer’s back wall, a warm freezer cabinet, and restricted airflow. Keep in mind that the cost of the defrost components ranges from $200 to $400.
If you want to get any replacement part – or see how much one would cost – click to enter your model number in the search bar below. Our partners at AppliancePartsPros stock almost every part with free guides on how to install them.

Wrapping Up: Key Takeaways for a Frost-Free Freezer
Hopefully, now you know how to fix your freezer issues.
Remember that to defrost a frozen freezer manually, you’ll need to empty it, unplug it, and let it sit. Place a bowl of hot water inside, or use a wooden spatula to scrape off ice and speed up the process. Then, clean the freezer and plug it back in.
Don’t forget that if you constantly have to defrost your freezer, you must inspect the door seals, ensure proper airflow, and check the defrost system.
Thank you so much for reading. Please check out our other related guides if you found this post helpful.
Good luck!


Designing Modern Living Rooms from Iconic Movies

7 Tips for Heating a Room with High Ceilings (On A Budget)