This page is part of our Appliance Challenge – helping our readers save thousands of dollars in just one day’s effort. Click here to return to the challenge homepage.
What would we do without freezers?
Our ability to keep food fresh for months on end, combined with unlocking our love for ice cream, make freezers such a valuable appliance. One that’s often underrated.
Underrated, that is, until it starts malfunctioning. Overflowing frost and ice, frost burns on food, loud noises and high electricity bills are all common symptoms of a freezer that isn’t working right.
Following this guide will help make sure your freezer will work well, work quietly, and all without producing tons of extra ice or frost. It should also help it last much longer, and keep your electricity bills down.
If you’re ready then grab some gloves and let’s get to work!
Freezer Essentials
First, let’s take a look at the essential dos and don’ts when it comes to using your freezer.
These tips are the best ‘bang for your buck’ – if there’s only one set of tips to follow, it’s these ones.
#1 Make Sure It’s Level
Let’s start off by checking that your freezer is installed properly and set on an even surface. This might sound unnecessary, but it does affect how well your freezer can function.
You see, in order to freeze your food as you like it, your freezer uses a refrigeration process that involves heating and cooling a liquid/gas called a refrigerant. When the appliance is tilted, the refrigerant isn’t able to flow as easily throughout the system.
Have you ever known water to flow upwards? The same issue can happen with an off-level freezer.
This can quickly turn into higher energy bills and an increased chance of your freezer breaking down or freezing over.
Solution: Here is where our handy-dandy spirit level comes in. Place the level on the base of the fridge, and see if the bubble lands in the center.
If your freezer isn’t level, we may need to make some adjustments. Here’s how to do it:
- Open the doors at a 90º angle and remove the plastic kick plate at the bottom of your fridge.
- Locate the leveling legs or adjustable rollers (they’re located behind the grille).
- If your fridge has leveling legs, use a wrench to level it. But, if your fridge has adjustable rollers, you’ll need a screwdriver instead.
- To raise your fridge, turn the wrench to the left. But, if you want to lower it, turn the wrench to the right.
- Keep doing small adjustments and checking back in with the spirit level until that bubble is centered.
Tip: If your freezer doesn’t have adjustable foot levelers, try using a thick piece of cardboard and place it under the appliance’s feet until the spirit leveler’s bubble is centered.
I know this one can seem like a hassle, but honestly – an off-level freezer is a sure-fire way to increase your energy bills AND increase the chance of a breakdown.
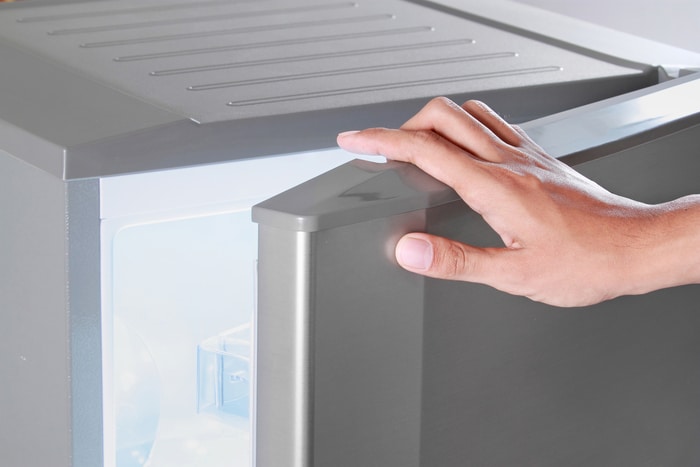
#2 Ensure There’s Breathing Room
This one might raise some eyebrows as it’s not the first thing you might think your freezer needs to work as well as possible. But believe it or not, it can be the make or break of proper functioning.
Freezers and refrigerators are all about temperature regulation and heat preservation or dissipation. In order to stay cool and freeze your food, your freezer needs to have a few inches on all sides to exhaust heat.
Exhaust heat? Isn’t it a freezer?
It can be a surprise to some, but every appliance that produces cold air will exhaust hot air! It’s part of the process. If you don’t give your freezer a few inches of air on all sides, this warm air will get trapped. Which will warm up the freezer, meaning it needs to work harder and harder. It’s almost like it’s slowly cooking itself.
Since a freezer is never turned off, this can create a vicious cycle. With the main victim being your energy bill.
Since your home’s air is warmer than that inside the appliance (fortunately), enclosing the unit within a confined space can force it to work harder to maintain an acceptable temperature for operating.
This does not only translate into much higher power consumption, but also a reduced lifespan.
To avoid this from happening, do what you can to leave at least 1 or 2 inches (2.54 cm—5 cm) of extra room around the rear and sides of your freezer. We need to make sure the freezer has room to exhaust warm air.
Make sure to also check below your freezer. If it’s sitting on a pile of dust and debris, that’s REALLY not going to help! But we’ll touch on cleaning this out later on in the guide.
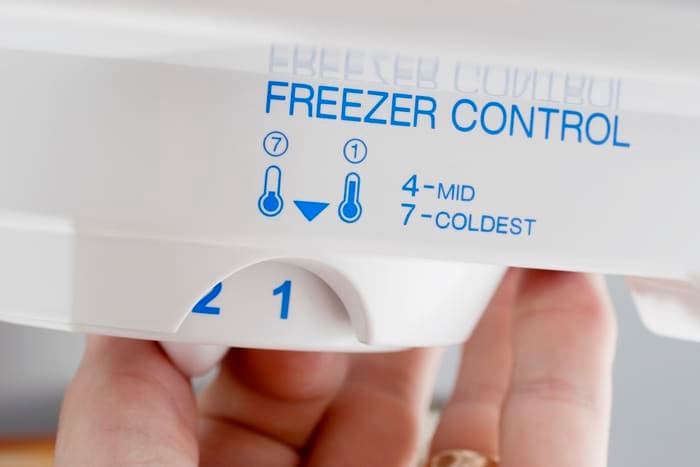
#3 Experiment With the Temperature Settings
Another essential freezer best practice that you should adopt is experimenting with the temperature settings of the unit.
This is recommended not only because going too far in either direction will thaw out or excessively freeze your groceries, but also because adjusting the settings properly can save you a lot of money. In fact, hitting the sweet spot in your settings can reduce power consumption by 5-10%.
The yearly average power consumption of a standard freezer is about 365 kWh (kilowatts per hour), which is about a kWh per day. By using the right temperature settings, you could save up to 36.5 kWh in a year, or about $6. I know this doesn’t sound like much, but it does add up!
Moreover, even if you’re not convinced by the yearly savings this freezer best practice represents, I should also mention that using the wrong temperature settings can also reduce your appliance’s lifespan.
I bet that sounds a little more important, huh?
Solution: Figuring out the temperature sweet spot for your freezer doesn’t have to be a painful trial and error process. Most manufacturers include this information in their user manuals, so if you still have yours, I strongly advise you to read it.
Provided you don’t remember where it is or whether you even have it, that’s ok. Check out our guide to find your manual online – no matter your freezer.
#4 Check the Door Seals
The whole principle of freezing depends strongly on isolation from the outer world. Delivering the results you’re used to under constant exposure to the humidity and warmth of your home’s environment is difficult, to say the least.
This is why the door seal on your freezer is an essential component of it.
This rubber band that runs along the appliance’s door ensures that the freezing climate inside is isolated, which allows for better food preservation.
By keeping the cold inside the unit’s compartment, its internal temperature can be regulated much better, which makes your freezer’s job significantly easier. This directly translates into considerable savings in electricity and less wear and tear on each component.
Who knew something as apparently unimportant as a piece of rubber could make or break your appliance’s efficiency?
Solution: I recommend checking the door seal at least once every month. It’s so easy that it makes no sense to wait longer than that.
All you have to do to check the integrity of the part is open your freezer door and look at the bottom section of the lid. You’ll see a long rubber strip running along the rectangular contour. Simply look closely for any bending, displacement, or breakage across its length.
Provided everything looks normal, you have nothing to worry about. But if you spot any damage, getting a replacement as soon as possible is strongly advised. You can either get a new door seal by calling your manufacturer directly or looking up the appliance’s make and model online followed by the word “door seal”.
#6 Keep Away From Ovens and Stoves
At this point, you’re probably fed up with me talking about temperature all the time, but what can I say? It’s a key factor that must always be taken into account when implementing freezer best practices.
Ideally, you want to keep your appliance away from heat sources, such as ovens and stoves as they radiate heat outwards. And since your freezer is actively trying to maintain subzero temperatures at all times, it will do whatever it takes to keep your groceries frozen, regardless of external conditions.
This might not sound like a big deal, but it is. If your freezer keeps getting bombarded with heat, it can overwork itself, which means more power is drawn and there’s an unnecessary strain on every one of its internal components.
By placing the unit as far away from heat sources as possible, you can reduce power draw by up to 10%!
Freezer Bad Habits
Having covered the essentials, let’s now move on to some of the worst things you can do when owning a freezer. These are bad habits that you should immediately eliminate from your daily appliance usage routine if they’re present, as you could otherwise damage the unit and spend money unnecessarily.
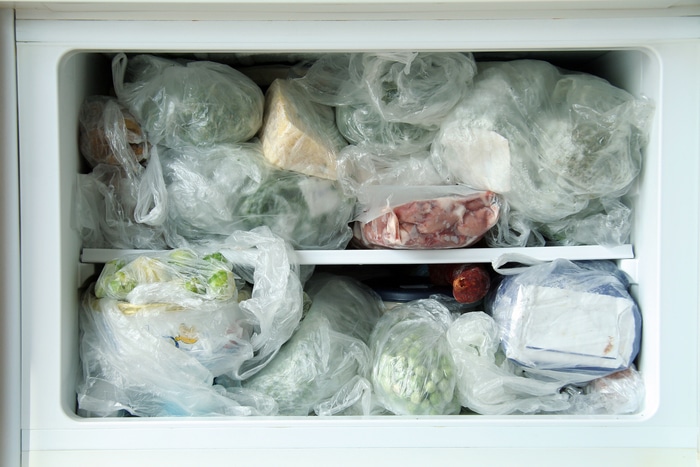
#1 Overfilling
When looking into buying a freezer, most people go for the largest and deepest models, as they think they’ll provide almost endless storage capabilities. And while this is true, it’s also a common misconception to believe that you’ll be able to fill the unit to the brim!
Overfilling your freezer is strongly advised against for many reasons. First, you’ll be restricting the flow of cold air throughout the appliance’s internal compartment. And second, this can overtax the unit’s condenser, causing overheating and considerably reducing component lifespan.
Exceeding your appliance’s maximum storage capacity also means that it will have to draw more power from your home’s electric layout, which will directly translate into higher utility bills.
Solution: The best way to prevent this is through organization and proper placement. Make sure to leave some space between your groceries and leave at least a 4-inch gap between the unit’s lid and everything else.
If you ever played Tetris, I’m sure you’ll have no problem figuring things out.
#2 Opening the Door Constantly
Another terrible habit is opening the door too often. As I said in previous sections, proper freezing, energy preservation, and high efficiency all depend on temperature preservation. As you know, the door seal on your appliance ensures that the internal compartment’s climate remains steady and isolated.
However, there’s little this part can do when the lid is wide open.
Ideally, you want to open the lid, grab what you need quickly, and then close it. Every time you expose the freezer’s contents to the outside world, a lot of the cold escapes, and warm air enters the compartment.
This means that now your appliance has to work harder to reach its original temperature again, drawing more power than necessary and straining its internal components.
When it comes to opening the freezer door, try to grab as many things as you might need in one when preparing a meal. This is a lot more efficient rather than constantly dipping in for one thing at a time.
#3 Putting Warm Food Inside
I know this one might seem very obvious, but it’s worth stating! A lot of people underestimate the effect putting a warm heat source inside of a cold freezer.
Placing warm food on your appliance will not only mess with the climate within its compartment but could also spoil everything else you have stored in there. It may partly thaw out food that isn’t safe to be repeatedly thawed and re-frozen.
So, if you want to keep your freezer from overtaxing itself and drawing excessive amounts of electricity from the wall, please make sure that your food is at least at room temperature before putting it inside the unit.
Maintenance
Freezers, just like any other home appliance, require some routine maintenance.
Although these tasks may require a bit more work, they’ll keep your freezer running efficiently and will save you from sudden breakdowns and related repair costs.
These are the tips that need a bit more elbow grease – but trust me, they’re what will make your refrigerator last years longer.
Aside from waiting on defrosting, everything here will only take you around 30 minutes.
#1 Defrost Once A Year
You might be wondering why I’m suggesting an excessive buildup of ice could be problematic – after all, isn’t that how your freezer is supposed to be?
Surprisingly, no.
Although your appliance should always be operating under freezing temperatures and have small traces of ice here and there, excessive frost can quickly make power efficiency and freezing capabilities drop considerably.

A freezer that suffers from an ice and frost build-up is another one of the vicious cycle issues. The more ice in the freezer, the less likely it is to work properly. Instead, it’s just going to cause more ice buildup, which is going to give it more issues, which is going to… I’m sure you get the point!
Ice forming often signifies a deeper issue. This can extend to issues like blocked vents or frozen water lines, which can then lead to other issues – potentially serious ones. These aren’t always visible, which is why I recommend defrosting a freezer around once a year, just to be safe.
Solution: Luckily, defrosting your freezer is very easy. Some models have a built-in feature for this, but if yours doesn’t that’s ok. Here’s what to do instead:
- Go to the store and buy a couple of bags of ice.
- Throw the ice in a tub or a large cooler.
- Remove your frozen food from the freezer and place it in the tub or cooler you just filled with ice.
- Unplug your freezer from the wall outlet or switch it off at the breaker.
- Place some old towels underneath it to collect any thawed water.
- Leave it to defrost for a while (I recommend anywhere between 6–12 hours or more if necessary).
- Clean up any pooled water – dry the appliance (leftover moisture may just jam it up again)
- After making sure everything’s dry, place your food back into the unit and plug it back into the wall.
Ideally, you should do this once a year. However, if you notice your model is more prone to frost than others, increasing the frequency of this to twice per year is not a bad idea.
#2 Clean the Condenser Coils Once a Year
Next, let’s talk about how often you clean your freezer’s condenser coils.
If the answer is never, then you might want to start! Not giving a little care to the coils can mean you find yourself in a world of trouble.
In a nutshell, these are curved iron tubes outside your freezer that serve as a pathway for the refrigerant liquid to flow and dissipate heat. They’re often on the rear or base of your freezer.
Clean condenser coils do a great job of dissipating heat. But when there’s gunk or dust stuck to them, their ability to work normally is affected. This directly translates into more power drawn and excessive strain on your freezer’s components.
Solution: Now that you know the crucial part that condenser coils play in your freezer, let me walk you through how you can clean them. This process might vary from model to model, but the broad strokes should be the same:
- Unplug your freezer from the wall outlet or switch it off via the breaker.
- Access the condenser coils. They’re usually located on the back/side of the freezer or across the bottom. You may need to use a flashlight to take a good look at them.
- Once you have clear and unrestricted access to the coils, vacuum any dust or debris buildup with a narrow vacuum head or a soft brush.
- Wipe the protective front cover with a damp cloth and let it dry.
- Reattach the front cover and move the freezer back.
Doing this at least once a year will help make sure your freezer is always running efficiently and should prolong its lifespan greatly.
You’ve Done It!
You made it! If you followed along with this guide, you may have just saved yourself hundreds of dollars.
I hope you can agree that none of these tips were complicated. Sure, we need a bit of elbow grease and some determination, but it’s all pretty straightforward.
By following this guide, you’ve made sure:
- Your freezer is level and working correctly
- It’s not being overworked by using the wrong settings
- It’s able to exhaust warm air properly, making it need to work less
- Your food is stored properly and not disrupting the operation
- You’re following great habits that don’t make your freezer work harder than it needs to
With your effort today I’m positive you’ve just made a great reduction in your energy bills, and added YEARS of good working life to your freezer – delaying the need to buy a whole new one anytime soon.
If you found this guide helpful, make sure to check out the rest of our appliance challenge. In total our guides can save you over $1,000 a year by just following simple walkthroughs like this one!
Make sure to also sign up to our email list below – and we’ll let you know more money-saving appliance tips and advice.
Have a great week!
-Craig.


Designing Modern Living Rooms from Iconic Movies

7 Tips for Heating a Room with High Ceilings (On A Budget)