We've independently reviewed this article to make sure it's as accurate as we can make it.
To find out more about our article creation and review process, check out our editorial guidelines.
Does your dryer keep saying “clean filter”?
You’re not alone! I know how annoying it can be when the “clean filter” message just won’t go away.
Luckily, you’ve come to the right place to fix the issue.
If your dryer keeps saying to clean the filter, make sure you remove the lint from the screen after every load. But if the message persists, you probably have airflow issues or a faulty thermistor.
Ready to fix the problem? Let’s dive in!
Dryer Says “Check Filter”? 4 Reasons Why (With Fixes)
In this section, I’ll guide you through the different reasons why your dryer keeps saying to clean the filter and provide various solutions to get rid of the message.
Note – it’s worth stating that some dryers automatically show a ‘Clean Filter’ message after every cycle. It reminds you to give the filter a quick clean. In most cases it’s not a real issue.
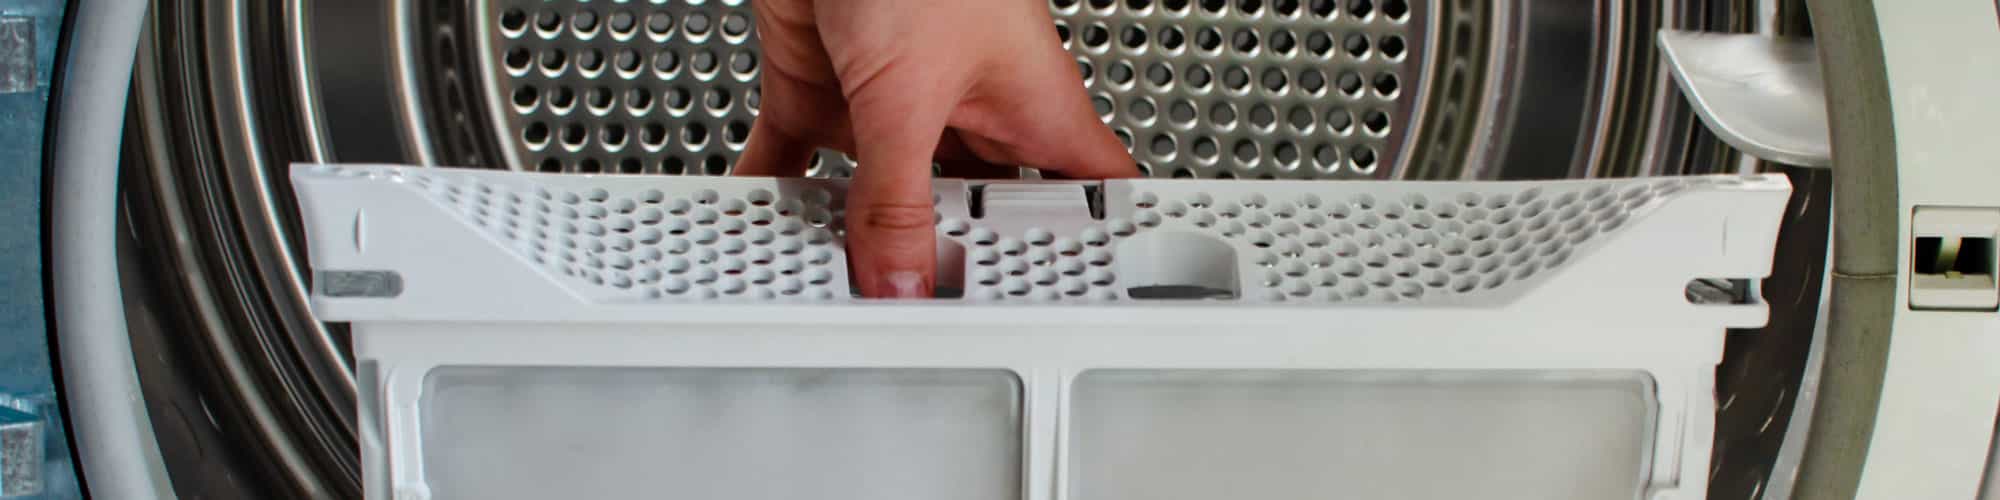
#1 You Haven’t Cleaned the Filter
Your dryer will display a “clean filter” message to remind you to remove the lint buildup after every load.
So, to get rid of the message, you’ll need to clean the dryer filter. Here’s how to do it:
- Locate the filter. It’s typically inside the dryer door or at the top of the dryer’s opening.
- Slide out the lint filter and peel off any lint trapped on the screen. You can use a clean cloth.
- I also recommend using a vacuum attachment to reach into the lint filter slot and remove any lint buildup.

#2 Airflow Issues
In my experience, when a dryer keeps saying “clean filter”, even when the lint screen is clean, it’s typically due to airflow issues.
A quick way to check for airflow issues is by using a paper towel. Open the dryer’s door, and hold down the door switch to trick the dryer into thinking the door is closed.
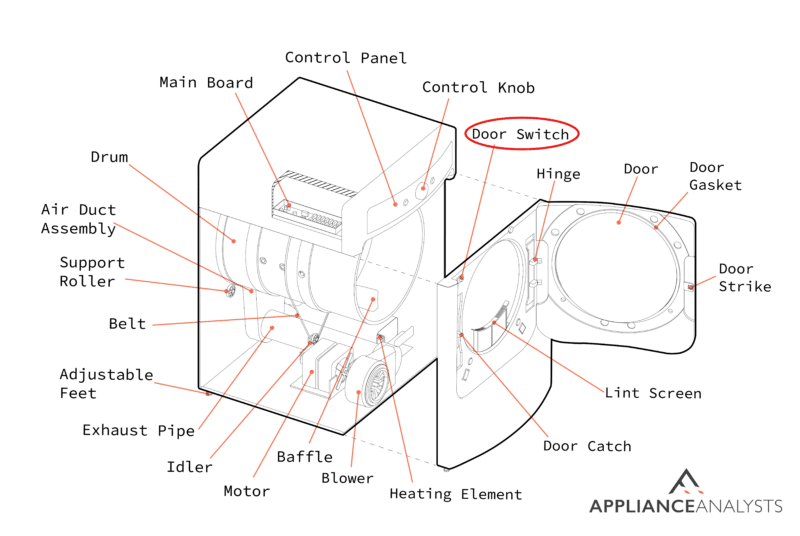
Then turn on the dryer and hold the paper close to the vents. Your airflow is good if it’s getting pulled toward the vent. If the paper towel is just sitting there, you probably have a blockage in the vent that is restricting the airflow and making your dryer think there’s a filter issue.
In such cases, I recommend cleaning the dryer vent.
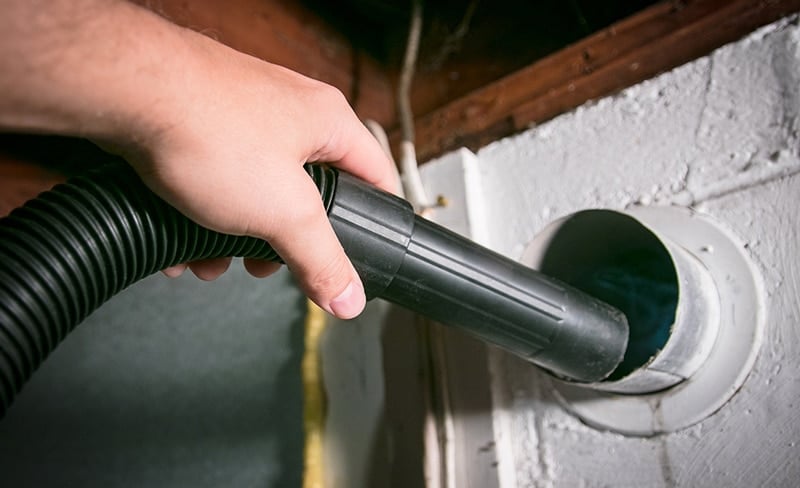
Follow these instructions to do it:
- Unplug your dryer from the power source.
- Remove the vent hose from the wall. You’ll need to use a screwdriver to loosen the clamps that attach the hose to the wall.
- Vacuum inside the vent opening and remove as much lint as possible.
- Reattach the dryer vent hose. Ensure the vent cover is properly installed.
- Plug your dryer back in and turn it on to see if the “Clean Filter” message has disappeared.
#3 Faulty Thermistor
If your dryer keeps saying “clean filter” even when the filter is clean and you don’t have airflow issues, the thermistor is likely faulty.
You see, the thermistor is often mounted on the blower housing and is responsible for detecting changes in the dryer’s temperature, which the control board interprets to gauge the level of airflow.
Unfortunately, when the thermistor malfunctions, it can provide incorrect information to the control board and make it think there’s a reduction in airflow, even when there isn’t. As a result, your dryer will associate the false reduction in airflow with a dirty filter and display the “clean filter” message.
In such cases, I recommend reading the manufacturer’s manual, accessing the thermistor, and replacing it with a new one.
If you want to get any replacement part – or see how much one would cost – click to enter your model number in the search bar below. Our partners at AppliancePartsPros stock almost every part with free guides on how to install them.

#4 Malfunctioning Filter Sensor
From what I’ve seen, some modern dryers have a filter sensor that detects when the lint filter needs cleaning.
If the sensor is not working as it should, it could cause your dryer to display the “clean filter” message, even when the filter is clean.
In such cases, you need to read the user manual to determine where the filter sensor is. It’s typically behind your dryer’s panels.

Remove the panels to access the filter sensor and test it with a multimeter. You should look for a number significantly above zero. If you are not getting a lot of resistance flowing to the sensor, it is probably broken, and you need to replace it.
It’s worth noting that there are several components that resemble the sensor, making it crucial to have the manual on hand for accurate testing.
Attempting to test the filter sensor without proper training is not recommended. If it’s your first time testing the sensor, I suggest calling a qualified technician.

Keep in mind that it can be expensive to replace a filter sensor in a dryer. Depending on how old your dryer is, replacing the entire unit can be more cost-effective.
You should never ignore the filter sensor because there is always a chance of a serious clog somewhere in the dryer.
If you force your dryer to operate even when a clogged filter is present, your dryer will overheat quickly. As a result, your motor will burn out sooner, forcing you to replace the entire machine. Keep in mind that running a clogged dryer can also lead to fire hazards.
Addressing Your Dryer’s “Clean Filter” Message
Hopefully, now you know how to get rid of your dryer’s “clean filter” message.
Remember that you’ll need to remove the lint buildup from the screen. But if the filter is clean and your dryer keeps saying “clean filter”, check for airflow issues, clean your dryer vent, inspect the thermistor, and test the filter sensor.
Thank you so much for reading! Please check out our other related guides below if you found this article helpful.
Good luck.


Designing Modern Living Rooms from Iconic Movies

7 Tips for Heating a Room with High Ceilings (On A Budget)