We've independently reviewed this article to make sure it's as accurate as we can make it.
To find out more about our article creation and review process, check out our editorial guidelines.
Is your ice maker so frozen it’s singing ‘Let It Go’?
You’re probably sick of looking at the growing ice barrier around your ice maker and struggling to get a steady supply of ice cubes for your drinks.
Strange as it sounds, being frozen over isn’t good for your ice maker, and repairs can cost you hassle and money.

But fear not. Below, you’ll find an article including the 8 reasons why your ice maker is frozen over and what you can do to solve the problem.
Ready? Let’s dive in!
Why trust us? This article was written by Craig Anderson and Andy Fulenchek.
Craig has helped thousands of other homeowners repair their appliances since 2016.
Andy is one of our resident appliance repair experts with over a decade of experience. He currently runs his appliance repair company with a team of trusted technicians.
Fixing A Frozen Ice Maker
A frozen ice maker can happen for many reasons. It can be hard to tell which is affecting your ice maker – especially when everything’s covered in ice.
I’ve arranged the fixes below from the easiest to the most complex. Following the tips one by one should give you the path of least resistance to figuring out (and fixing) the issue.
Before doing any repairs, I recommend you unplug your refrigerator/ice maker entirely unless specified otherwise. Let’s get started.
Ice Tray Freezing Up
Sometimes, when your ice maker’s frozen, the ice tray inside it can ‘overflow’ and freeze up, causing the unloading/ejecting of the ice to stop, resulting in an ice blockage.
Fixing A Frozen Ice Tray
To fix your frozen ice maker tray, all you have to do is take it out of the refrigerator and place it in the sink to defrost, and let the ice melt. Once there’s no ice left in the tray, dry it completely and place it back on the fridge.
I find that if you can’t pull the tray out, using a hair dryer to thaw out the ice tray also works. You’ll have to move quickly to avoid thawing everything in the freezer and fridge, though.
If your ice tray keeps freezing over, it can be a symptom of a slowly dripping water valve / failed water inlet valve. Also, a failed heater on an icemaker can leave cracked pieces of cubes in the mold before filling with water, causing the ice maker to overfill.
Any of the above can cause cubes to become stuck and jam up the ice maker.
Water Filter Problem
Another possible reason why your ice maker is frozen is a water filter issue.

From what I’ve seen over the years, a frozen filter can stop or slow the water flow to an ice maker, and a filter that’s dirty or clogged will slow down or negatively affect the amount and quality of ice that the ice maker will produce.
The slow water flow negatively affects the ice cube size because the valve will typically only stay on for about 7-8 seconds as it fills the ice cube mold. If the water is restricted – you’re not getting the appropriate amount of water during the 8-second fill cycle.
Handling A Faulty Water Filter
To avoid any issues with your ice production, change the water filter in your fridge every 6 months. If you don’t use the filter too often, you can go as long as 1 year without a replacement. My usual advice is to check the filter after 6 months to determine whether it’s time for a replacement.
If you want to get any replacement part – or see how much one would cost – click to enter your model number in the search bar below. Our partners at AppliancePartsPros stock almost every part with free guides on how to install them.

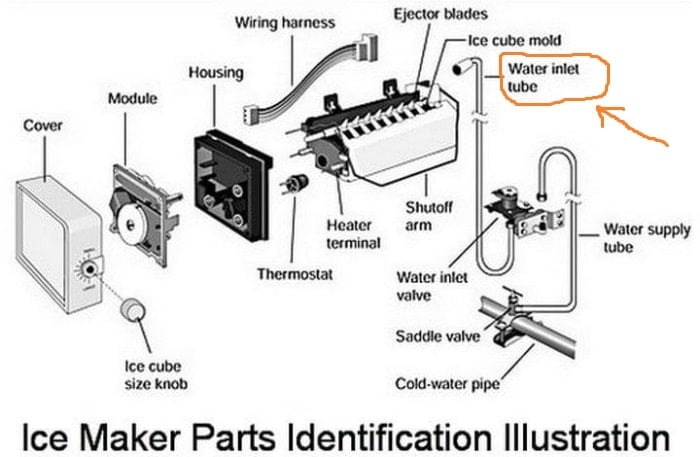
Your Water Inlet Tube Is Frozen
Even in a refrigerator at a good temperature, you can get a frozen ice maker if the water Inlet tube freezes over.

To thaw out the water inlet tube, take a hairdryer on a medium to low setting and blow warm air onto it until all the collected ice melts and drips out. Keep going until no more water is dripping from the inlet tube.
If you can’t spot the inlet tube on the rear of the fridge/ice maker – blowing hot air into the ice maker itself CAN work. Ideally, after the ice maker has been powered off for a good while.
I recommend having an old towel, old rags, or newspaper laid down to catch the water that comes out and avoid a mess!
If you don’t have a hairdryer handy, you can run warm water over and along the inlet tube with a turkey baster or similar instrument until the ice has melted.
Frozen Water Lines
Frozen water lines could also explain why your ice maker is frozen over.
If the line that supplies water to the ice maker is getting frozen, it’s a sign that the whole system is too cold or that the fridge itself is being exposed to outside temperatures that are too cold, leading to over-freezing.
A low water flow will result in the ice maker not being able to get cubes out of the ice maker mold, eventually causing buildup and freezing.
Fixing Frozen Water Lines
If you live in very cold temperatures and have your fridge placed outside or in a very cold part of the house – consider moving it to a warmer area to prevent freeze-ups.
Unless a freezer/refrigerator is specifically designed as “garage ready”, manufacturers will often specify that the appliance is designed to be used indoors at around 70-77F. Having the appliance in a colder ambient (i.e., outside) temperature can create issues with the freezing lines.
An appliance technician can advise you on insulation if needed or placement options for your appliance to prevent issues in the future.

If freezing occurs with the incoming water supply to the appliance, you may need to call a plumber to correct the issue. However, if your water supply lines are regularly freezing up at or after the water inlet correction point, the lines themselves may need to be insulated.
Optic Board (Sensor) Fault
Some ice makers – mainly Whirlpool models – have an electric ‘eye’ sensor or Optic Board that tells the ice maker when the ice cube holder on the door is full. On some models, the Optic Board looks like a red light source on one side and a sensor on the other side of the freezer.
Power is cut to the ice maker when the Optic Board’s light is interrupted or blocked. Problems with the optic sensor system can cause a backup or a lessening in ice production.
Fixing Sensor Faults
If you’re lucky, there may just be something blocking the sensor. Potentially even some ice!
A common culprit is the board housing itself, which has a sliding door that, if closed, will block the sensor’s path. Sliding the door back to the ON position may be all that’s needed to fix the problem.
However, repairs can be expensive if there’s an issue with the electric ‘eye’ of the Optic Board or the sensor system itself. Thankfully, while OEM (Original Equipment Manufacturer) boards can cost hundreds of dollars, good aftermarket models work just as well for much cheaper.
If you’re uncomfortable with repairing the Optic Board yourself, my usual advice is to contact the retailer or manufacturer of your appliance and get several quotes from reputable technicians to have it repaired if it’s no longer under warranty.
You Have a Dead Heating Element
Every ice maker has a heating element inside it, which is used to melt the surface of the ice cubes in the tray enough so that they can be easily separated and ejected from the tray.
Common symptoms or complaints with an ice maker’s heating element failure are excessive noise from the ice maker. Often described as a loud bank or crack.
The noise happens because the ice maker’s arms are trying to force the frozen cube out of the mold. However, since the heater has failed, the cubes won’t eject. The massive tension created from the ice maker ejection fingers eventually will crack the cube causing a loud pop – or worse, can break the ice maker itself.
Fixing A Dead Heating Element
If your heating element is completely dead, it’s often wise to do some research and work out the cost of parts for your refrigerator model’s ice maker. Often replacing parts like a heating element can cost more to replace than having a new ice maker installed (between $200-400).
Discuss the issue with your appliance retailer, manufacturer, or trusted technician, check your warranty status for the appliance, and then decide whether a repair is worthwhile.
Problems with the Gasket, Freezer Cooling/Evaporator Coils
Faulty cooling/evaporator coils could also explain a frozen ice maker.
If cold air from the freezer cooling coils is circulating around parts that it shouldn’t be, ice maker water can freeze in the wrong place. You need cold air to stay firmly within the freezer cooling coils and not escape!
Fixing Frozen Coils
Check the coils on the back of the fridge (particularly the bends) for splits, cracks, holes, or bypasses. Feel for cold air circulating from the cold side of the coils into the water supply area of the ice maker.
If you find any damage, holes, or rusted areas, clean the coils gently to remove any dirt or debris entirely.
If you find any refrigerant oil on the coils, the refrigerator has a refrigerant leak and needs a professional to perform a sealed system repair. Often, the repair can cost more than a new residential refrigerator.
If your ice maker is frozen due to a damaged gasket letting air in, I recommend looking up your fridge’s make and model to get a gasket replacement kit and stop the air leaks.
Note: Repairing the gasket yourself is easy and can save you up to $250 in a technician’s visit.
If you want to get any replacement part – or see how much one would cost – click to enter your model number in the search bar below. Our partners at AppliancePartsPros stock almost every part with free guides on how to install them.

Defrosting Your Ice Maker
There you have it – 8 freezing causes with very different levels of complexity to fix.
I hope at least one of the fixes above has given your ice maker a new lease on life. If the issue has happened once, it can happen again, so keep an eye out for excess ice buildup.
If this content has helped you, please consider checking the related articles below and subscribing to our newsletter!
Thanks for reading. Now go enjoy a cold drink 😉
-Craig.


