We've independently reviewed this article to make sure it's as accurate as we can make it.
To find out more about our article creation and review process, check out our editorial guidelines.
Is your DeWalt battery not charging?
Sadly, I’ve been there too. I know how annoying it can be to have this happen, especially when you’re in the middle of an important project and your tools suddenly lose power.
Luckily, you’ve come to the right place to get this issue fixed.
If your DeWalt battery is dead, try cleaning the contacts, and charging the battery slowly with mini boosts. Connecting it to another battery or compatible AC adapter can also solve the issue.
Read on to learn more about these methods and forget all about the problem!
4 Ways to Revive Your Dead DeWalt Battery
Before you go tossing your DeWalt battery into the trash, there are different ways to revive it and get more use out of it.
In this article, we will consider 4 ways you can do this. Take a look at them below.
#1 Clean the Contacts
So we’ll start the ball rolling with the easiest method for fixing your DeWalt battery. That is, to check your contacts and give them a good clean.
A thorough cleaning of the contacts is sometimes all your battery needs to start working again. This will save you from having to pull the battery to pieces or turn the garage upside down trying to find your multimeter.
You might need to clean the contacts on your DeWalt battery for the following reasons.
- The contacts are rusty. The battery will not be able to charge through the rust.
- The contacts are dirty. They must be clean for the battery to charge properly.

If your contacts are dirty, try this cleaning method:
- Use a clean rag to wipe over the contacts on the battery and the charger. Completely remove any dirt, dust, or grime from them.
- Connect the tool to the charger to see if it charges. If it doesn’t move on to the next method.
If your contacts are rusty, do the following:
- Scrub the contacts gently on the battery and the charger with sandpaper*. Do this until they are clear of rust.
- Connect the tool to the charger to see if it charges.
*NOTE: Fine-grit sandpaper between 320 and 400 should suffice for this job.
#2 Charge the Battery Slowly With Mini Boosts
So you’ve cleaned the contacts but still can’t get your DeWalt battery to charge? Then here’s the next method. That is, charging the battery slowly with mini boosts.
But what does that mean exactly?
Charging the battery little by little helps to wake the battery from its slumber. It raises the battery’s charge just enough so that you can then use the charger properly.
Why is this necessary?
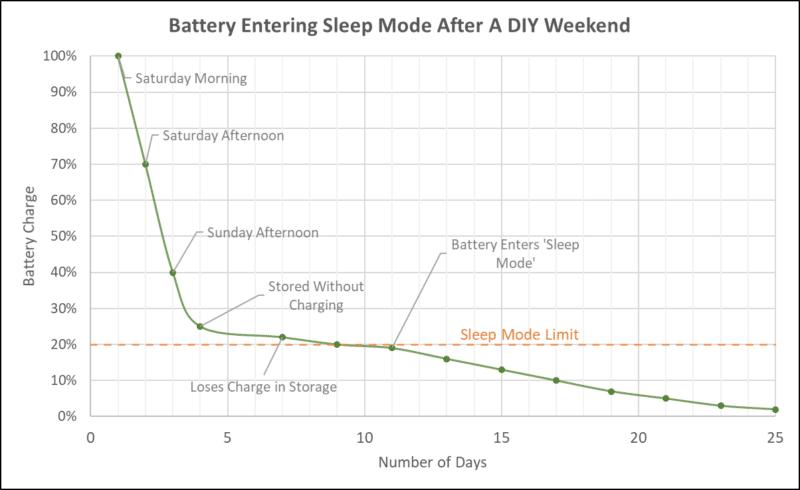
If your battery won’t charge normally, it means that the battery is too flat to be safe for charging.
This happens when you use the tool until the battery is almost flat then don’t connect it to the charger for a few days. The following graph explains a little more about what happens when your battery enters sleep mode.

Connecting the battery to a power source for just 2 or 3 seconds at a time slowly boosts the battery. It does so until it is out of the slumber zone.
Ok, so how do you do it? Take a look at the following steps.
- Connect the battery to a power source for 2 to 3 seconds at a time. After 2 or 3 seconds, disconnect the battery from the power source. You should disconnect the battery just before the lights come on.
- Repeat step 1 for up to 30 minutes. This should give the battery enough power for you to charge it normally.
Bear in mind that most chargers don’t have an on/off button, you just plug them in. Depending on the specific charger model, it may be easier to unplug it from the outlet rather than removing and reattaching the batteries.
#3 Connect the Battery to Another Battery
This method will help you to pass the charge from a charged battery to your flat battery. This will help the flat battery to have enough power for you to charge it normally.
Ready to get started? Then here’s how to do it.
You Will Need:
- DeWalt battery that won’t charge
- Another DeWalt battery that is fully charged.
- Two insulated wires
Do not use any other material, such as scissors, to connect both batteries, as this can cause short circuits, sparks, or even fires if they come in contact with the battery terminals.
Please wear gloves that are made of a non-conductive material and safety glasses. Do not work near any gas vapors.
Once you’ve gathered your tools, do the following.
- Take an insulated wire and connect one end of it to the positive terminal of the good DeWalt battery. Then, connect the other end of the insulated wire to the positive terminal of the dead battery.
- Take the other insulated wire and connect one end of it to the negative terminal of the good battery. Then, connect the other end of the insulated wire to the negative terminal of the dead battery.
- Leave the wires connected for a few seconds.
It is very important to double-check which terminals you are connecting. Positive should be connected to positive and negative to negative. Getting this the wrong way around could cause permanent damage to the battery.
Would you rather watch the movie than read the book? Then take a look at this handy video that will show you all the steps mentioned above:
#4 Connect the Battery to an AC Adapter
For this next method, you are going to make mini booster cables. These cables will resuscitate your battery.
For this, you will need to say goodbye to one of your AC adapters. It’s best to use an old AC phone charger for this job.
Make sure the AC adapter you have is compatible with your DeWalt battery by checking the voltage and amperage of both devices. This way, you can avoid any damage to your battery and ensure your safety.
Here’s a list of everything you’ll need:
- An AC adapter, such as an old phone charger. Remember to use an AC adapter that matches the voltage and amperage required by your DeWalt battery.
- DeWalt dead battery.
Here’s the method:
- Unplug the old charger first.
- Cut the end of your AC adapter with an insulated tool to prevent any electrical hazards.
- Separate and carefully strip off 1” of each wire. You’ll see a black wire and a stripped/white wire.
It is very important to double-check which terminals you are connecting. Positive should be connected to positive and negative to negative. Getting this the wrong way around could cause permanent damage to the battery.
- Use a very thin screwdriver to remove the screws on the DeWalt battery pack. Remove the battery pack’s case.
- Carefully remove the two plastic side pieces.
- Use your fingers to carefully remove the battery pack.
- Plug the AC cell phone charger into an electrical outlet.
- Use the two wires to “resuscitate” the DeWalt battery. You can do this by touching the black wire to the negative terminal and the white or striped wire to the positive terminal.
Ensure you are touching negative to negative and positive to positive.
- Touch the wires to the terminal on and off for one minute. This should be enough to charge the battery slightly.
- Put the plastic cover back over the battery pack
- Place the battery pack to charge
- If the battery doesn’t begin to charge, remove the cover and repeat step 8 for another minute.
Conclusion
There’s nothing more frustrating and time-wasting than a battery that won’t charge. Setting it to charge then coming back and realizing it hasn’t done anything is infuriating.
Thankfully, this article has gone through 4 things you can do to fix this problem. I am sure they have been useful to you and have helped you breathe new life into your DeWalt battery.
Has this article been useful to you? Then why not check out some of our other articles and free guides? You could even sign up to our email list.
Have a great day!
-Craig


