We've independently reviewed this article to make sure it's as accurate as we can make it.
To find out more about our article creation and review process, check out our editorial guidelines.
Did your toilet chain break, and you don’t know how to fix it?
Sorry to hear that! When your toilet chain keeps coming off, you understand just how necessary such a small part can be. In such scenarios, you need to figure out why your toilet chain is coming off so you can address the issue and get everything back in working condition.
There are several possible reasons why your toilet chain may keep coming off. Sometimes; the chain simply falls off when the toilet is flushed. The chain may have too much slack, the flapper might be out of place, or the chain itself could be broken.
Luckily, you’ve come to the right place for answers. Below, you’ll find an article showing 3 simple steps to fix your broken toilet chain.
Are you ready? Let’s go!
Fixing a Toilet Chain That Keeps Coming Off
If you want to fix a toilet chain that keeps coming off, you must ensure you have the right materials. Fortunately, you don’t need a lot to fix a broken toilet chain.
- The most important tool for repairing a toilet is a set of pliers. You can use channel lock pliers to loosen or tighten any nuts, and needle nose pliers allow you to grab the small clip on the end of the chain without dropping it. Needle nose pliers are useful for removing the clip that attached the chain to the arm.
- You need to have access to the water supply, as you will need to turn the supply off before you start working on the flapper for your toilet.
- You’ll also need a replacement chain and flapper. Even though there’s a chance you’ll need a screwdriver, most chains and flappers do not require one.
- You may want to have towels you can place around a toilet that will prevent water from accumulating around the basin as you’re working.
3 Steps To Fix a Broken Toilet Chain
Fixing a broken toilet chain doesn’t have to be a challenge. Now that you have the necessary tools, let’s get into the repair process.
Step 1: Turn Off the Water Supply
To fix your broken toilet chain, you first need to turn off the water supply. Then, you need to remove the water. You don’t want to contend with water when repairing the toilet. Even if you feel like your hands can take the water, you don’t want your floors to absorb this.
From what I’ve seen over the years, the valve is connected to the wall behind the toilet. Look at the back of the toilet, turn the valve clockwise, and ensure you close off the water supply.
Be careful with the valve! In my experience, the first mistake a homeowner makes is trying to close the supply valve. The supply valves never get opened or closed until something breaks, so they usually corrode before they ever get used.
The result is a broken handle, because that’s often the first thing to rust. If you think the handle is corroded, use a penetrating lubricant on the valve before attempting to turn the handle. If the handle requires excessive force to open it, make tiny movements and add lubricant as needed to avoid breaking off the handle.
Once you’ve dealt with the handle, you need to drain the water that is already in the toilet. In my experience, the easiest way to drain the water is to flush the toilet. You may need to manually lift up the flapper if you’re interested in completely draining the water supply. You may need to flush the toilet several times to remove all the water.
After you have drained the water from the toilet, it’s time to get started with the rest of the repair process.
Step 2: Replace the Flapper
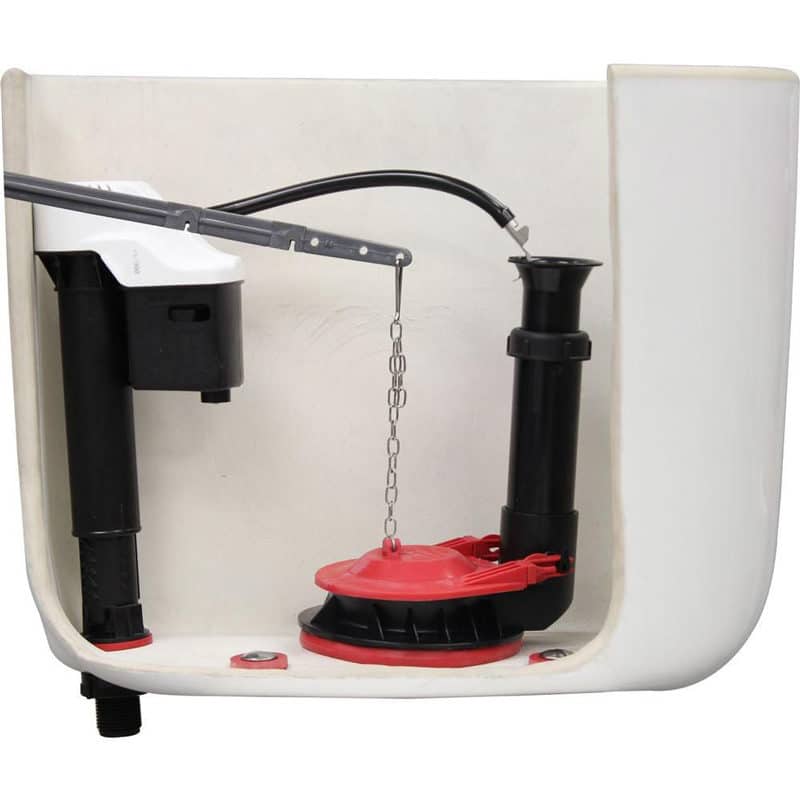
Now that the water is gone, it is time to replace the flapper. Luckily, even if you’ve never fixed a broken toilet chain before, replacing the flapper is one of the easiest jobs. All you need to do is unclip the chain from the flapper. Avoid snapping the chain off – the flapper itself should unclip relatively easily.
With the flapper removed, replace the chain as well. Locate the area where the chain connects to the toilet’s base and remove the chain.
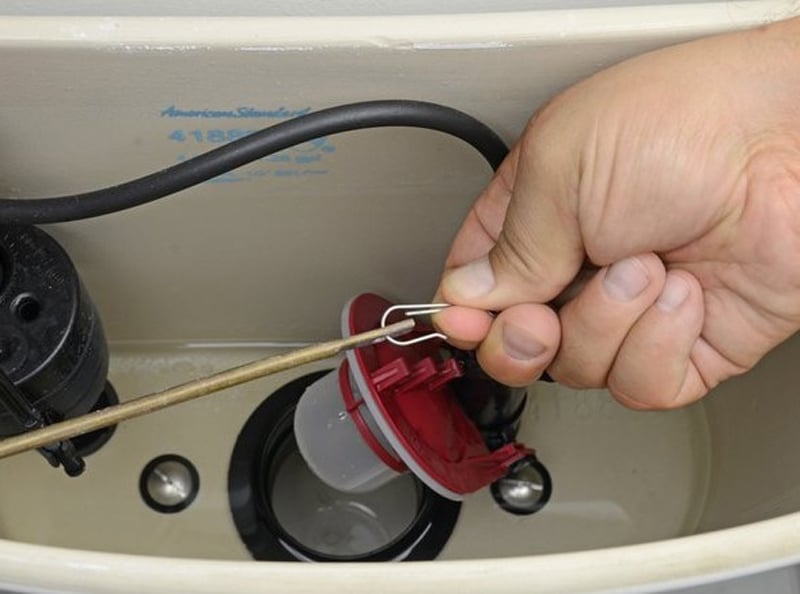
Now that the flapper and chain have been disconnected, it is time to install the replacements. Remove the new flapper and chain, work the steps in reverse, and connect the chain and flapper to the toilet.
Ensure the new chain and flapper are connected securely to the flush lever.
Step 3: Try Out the New Flapper
Now that everything’s been properly installed, it is time to try out the new flapper to ensure you’ve successfully fixed your broken toilet chain. Turn the water supply on again, and give the toilet a few minutes to fill up. After the toilet has filled up, flush it to ensure it works properly.
You may want to watch the flapper go down the first time. If the flapper looks like it’s not behaving accordingly, you’ll need to jiggle it a few times. You need to ensure there is not too much slack with the chain and flapper – otherwise, the new chain could fall off again.
What About Tightening and Loosening the Chain?
This step is optional, as it depends on the type of flapper you have, the chain you have, and what you saw the first time you flushed it. It’ll take a bit of trial and error to tighten or loosen the chain. All you have to do is move the chain in different directions.
You must ensure the chain is properly attached to the flush lever.
Common Reasons Why the Chain Keeps Falling off
Now that you’ve fixed the flapper and chain, my usual recommendation is to learn to prevent the problem from happening again. If you can figure out why the problem occurred, you can ensure the flapper and chain will work appropriately moving forward.
There are several common reasons why the chain keeps falling off. A few of the most common examples include:
The Chain Has Too Much Slack
One of the most common reasons why the chain and flapper keep falling off is that the chain has far too much slack. You need to ensure the chain has enough slack to completely open and close when you flush the toilet. On the other hand, if the chain has too much slack, it will have far too much freedom to move around.
Take a closer look at the chain and ensure it is attached securely to the flush lever. You may need to move the chain around a few times to get it to the right spot. Remember that you can adjust the pin on the flush lever to ensureit is attached securely. If you need help adjusting the chain, you may want to ask someone for assistance.
The Links Are Broken
Another possible reason why the chain keeps falling off is that there are broken links in the chain. If there are broken links in the chain, it will simply tumble into the basin, making it impossible for you to flush the toilet.
There are several reasons why the links might be broken, one being that the chain is too short. If you put too much pressure on the chain itself, the links will eventually snap. If the links are broken, the chain will not work properly.
Therefore, you must ensure there is some slack in the chain. There’s a sweet spot between having a too-tight and loose chain. It’ll take some trial and error before you determine the right location for the chain.
There Is Corrosion
Finally, another possible reason your toilet chain keeps falling off is that too much corrosion is present. If there is a lot of corrosion in the chain, it will eventually stop working properly. It may even break. Because most chains are made of metal, they will eventually get rusty. When rust appears, the chains will need to be replaced.
Take a closer look at the chain and see if it looks discolored. If the chain looks discolored, it’s a sign that you need to replace it. Fortunately, all you need to do is follow the steps above. Then, the new change should be installed, and it should start working properly.
If you’re having a difficult time finding the right chain for your toilet, you’ll want to talk to a professional. You can find replacement parts at your local home improvement store. Take a trip down to the store, talk to the experts there, and find parts that you know will be compatible with your toilet.
Fix a Broken Toilet Chain
These are the steps you need to follow if you would like to fix a broken toilet chain. Even though it may be frustrating to see that your toilet is not behaving as it should, remember that it’s not that difficult or expensive to fix a broken toilet chain.
You need to ensure the chain has enough slack. You don’t want the chain to have too much slack, but it still needs to have enough slack to do its job. It will take some trial and error to determine where the chain must be located. Watch the toilet flush several times to ensure it’s in the right spot.
Thanks for reading. If this post was useful and interesting, please consider checking out our other articles below and subscribing to our newsletter. On the site, you’ll find various solutions for daily appliance issues, such as a dishwasher making a buzzing sound or an oven leaking grease.
Happy flushing!
-Craig.


Designing Modern Living Rooms from Iconic Movies

7 Tips for Heating a Room with High Ceilings (On A Budget)