Are you trying to figure out why your Ryobi charger is not working or lighting up?
If so, then you’re likely already familiar with the frustration and inconvenience that comes with needing a freshly-charged battery to keep working, only to have your entire project stopped by this.
What gives?
This is where you probably go back to the charger for further inspection. If you find that the charger doesn’t seem to be working or even lighting up, you obviously have a riddle to solve.
Take heart, though. Here are five possible fixes to try before you place an order for a brand-new charger.
Keep reading to get full power!
#1 Inspect the Power Cord
The first thing to remember is that “cordless” doesn’t mean that everything involved is completely operating without a cord. When it comes to your Ryobi primary battery pack charger, the cord is inescapable.
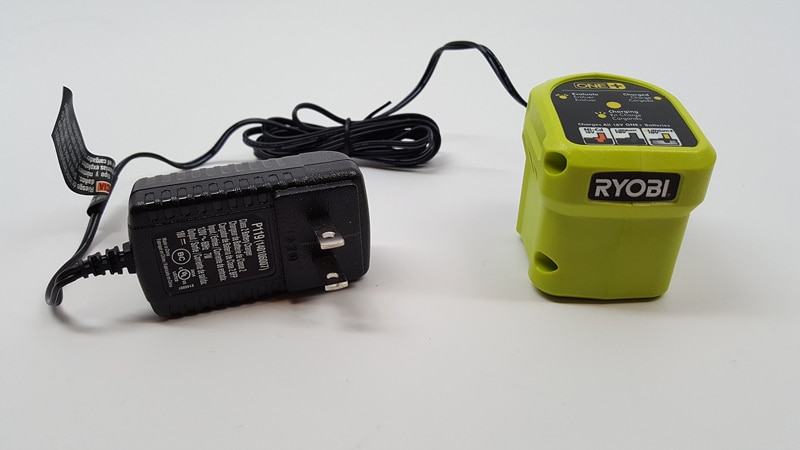
If you plug in your charger, even without a battery pack already on it, you should at least have a solid RED LED light up, indicating the charger is receiving power. If that isn’t happening, then you need to start with the power source, which first involves the cord.
Which is why it’s also the first thing you should inspect. More than likely, the cord is fine. However, because it is a charger handling batteries for cordless tools, your charger is more than likely utilized in an area where sharp items can be found.
This is why it won’t hurt to do a simple visual inspection of the cord, just make sure the charger is unplugged from the wall outlet before doing so. Look for anything that may cause an issue, like cuts, abrasions, or damage to the plug itself. Also, check to see if the cord is loose or feels looser than normal where the cord enters the charger.
Why?
It’s a natural instinct to carry anything with a cord by the cord. Of course, this means the heavier part is usually at the lower end of the cord when carried. Over time, the cord can start to pull out or separate for the connection internally.
The same type of thing happens when cords get yanked often. Think about vacuum cleaner cords that need repairing or replacing because they’ve been stretched too much and that internal connection starts having issues.
This is all assuming, of course, your cord is hard-wired. If it’s damaged or the internal connection is the issue, you can reconnect or replace the cord rather than get a whole new charger, but ONLY if you have the training and experience, as well as the proper tools to do so!
Alternatively, you could try replacing the charger with a detachable transformer like the one in the picture below.

#2 Inspect the Power Source
Okay, if you’re satisfied the cord is in good working condition, it’s time to check the outlet you’re plugging into. Or better, plug the charger into a different outlet. If you get a RED power light there, then there’s probably a problem with the original outlet.
If you’re still not getting any lights even after changing outlets, you should try plugging something else into the outlets. If it works, the outlets are fine.
You can also plug your charger back in and use a multimeter to see if it’s getting any juice regardless of the lights. If it’s not, the charger is more than likely defective and will need replacing.
#3 Your Charger is Getting Power but Not Charging Batteries
You’ve eliminated the possibility the charger isn’t getting power. However, you still haven’t solved why the battery or batteries aren’t charging.
This is where you can eliminate a few things right off the bat, based on what light you are getting.
- If your charger is flashing RED and the GREEN light is off, then your battery may be too hot or too cold. In either case, the charger will not charge the battery until the battery pack has returned to a more tolerant temperature. In other words, give it some time and maybe move it to a room that is a normal living temperature.
- If your charger is flashing RED and the GREEN light is off, but the temperature is fine (both hot or cold), then you might be dealing with a battery that has been deeply discharged.
Deeply discharged? That sounds-
Yes, it sounds like a dead battery. Or one that’s basically in a deep sleep.
#4 Wake Your Battery Up
For most Ryobi batteries that have been deeply discharged, you can place them on the charger and wait. Once the normal voltage is reached within the battery, it should shift into a normal charging mode. However, consult your manufacturer’s manual to ensure this is the recommendation.
Another way is to do quick charges. Basically, you put the battery on the charger, count to 2 or 3, and then remove the battery. You do this for up to thirty minutes, or until you see the flashing GREEN light, indicating it’s charging normally.
Think of it like battery CPR. Only the battery isn’t dead dead. It only seems like it is.

#5 Charger Flashing Green and Red
You’ve got power. Your battery is on the charger. And you’re getting a flashing RED light.
And a flashing GREEN light.
Now, normally, a flashing GREEN light is good. That means the battery is charging.
However, if it’s also coupled with a flashing RED light, that means there’s a problem.
First, check the charger and the battery to see if you can do some cleaning. Check the contacts for gunk or rust. If there’s gunk, a wire brush and rubbing alcohol can help. If there’s rust, try using some sandpaper. Remember, though, this isn’t The Karate Kid. Sand enough to clear the rust off.
If after cleaning the contacts there’s still the flashing RED and GREEN, it’s time to try a different battery on the charger. If it charges normally, then your previous battery is probably done and needs to be recycled.
If you still have flashing RED and GREEN lights after trying a different battery, the issue is likely on the charger’s end.
At this point, taking it to a technician may be an option worth considering, as it’s not recommended that you try to open and inspect your tools’ components by yourself. That being said, if the repair is almost as expensive as buying a new charger, you’re better off just going to the store for a new unit.
Conclusion
A Ryobi charger that’s not working or lighting up is clearly a charger that’s not doing the job it was designed to do. There’s no arguing that. After all, if a charger isn’t functioning the way it’s supposed to and won’t stay powered up by itself, how can it actually charge anything?
The good news is there are likely some reasonable explanations as to why your charger is behaving the way it is. Along with those explanations are some possible fixes that may be able to get your charger back to, well, charging.
If not, then yes, you’ll probably need to buy that replacement.
Thank you very much for reading, have a great day!
— Craig.


