Is your dehumidifier not draining properly? Gravity might be working against you. Here are 5 causes to this problem, and the fixes you can try.
Household appliances are designed to make our lives easier, and save us time. That is, until they fail to go about their everyday processes correctly.
A clear example of this is a dehumidifier that is not draining properly. After all, you bought this appliance because you wanted it to be independent of you, and drain its own reservoir.
What an unpleasant surprise this is.
I understand your frustration, and how inconvenient this can be, but not all is lost. There are several reasons why your unit might be having this issue. From the force of gravity working against you, to a damaged drain hose.
The possibilities are nearly endless, and it’s easy to feel lost. That is… unless you’ve done your homework.
Below, you will find a list with the most common causes behind this occurrence, and the simplest steps you can take to address each one of them. There’s not a doubt in my mind that, if you follow them religiously, your dehumidifier will start draining again in a jiffy.
Ready? Let’s go!
Fixing a Malfunctioning Dehumidifier
More often than not, when these issues arise, they are much more closely related to user error or improper maintenance, than they are to technical faults. Before immediately assuming that there’s a broken internal component in your appliance, we must analyze other external factors.
Patience always pays off, especially when it comes to troubleshooting. I promise that we’ll get to the bottom of this.
Here are 5 factors that could be causing your dehumidifier to not drain properly:
- Gravity
- A damaged drain hose
- Blocked pumps
- A broken capacitor
- A faulty microswitch
#1 Gravity
This is probably something you’ve never thought about, but the position of your hose relative to gravity, is very important.
Unless you’re extremely experienced in DIY’s, it’s very likely that a certified professional helped you install your dehumidifier. If this is the case, they already accounted for gravity when it comes to the draining process, and you should probably not worry about this.
That being said, there’s always room for human error.
No matter the condition of your appliance’s internal components, or how well your pumps are working, if your drain hose is improperly installed, it will struggle with gravity.
Now, I’m not saying that your machine will not drain any water, but it will definitely operate in suboptimal conditions.
Solution: Make sure that the exhaust in the wall end of your drain hose is not very high.
Ideally, the outlet should be at floor level for maximum pumping efficiency, so, if this is not your case, you might need to relocate the unit.
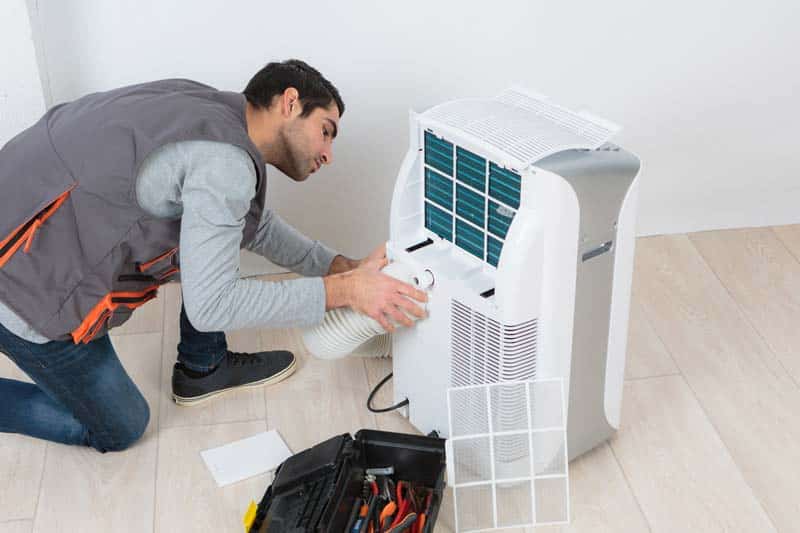
#2 A Damaged Drain Hose
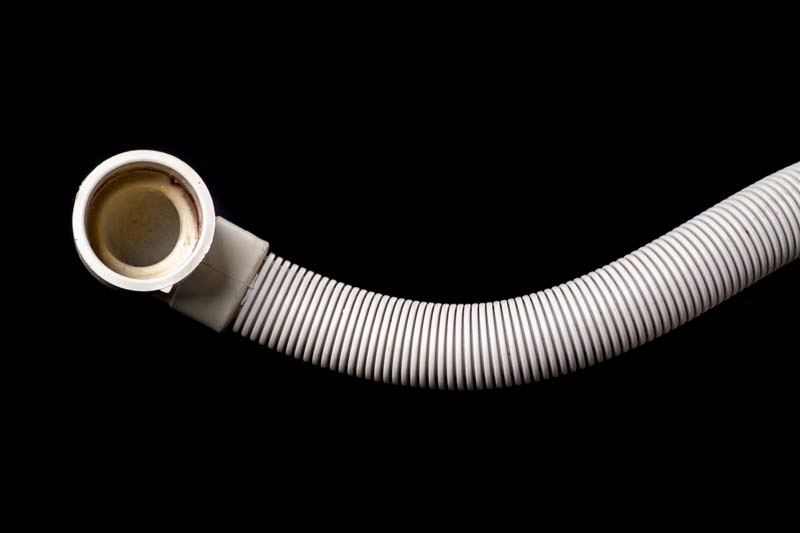
Assuming that your wall exhaust is, in fact, at floor level, and not struggling with gravity, we can safely consider damage to your drain hose.
Just as it happens with any other component within your household appliances, your drain hose will become damaged over time. The rate at which this occurs will depend greatly on how often you use your dehumidifier, and how often you move it from one room to another.
As you know, your machine uses pressure and pumps to drain your reservoir through the hose, so any holes or tearing can be catastrophic.
Even the tinniest, thinnest ruptures on the hose can wreak havoc, so make sure to look closely.
The simplest way to tell whether this is your problem, is by looking for puddles across the hose’s length. Water coming from the middle of it will indicate damage. Whereas water coming from either end means you need to tighten or replace the locking mechanisms.
Solution: Carefully unplug your appliance, and let it cool down for a couple of minutes. Once you have done that, remove the hose, and take it to the sink to look for any kind of bubbling or leaking.
Provided that you spot any, and don’t want to spend money on a new hose right now, you can try using waterproof adhesives to seal the tearing. However, I’d advise against it for two main reasons.
Firstly, there’s no guarantee that these adhesives will work, so you just might end up wasting more time. Secondly, even if they work, they are not a long-term solution, so you’ll eventually have to buy another drain hose.
I know it’s annoying to have to spend money on repairs, but, why not just nip this in the bud?
If you want to get any replacement part – or see how much one would cost – click to enter your model number in the search bar below. Our partners at AppliancePartsPros stock almost every part with free guides on how to install them.

#3 Blocked Pumps
If you’re in the habit of waiting too long between cleaning cycles, there’s a very good chance that your pumps have become blocked by sediment.
Now, before you throw your dehumidifier in the bin, let me assure you that this substance is not dangerous per se. In fact, it is present in the water we shower and do our dishes in, as well as in the water we drink (if you drink tap water, of course).
The rate at which sediment builds up in your pumps will vary greatly depending on the quality of the water where you live. But the ultimate certainty is that it will eventually appear unless you clean your appliance often.
If your dehumidifier is not draining properly, you will have to give it a much-needed cleaning session.
Solution: Carefully remove the reservoir and empty it. Once you have done that, prepare a mixture made up of equal parts of water and white vinegar, and pour it into the container.
Let your unit run normally to pump out the water, refill the reservoir, and run it one more time.
This process is known as descaling. Doing it at least once a month will keep your machine running flawlessly, and free of obstructions.
#4 A Broken Capacitor
Let’s move on to more technical factors.
What would your dehumidifier be without its capacitor?
An expensive doorstop, that’s what. This component is responsible for making your fan’s motor, and the pumps, work.
Your dehumidifier uses its fan to pull in air from the environment to dry, while your pumps get rid of the collected moisture. Two very important processes that cannot happen with a faulty capacitor.
If your appliance is not draining properly, there’s a very good chance that you need to replace this part. Who would have thought such a small component could cause so much trouble, huh?
Solution: Carefully unplug your appliance from your wall outlet, and let it cool down for a couple of minutes. Once you have done that, remove the frontal plastic panel, the filter, and any protective screws to expose your unit’s guts.
Locate your capacitor and gain comfortable access to it, so you can test it for continuity by using a multimeter. Provided that you get null readings on the meter, you’ll have to replace the part.

If you’re a visual person like me, there are tons of online videos you can check out and follow along step by step.
#5 A Faulty Microswitch
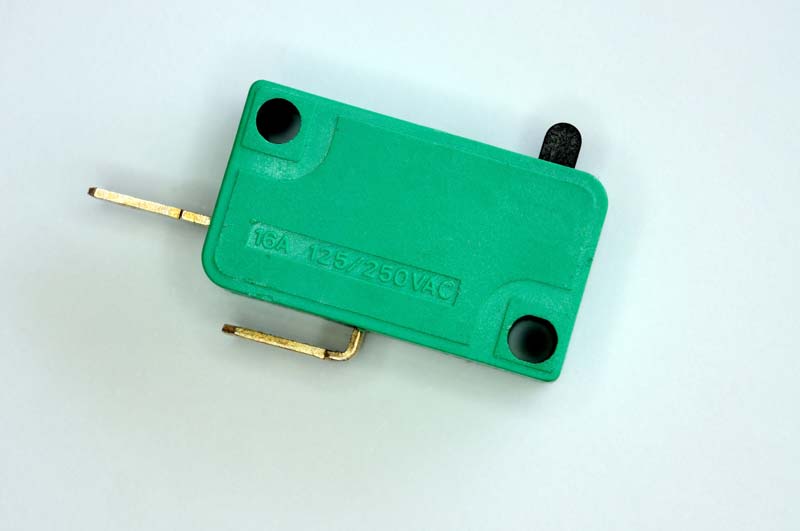
Lastly, let’s check your microswitch.
In case you’re not familiar with what this part does, let me briefly explain. Your microswitch is responsible for detecting the water levels in the reservoir, and prompting the pumps to drain it when it’s about to overfill.
When it works normally, your appliance’s pumps should work constantly as the water is collected. However, any malfunction to this component can compromise your unit’s functionality, and stop the pumps from draining when they should.
Just as it happens with the capacitor, mistaking a bad microswitch for a faulty pump, is very easy. Make sure to test this part before tampering with any other draining element in your machine.
Solution: Gain comfortable access to your microswitch. In most models, it’s located next to the reservoir, but there can be some variations.
Once you have found it, use a multimeter (if you have one) to test it for continuity, and replace it if necessary.
You should be able to easily buy a new microswitch from either your nearest hardware store, or your manufacturer.
When Should You Call a Pro?
The answer to this question will depend greatly on the status of your warranty, and whether the solutions on this list worked for you.
If you’re still under coverage and don’t mind waiting a couple of days or weeks for your manufacturer to send a technician to your home, by all means, give them a call.
Unless specified otherwise, they should take care of the repairs for free.
Provided that your warranty has expired, you’ll have to weigh the cost of repairs vs the cost of buying a new model. The replacement parts to fix your dehumidifier are not awfully expensive, but the cost of labor to have them installed and configured, can be.
Conclusion
To have your dehumidifier stop draining properly is… inconvenient to say the least. After all, you bought this appliance to make your life easier, and now you have to constantly supervise it to avoid overflowing.
What a disaster!
Luckily, as I hope you’ve learned in this piece, addressing most of the causes behind this situation is fairly simple, and not very time-consuming. In most cases, checking your drain hose for damage, and descaling your pumps regularly, is all you need to do to keep the dehumidifier working perfectly.
Thank you for reading. If you found this article helpful, why not keep learning through our other incredible resources below?
Happy DIY’s!


Designing Modern Living Rooms from Iconic Movies

7 Tips for Heating a Room with High Ceilings (On A Budget)