We've independently reviewed this article to make sure it's as accurate as we can make it.
To find out more about our article creation and review process, check out our editorial guidelines.
Wondering why your crank window won’t close all the way?
You’re not alone! I know how annoying it can be to be unable to close your windows, especially during winter.
But don’t worry; I’m here to help.
If your casement or crank window won’t close, there’s likely a problem with the lock system, lubricant, or hinges. Luckily, solving the issue is very simple.
Read on to learn how to fix a crank window that won’t close!
Crank or Casement Window Won’t Close? 5 Steps to Fix It
Different reasons can explain why your crank or casement window won’t close all the way.
Don’t worry, though. In this section, I’ll guide you through the window repair process to help you forget all about the problem.
#1 Check the Window Lock System
When a casement window won’t close, I usually advise checking the lock system.
Make sure you disengage the lock system before you try to move the crank window. If the lock is engaged, your window will not be able to open or close.
You’ll need to replace the lock system if there’s a problem with the mechanism. Check the manufacturer’s manual for replacement instructions.

Tip: Do not force the lock open; doing so could lead to further damage.
#2 Apply Lubricant to the Crank System
When fixing a casement window that won’t close, I always clean the crank system and use a lubricant to solve the problem.
Start by taking a cleaning solution and applying it to the entirety of the crank system. Then, take a microfiber cloth and clean it thoroughly.
If you still have difficulty getting your casement window to close properly, please take some lubricant and apply it to the crank system.
You can use some WD-40 to get the crank system moving again. Ensure you are generous with your application to get the system loose enough to start operating.
#3 Check the Hinge System
I tend to find that when a casement window won’t close, it’s typically due to the hinge system.
You see, hinges can become damaged over time, affecting your window’s smooth operation.
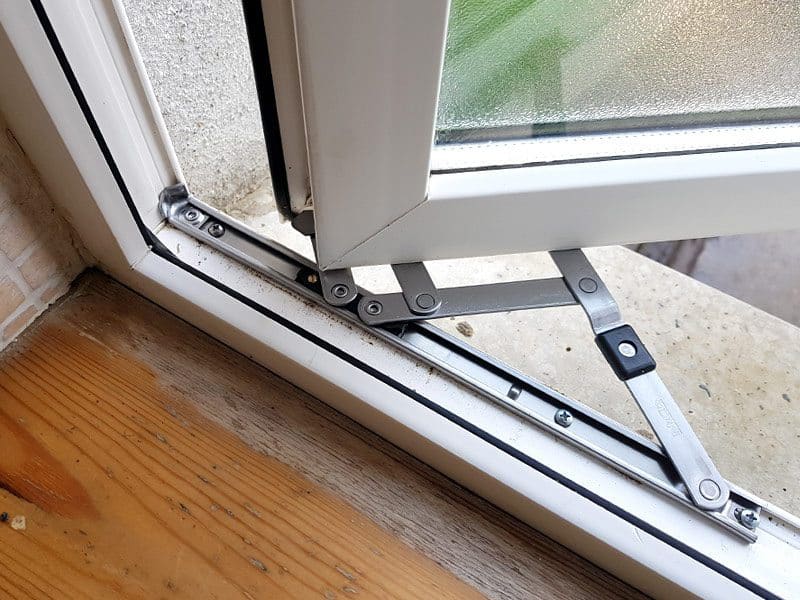
Inspect the hinges for any visible signs of damage. If they’re misaligned or you notice a gap between the sash and the seal of the window frame, you’ll need to read your manual and replace the hinges with new ones.
Of course, if you have any questions or concerns about replacing the hinge system, you need to contact a professional who can help you so you don’t risk damaging the window.

#4 Check the Threads on the Crank Handle
If your window still won’t close, you’ll need to look closer at the crank system.
Casement windows typically feature a single worm gear in the crank handle. If the gear’s threads are worn out or damaged, the hinge arms won’t operate.
If there is no friction between the lever and the gear system, it indicates that the crank system has been damaged.
If your window is under warranty, I advise you NOT to attempt repairs. Doing so can void the warranty. Instead, it’s best to seek professional assistance.
If your crank window is no longer under warranty, you can disassemble the handle, remove the outer casing, and inspect the operator assembly.
In my opinion, installing a new part is typically quite straightforward; you’ll just need to find the part for your exact window model.
#5 Replace the Crank
The last step in fixing a casement window that won’t close all the way is to replace the crank.
After you have the replacement parts in, it’s time to replace the crank to your window. The exact steps vary, but I’ll provide a basic description for most general windows – typically Jeld-Wyn branded windows. However other brands like Pella or Andersen don’t apply, as they use a different crank design.
Remove the old crank and look closely for any signs of damage. If you have worn out or missing splines, broken gears, and a worn-out arm, it indicates you have found the problem. Then, release the window. You should open the window and push down on the arm to break it free from the track.
Next, remove the trim and the crank. Back out the trim screws using a basic screwdriver and remove the casement cover from the window jamb. If the screws appear rusted and bent, you must also replace them.
Finally, you can install the new crank system. You need to line up a new crank system with the old holes. Then, use fresh screws to attach the system to the wall and reattach the casement window cover and the crank arm. Finally, test it to make sure the new crank system is working properly.
Even though replacing the crank system can be time-consuming, it does not necessarily have to be expensive. Remember, if you ever feel uncomfortable replacing the system, contact a professional who can help you.
Wrapping Up: How to Fix a Crank Window That Won’t Close
Hopefully, now you know how to fix a crank or casement window that won’t close all the way.
Remember to disengage the lock and check the mechanism, use lubricant, or replace the crank system to solve the problem.
Thank you so much for reading! If you found this article helpful, please check out our other free guides below.
Good luck!


Designing Modern Living Rooms from Iconic Movies

7 Tips for Heating a Room with High Ceilings (On A Budget)