This page is part of our Appliance Challenge – helping our readers save thousands of dollars in just one day’s effort. Click here to return to the challenge homepage.
Refrigerators are one of the most expensive products in our homes. Yet we never pay any attention to them. We take our cars to the mechanic every year, but what about our appliances?
It takes less than an hour to do a quick DIY maintenance check on your fridge – and yet doing this can save you over $1,000 in repairs, running costs, and fridge lifespan!
I know the concept of performing maintenance on your fridge is scary, but don’t worry. If you got offered a $1,000 bonus to do a few hours work at your job, I’m sure you’d take it! I know I definitely would.
Don’t worry, this isn’t anything complicated, and I’ll be walking you through each step of the way. I’ve got 7 years of experience in major appliance maintenance and everything below is super simple. If anything might get tricky or need a pro, I’ll let you know.
If that sounds good, then let’s get started.
Gather Your Gear
Just like a chef needs their mise en place, any good DIY job starts with gathering the tools we need.
The most important tool here is your refrigerator’s manual. No idea where yours is? Don’t worry! Appliance manuals go missing easier than cookies in a jar. Thankfully, everything’s online these days.
If you’ve lost your manual, check out our guide to finding any appliance manual online.
When it comes to tools, you’ll need:
- A spirit level
- A soft brush (a pan or small hoover to pick up dust helps)
- A positive attitude!
Depending on the tips you follow, you may optionally need:
- Crosshead screwdriver
- Adjustable wrench
- A thermometer
All set? Then let’s dive in.
Refrigerator Health Check – The Essentials.
To kick-start things, here are 6 quick but essential things to do
#1 Turn On Eco-Friendly Settings
While fridges don’t use a ton of energy, they are still running 24/7. The poor guys never catch much of a break.
What we can do to help is to make sure any eco-friendly settings are enabled. By doing this, your fridge will use less energy to keep your food fresh, and will even detect when the door is closed, so it doesn’t keep running the display and other components.
If not obvious if your fridge has an eco setting or how to activate it, have a look in the owner’s manual. Typically, fridges with digital displays will have a mode like this.
You see, an old refrigerator can use up to 1000 kWh every year, whereas an energy-efficient fridge can use as little as 336 kWh each year.
So, if you have an energy-efficient fridge, you will be able to save more than 66% on your energy bills, or more than $160 USD* each year!
*Based on the average residential electricity rate in the U.S. of 2023 ($0.16 USD per kWh).
I know what you’re thinking – “Craig, if I turn it onto eco-mode, it’s going to stop working properly!”. Don’t worry. Eco mode mainly saves energy in bonus areas like display power options and rapid cooling. It will still keep your food refrigerated, and you’ll be improving its cooling power anyway by following this guide.
#2 Place Your Fridge Away From Heat Sources
When it comes to appliances, some like it hot. And your fridge isn’t one of them.
Have a look at your fridges positioning. Is it somewhere cool, or will it get hot there? If it’s next to an oven, a dishwasher, washers, or even getting a lot of direct sunlight – then your fridge has it’s work cut out for it!
Being near any sort of heat source will increase your energy bills and cause all sorts of issues with your fridge.

I know it’s not like we can just pick up and move a refrigerator just anywhere, but it’s worth considering. Try to see if you can make any changes to give the fridge more shade, or a bit of separation from hot appliances.
#3 Give It “Breathing Room”
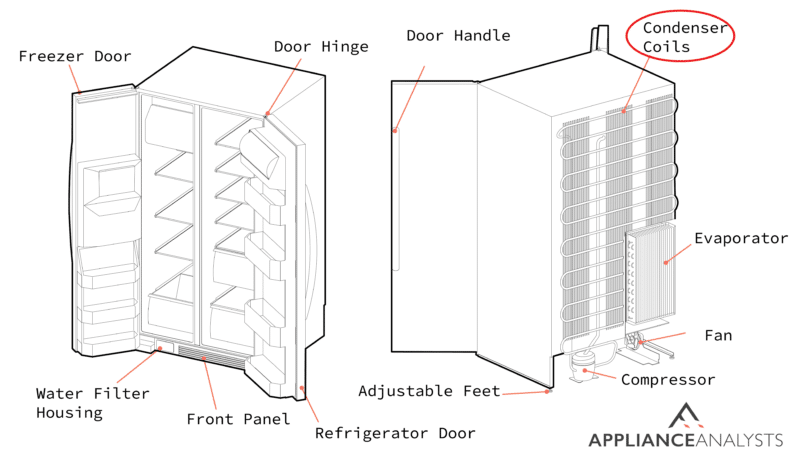
Your refrigerator keeps itself cool using a refrigeration cycle. As part of this cycle, your fridge exhausts warm from the condenser coils behind and beneath it.
If your fridge doesn’t have enough “breathing room”, the warm air won’t have room to flow away. Your fridge will end up cooking itself in a constant battle of trying to cool down it’s own hot air!
This can be a significant issue for your fridge. It can quickly overwork the fridge’s compressor leading to sky-high energy bills and turn your fridge into a ticking timebomb for repairs.
To avoid this from happening, do what you can to leave at least 1 or 2 inches (2.54 cm—5 cm) of extra room around the rear and sides of your fridge. We need to make sure the fridge has room to exhaust warm air.
Make sure to also check below your fridge. If it’s sitting on a pile of dust and debris, that’s REALLY not going to help! But we’ll touch on cleaning this out later on in the guide.
#4 Make Sure It’s Level
Now that we’re done with tips that may involve moving the fridge, we can get to my favorite tip on this list.
One overlooked MUST for a fridge is that it should always be level. Otherwise, the refrigeration process won’t work as intended, and the doors may not close completely.
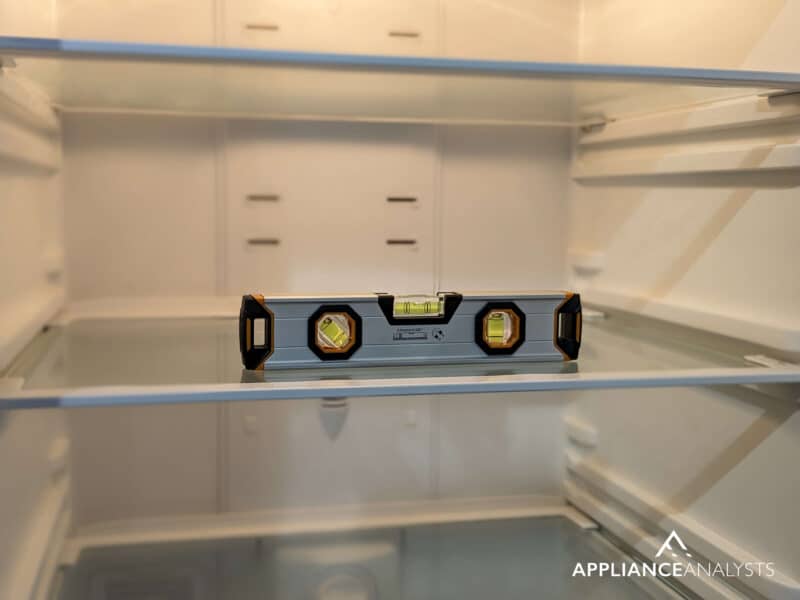
You see, all refrigerators work using refrigeration. This is a system of cooling, transporting, and heating a refrigerant which is often a mixture of liquid and gas. Have you ever known a liquid to flow uphill? Well me neither! A fridge that isn’t level can mean it has to work REALLY hard to keep that refrigerant flowing properly.
This is where our handy-dandy spirit level comes in. Place the level on the base of the fridge, and see if the bubble lands in the center.
If your fridge isn’t level, we may need to make some adjustments. Here’s how to do it:
- Open the doors at a 90º angle and remove the plastic kick plate at the bottom of your fridge.
- Locate the leveling legs or adjustable rollers (they’re located behind the grille).
- If your fridge has leveling legs, use a wrench to level it. But, if your fridge has adjustable rollers, you’ll need a screwdriver instead.
- To raise your fridge, turn the wrench to the left. But, if you want to lower it, turn the wrench to the right.
- Keep doing small adjustments and checking back in with the spirit level until that bubble is centered.
Tip: If your fridge doesn’t have adjustable foot levelers, try using a thick piece of cardboard and place it under the appliance’s feet until the spirit leveler’s bubble is centered.
I know this one can seem like a hassle, but honestly – an off-level refrigerator is a surefire way to increase your energy bills AND increase the chance of a breakdown.
#5 Check the Door Seals
As you may already know, your fridge doors use gaskets to seal in the cold air.
If these gaskets get dirty, loose, or damaged, then the door won’t stay closed and your cold air will be escaping. Which pretty much means your compressor is constantly sprinting to keep up.
This is why we need to check the door seals. If you notice that they have food residue or dust, then it just takes a 2-minute clean to fix it. Just use any general kitchen cleaner (not bleach!) on a cloth to gently wipe away any dust, dirt, or grime. Then make sure to dry the door seal with a cloth or paper towel to prevent mold.
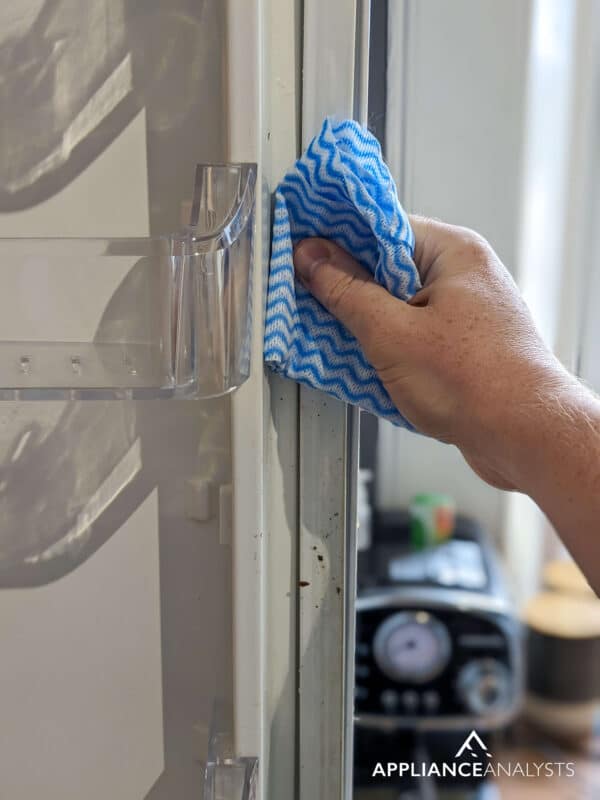
If you clean the door seals and notice that their ability to seal is quite weak, your door magnets may have lost their strength. Your best bet here is to replace them – click that door magnet link to learn more.
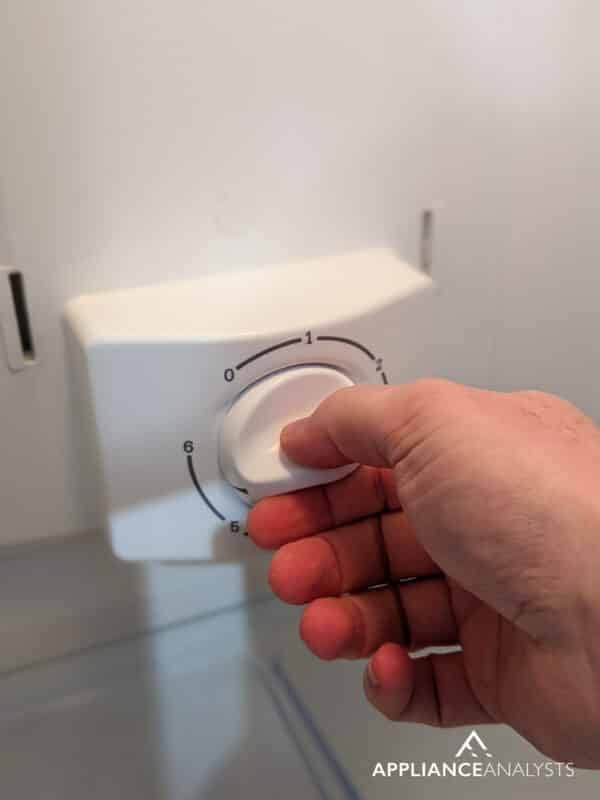
#6 Experiment With Temperature Settings
Setting the refrigerator to a super low temperature is a common mistake to make.
Homeowners want to make sure that their fridge lasts longer – so they whack the fridge to as low a setting as it can go.
Unfortunately, this will severely overwork the compressor – and can also lead to frost or ice buildup, which will cause your food to lose moisture and flavor.
Your refrigerator needs to work exponentially harder the lower the temperature you set. If you set it to 40F it might need to run for 10 minutes every hour to maintain that. But if you set it to 30F, it might need to run for 30 or even 40 minutes every hour!
Most refrigerators should sit between 3 °C (37.4 °F) and 5 °C (41 °F). However, this may vary depending on the model you own.
You can easily check your fridge’s temperature by placing a glass of water on the middle shelf and leaving it there for 8–12 hours (keep the door closed). Then, place a thermostat in the glass of water and check the temperature.
If your fridge is too cold, you should probably raise the temperature. Make sure to double-check with the water trick after a few hours – we also don’t want it going above 40°F. Just like Goldilocks, we want it juust right.
Refrigerator Health Check – Follow Good Habits
Believe it or not, a few tweaks to your routine can help you get the most out of your refrigerator, save on your energy bill, and reduce your carbon footprint.
Try incorporating these 5 habits into your daily routine to save yourself hundreds of dollars in refrigerator repairs and lifespan:
#1 Don’t Over-Fill
If you’re like me, you probably like to meal-prep to save time during the week. But cramming half the supermarket into your fridge can restrict airflow.
If your fridge is overfilled, it will need to work extremely hard to cool all of those items down. Not only will this overwork your system and use tons of energy, but it can also cause your food to spoil.
This is why you should always make sure your fridge isn’t so full that it prevents air circulation. Try to make sure there’s always plenty of room for airflow inside the fridge.
#2 Don’t Open the Door When You Don’t Need To
While we may not think about it, our fridges are scared of us opening the door! Because every time we do, all that lovely cold air flows out into the kitchen – meaning they’ve got to work hard to cool the whole thing down again.
Opening your fridge’s door is like starting its workday all over again.
I know it can be tricky to break a habit, so I do have a trick here.
One simple trick to stop opening your fridge’s door all the time is just to use a sticky note!
Place it as a reminder to think twice before opening the fridge. I just write “Do I NEED To Check This?” on mine.
It sounds obsessive, but you’ll soon realise how many times you’re opening the fridge just to check if you have something, or every time you need an ingredient, or if you’re hungry and keep checking for snacks every 5 minutes.
One simple solution is to also take out ALL the things you’re gonna need to cook a meal before you get started with one. Similarly, it’s better to leave things out of the fridge for a little longer if it means you put it all back in one big go.
#3 Turn On Vacation Mode When Away
If you’re going away for a long period of time (two weeks or more), and your fridge has a Vacation or Holiday mode, you’ll want to turn it on.
You see, this feature reduces the power consumption of your refrigerator by keeping the freezer running normally, but maintaining the temperature of other compartments at 59 °F (15 °C).
Unfortunately, not all refrigerators support this feature. So, if your fridge doesn’t offer a Vacation mode, but you’re going away on a holiday or business trip for a couple of weeks, you can still follow these simple tips:
- Remove all food from the fridge.
- Defrost your refrigerator.
- Unplug your fridge from the power source.
- Clean your fridge and wipe excess moisture to prevent a musty smell or mold.
- Close the water valve.
This might sound like a lot, but it’ll help reduce your energy bills AND extend the lifespan of your fridge.
#4 Don’t Put Warm Food In
Putting warm food in your refrigerator is like giving peanuts to someone with an allergy. You just shouldn’t do it!
Storing warm food in your refrigerator can raise its temperature. When this happens, your fridge needs to work harder to cool down your food.
Not only this, but warm food can lead to excess moisture, which can transform into frost buildup.
This is why you should always let your food cool down before storing it in the fridge.

You can speed up this process by dividing large batches of food into smaller storage containers.
Bear in mind that cooked food can be left at room temperature for two hours before bacteria start to grow.
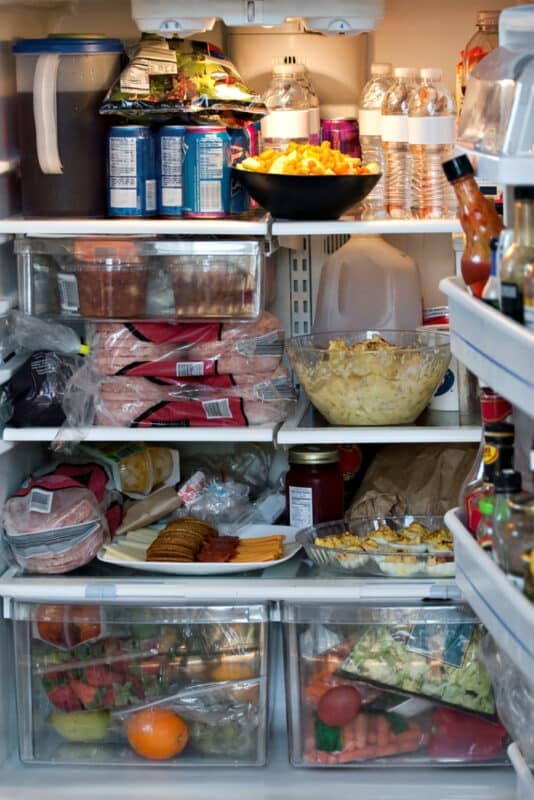
#5 Store Food Properly
Proper food storage will reduce the risk of odors and bacteria. Moreover, it can make your food stay fresh for longer.
It will also help you save money since your food won’t go bad as quickly.
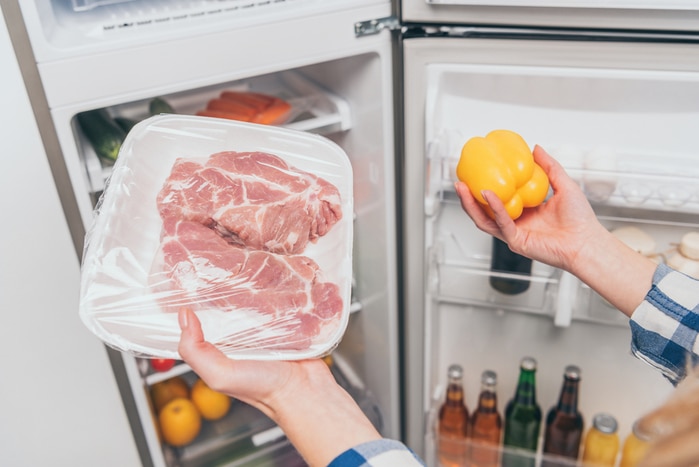
Here’s a few essential tips for proper food storage:
- Top shelf: Store all the ready-to-eat foods, such as drinks, and leftovers on the top shelf. Please make sure to date your leftovers and discard them after four days.
- Middle shelves: Refrigerate all items that are prone to spoiling, such as dairy products, cooked meats, eggs, etc. I recommend storing these items in the back of the fridge because it’s colder.
- Lowest shelf: Store raw meat, poultry, and fish on this shelf because it’s the coldest one. Make sure they’re stored in a separate bowl, plastic bag, or bowl to keep juices from dripping onto other foods and contaminating them.
- Drawer: You should store vegetables and fruits wrapped in paper or plastic bags with holes to keep them fresh. Make sure fruit is separated from vegetables because they can give off different gases that can shorten their storage life.
- Door: The door’s ideal for condiments, drinks, and spreads. Don’t store dairy products or eggs in the door because it’s the warmest place inside the fridge – and where the temperature fluctuates the most.
Refrigerator Health Check – Maintenance
Refrigerators, just like any other home appliance, require some routine maintenance.
Although these tasks may require a bit more work and time, they’ll keep your refrigerator running efficiently and will save you from sudden breakdowns and related repair costs.
These are the tips that need a bit more elbow grease – but trust me, they’re what will make your refrigerator last years longer.
Aside from waiting on defrosting, everything here will only take you around 30 minutes.
#1 Defrost Regularly
As you may already know, ice and frost can start to build up in your refrigerator, impacting airflow and keeping your fridge from cooling properly. Ice buildup can also cause bad odors due to the accumulation of bacteria.
This is why you should defrost your refrigerator whenever ice buildup is 6 mm (1/4 inch) thick, or once a year.
Most modern refrigerators have an Auto Defrost or Frost Free function that automatically heats the cooling element (evaporator coil) to melt any frost or ice buildup. Then, the compressor’s heat evaporates the resulting water into the air.
Some refrigerators have a red button that you’ll need to press in order to start the defrosting process.
On older models, you won’t find that button, and you’ll need to manually defrost your appliance. Here’s how to do it:
- Remove all items from your fridge. Please make sure to transfer all the high-perishable foods to a cooler.
- Unplug your refrigerator from the wall outlet and take out all shelves, drawers, and other removable compartments.
- Place old towels on the floor to absorb the wastewater.
- Wait until the ice has completely melted and clean your refrigerator.
- Dry your refrigerator with paper towels.
- Plug your appliance back in and set it to the coldest temperature mark. Then, wait for 30 minutes and adjust the temperature (remember to check your manual or set the temperature to 3 °C (37.4 °F) and 5 °C (41 °F)).
- Transfer the food back into the refrigerator.
#2 Clean the Condenser Coils Once a Year
Condenser coils cool down the refrigerant and exhaust the heat.
Unfortunately, if the coils are clogged, dusty, or dirty, they won’t be able to dissipate and transfer the heat effectively. This means your fridge needs to work extra hard to achieve the same level of cooling. Leading to – you guessed it! – higher energy bills and increased chance of a fridge breakdown.
You should clean the condenser coils at least once a year. Here’s how to do it:
- Unplug your fridge from the wall outlet
- Access the condenser coils. They are usually located on the back of the fridge and/or across the bottom. You may need to use a flashlight to take a good look at your coils, and a bit of muscle to move the fridge out.
- Take a soft brush and gently brush all of the dust and debris downwards onto the floor.
- Then grab your vacuum or dustpan to get rid of all the mess.
- Wipe down the coils protective front cover with a damp cloth, then dry with a paper towel.
- Move the fridge back into position. But first, check out the next tip…
#3 Clean Around Your Fridge Once A Year
Following on from the tip above, we should also clean behind, around, and below the fridge. A lot of dust and gunk can build up, which acts like insulation around your fridge.
That sounds like a good thing, but it’s not!
All this buildup will trap the warm exhaust air, leaving your fridge getting warmer and warmer. Which makes it work harder and harder.
Try moving your refrigerator and cleaning behind and below it once a year. This way, you’ll be able to keep dust to a minimum and reduce allergies. Moreover, if you live in a humid area, you’ll prevent mold and bad odors.
To clean behind and below your fridge, you’ll need to unplug it and move it. Try keeping the door closed to preserve the internal temperature.
Use a general kitchen cleaner (not bleach!) or mix equal parts of water and vinegar and use cloth to clean any grease and grime.
Don’t forget to vacuum or sweep, and mop afterwards. Allow it to completely dry before moving your refrigerator back to its original spot.
#4 Clean The Fridge – But Avoid Any Harsh Chemicals!
Deep cleaning your refrigerator is part of the maintenance process that will make it last longer.
It’s common to think that harsh chemicals, such as bleach, will help us kill bacteria faster. However, you should never use these chemicals on your fridge.
You see, food can easily absorb them, which may negatively impact your health.
Try using white vinegar instead. This natural cleaner can easily break down grime and grease. On top of that, it has antifungal and antibacterial properties.
Follow these simple instructions to deep clean your fridge:
- Remove all food from your fridge. Please discard any spoiled food and transfer meats and other high-perishable food to a cooler.
- Take out the shelves, drawers, and any other removable compartments.
- Mix equal parts of vinegar and water in a spray bottle. Then, use this cleaning solution on the drawers, door, shelves, and other compartments. I recommend using a sponge and a soft brush.
- Dry the refrigerator to prevent mold.
- Place a bowl filled with baking soda every three months or if your fridge starts to smell again. This ingredient can neutralize bad odors.

Bonus Tip – Check The Level Again
This is just a reminder that if you ended up moving the fridge to do any maintenance work, to re-check that the fridge is level. Just like we did in the ‘Essential Tips’ section.
Please don’t skip this part – it’s super simple but is one of the most common mistakes that will cause a refrigerator to break down much quicker than normal.
You’ve Done It!
You made it! If you followed along with this guide, you may have just saved yourself $850, or even more.
I hope you can agree that none of these tips were complicated. Sure, we need a bit of elbow grease and some determination, but it’s all pretty straightforward.
By following this guide, you’ve made sure:
- Your fridge is level and working correctly
- It’s not being overworked by using the wrong settings
- It’s able to exhaust warm air properly, making it need to work less
- Your food is stored properly and not disrupting the fridge’s operation
- You’re following great habits that don’t make your fridge work harder than it needs to
With your effort today I’m positive you’ve just made a great reduction in your energy bills, and added YEARS of good working life to your refrigerator – delaying the need to buy a whole new one anytime soon.
If you found this guide helpful, make sure to check out the rest of our appliance challenge. In total our guides can save you over $1,000 a year by just following simple walkthroughs like this one!
Make sure to also sign up to our email list below – and we’ll let you know more money-saving appliance tips and advice.


Designing Modern Living Rooms from Iconic Movies

7 Tips for Heating a Room with High Ceilings (On A Budget)