Has your fridge door lost its magnet strength, and you’re wondering what to do?
Generally, it isn’t advised to remagnetize a fridge door seal. Instead, buying and installing a replacement strip (which can either be cheap or expensive, depending on the fridge model) is recommended. Running a magnet up and down the gasket is sometimes suggested, but in reality, it can further ruin the seal.
That’s the short answer, but there’s a lot more to the topic, so it’s worth checking out the longer explanation below.
Read on to get your refrigerator back to normal!
Why trust us? This article was written by Craig Anderson and Andy Fulenchek.
Craig has helped thousands of other homeowners repair their appliances since 2016.
Andy is one of our resident appliance repair experts with over a decade of experience. He currently runs his appliance repair company with a team of trusted technicians.
Can You Remagnetize A Fridge Door Seal?
Technically, it is possible to remagnetize the seal of a fridge door using other magnets. However, I advise you NOT to do it.
I’ve found that while using a magnet can work, you also risk further ruining the magnets that are already weakening.
Instead, a much better solution is to try to help the magnet by cleaning, protecting, and maintaining the gasket or replacing the gasket entirely. Replacing the gasket is simpler than it sounds. But before you look for spare parts, let’s ensure there’s no other way around the situation.
Are All Fridge Door Seals Magnetized?
Not all fridge doors are magnetized. In fact, in modern fridges, few are.
Older fridges relied on magnetized gasket seals to ensure airtight conditions within their compartment, but this is no longer the case. Modern refrigerators rely more on compartment temperature and air pressure to stay closed properly.
So, if your refrigerator isn’t older than 5 years, remagnetizing your door seals likely isn’t what you have to worry about or what’s causing your fridge not to close as it should.
Is Your Fridge Door Seal Working Properly?
If you’re unsure whether your fridge’s door seal is the issue, here are some signs of a door seal that’s lost magnetization:
- The door doesn’t close tightly, leaving a gap. Remember, even the tiniest gap will ruin your food.
- The door opens on its own.
- The door is ‘sweating’ – it has beads of condensation on it.
- The seal on the door itself looks damaged, cracked, or worn.
- You’re not getting the cooling you used to get from your fridge.
- Your electricity bill is going up because the fridge is using more power – it has to work harder to maintain the same level of cooling.
- If you stand close, you can feel cold air escaping from the fridge door.
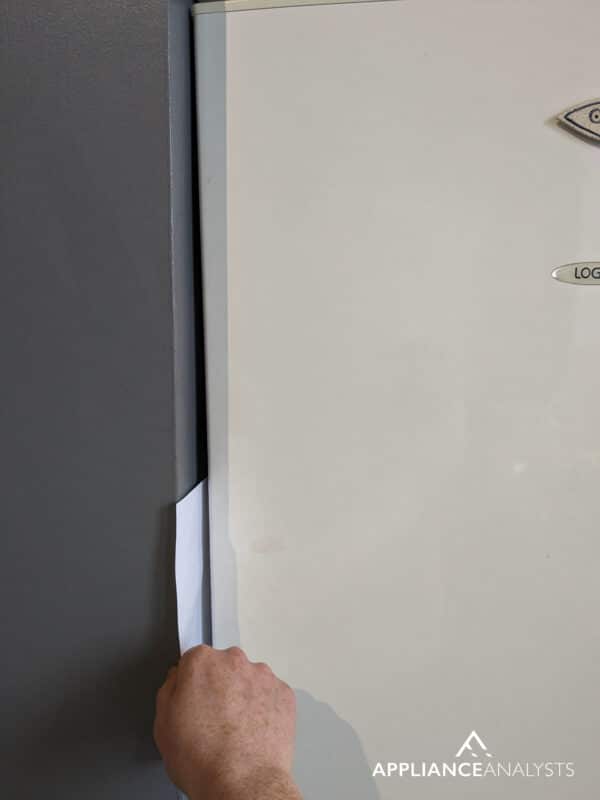
A SIMPLE TEST TO TRY
If you want to test the seal on your fridge door, here’s a simple test called ‘The Pull Paper Test’.
Put a piece of paper between the door and the fridge, close the fridge door firmly, and then pull on the piece of paper. If the paper slips out easily, it means that the door seal isn’t sealing properly or isn’t tight enough and may need repair or replacement.
Another important thing to consider is that the gasket might not be to blame. Sometimes, the gasket could simply be misaligned, or the hinges on your refrigerator door need adjustment to ensure a proper seal.
How To Keep Your Fridge Door Seals Working Properly
If you look after the seals well, you’ll be rewarded with a tight seal on your fridge door and fresh, long-lasting, healthy food to enjoy! Here are some good practices I strongly recommend you implement.
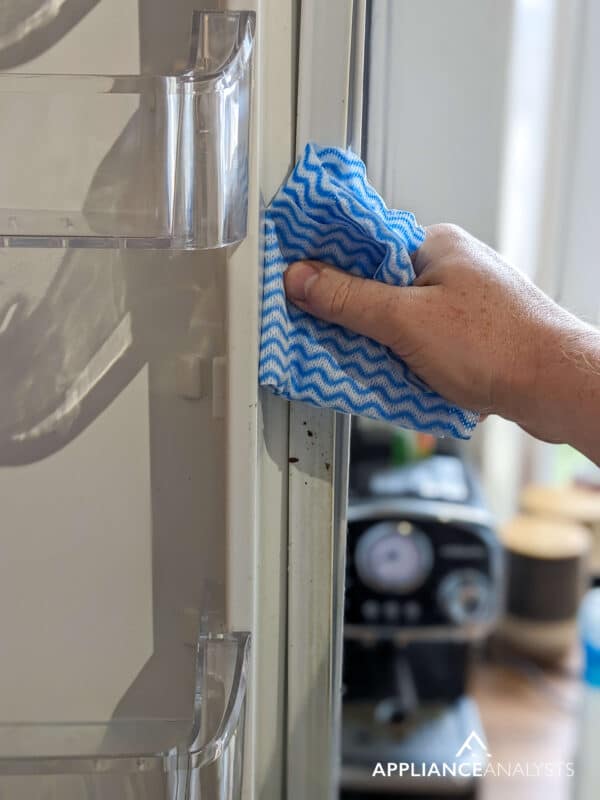
★ Cleaning – your fridge door seals could do with a good ‘clean out’ about once a year. To clean the gasket, use a mixture of warm water and baking soda – 1 cup of baking soda to a half gallon of warm water and a small scrubbing brush to get into nooks and crannies.
Remember to have some rags nearby to catch and clean up drips! You can also use clean, dry rags to dry into the grooves of the seals after you’ve washed them out – they need to be dried off thoroughly.
Pro – tip: Baking soda and sodium bicarbonate are EXACTLY THE SAME THING.
★ Protecting – try putting a thin layer of petroleum jelly (Vaseline) all over the seal’s surfaces to protect the rubber and make it last longer without wear. The petroleum jelly will also help to form a tighter seal with the opposite surface of the fridge cabinet.
★ Maintenance – if you notice that your fridge door seals are in poor condition or have holes or cracks in them, it’s an issue that must be addressed immediately. When in doubt, do a D.I.Y easy replacement or call a technician to do it for you.

Also, keep your fridge manufacturer’s manual safe and easily accessible. The manual has valuable information about looking after your fridge and its component parts.
If you’re in desperate need of a manual for your fridge, here’s a link to a website where you can find the user’s manual appropriate for your fridge model.
Replacing A Faulty Refrigerator Door Seal/Gasket
From what I’ve seen, there are 3 types of magnetic door seals commonly used in refrigerators by major appliance manufacturers – push-in, snap-in, and screw-in.

If you’re stuck trying to remagnetize your fridge door seal, how can you do so or replace the gaskets altogether? Here’s an easy–to–use D.I.Y guide to follow for each type of seal.
Notes:
The seals you receive from the manufacturer may come in small packages – it simply isn’t practical or economical to ship them in huge boxes. The shipping method can cause the strip to twist or kink.
Before installing new seals, always take them out of the box and lay them on a flat, sturdy surface for 24 hours so that they can regain their shape. If the seal isn’t as pliable or ‘bendable’ as you’d like, you can blow it with a hair dryer set on low heat OR soak it in a bathtub filled with hot water to ‘loosen it up’.
Replacing A Push-In Door Seal
A ‘push-in’ seal has a ridge fixed in a groove or channel around the edge of the door.
- Remove the old seal by pulling it out of the channel or away from the inner door liner, starting with pulling on one corner of the seal.
- Install the new ‘push-in’ seal by aligning the ridge on the back side of the seal with the channel in the door and pushing the seal into place.
- Start at 1 corner and work your way along the strip. Also, check your owner’s manual – you may have to put a bit of vinyl cement on the channel first to secure the seal fully.
Replacing A Snap-In Door Seal
A ‘snap in’ seal fits behind the inner door liner and is held in place by a retaining lip.
- Remove the old seal by pulling it out of the channel or away from the inner door liner, starting with pulling on one corner of the seal.
- Install the new ‘snap in’ seal by inserting the inside edge of the seal behind the retaining lip of the inner door panel.
- Start with 1 corner and work your way along the seal to ensure that it’s placed properly.
Replacing A Screw-In Door Seal
A ‘screw in’ seal is secured between the inner door liner and the outer door panel with screws.
- Remove the old seal by loosening the screws around the door liner and then pull the old seal free and out.
- To install the new ‘screw-in’ seal, position the upper half of the seal first and secure it by tightening the screws. Then position and tighten the bottom half to stop the door liner from moving around too much while you’re working.
Finish Off by Fitting The Seal
Whatever the type of seal you’ve just replaced, you need to close your fridge door and check that the seal is seated evenly around the whole door. There may be a couple of spots where the seal isn’t resting flush against the cabinet frame – a very common thing to have happen with new seals.
The magnetic strip will, over time, pull the door seal to the cabinet, removing any waves or gaps. Be aware that the process can take 2 or 3 days for the new magnetic strip to set.
If you still notice some air gaps after a couple of days, my usual advice is to use a steamer to ensure a proper seal and make the gasket fit the door properly.
How Much Will Replacing Seals Cost?
If you’re doing the job yourself, you’re only paying for the seal(s) themselves, and depending on availability and type, you can expect to pay $50 to $75 per seal. However, more expensive refrigerators, such as French Door models, can require seals costing anywhere between $150-$200.
Provided you want to hire a technician for the gasket installation, you’ll be looking at $350-$400 after the cost of labor and gasket have been considered.
The price will be higher if you have the part shipped. You can check with online retailers like ‘Parts Select’ to see whether they have what you need. Here’s a link to their fridge parts and spares ordering:
https://www.partselect.com/LG-Fridge-Parts.htm
If you want to get any replacement part – or see how much one would cost – click to enter your model number in the search bar below. Our partners at AppliancePartsPros stock almost every part with free guides on how to install them.

Remagnetizing a Fridge Door Seal
When your fridge door is not closing with its magnet, it’s understandable that you feel worried about your food spoiling and the steep cost of repairs.
Luckily, as I hope this piece has helped you better understand, addressing the most common causes behind a refrigerator door seal failing is easy. In many cases, something as simple as double-checking the gasket’s proper fit and looking at the door hinges will do the trick.
Thanks for reading. If this article was useful and answered your questions, please check out our other incredible resources below and consider subscribing to our newsletter.
Have a wonderful week!
-Craig.


Designing Modern Living Rooms from Iconic Movies

7 Tips for Heating a Room with High Ceilings (On A Budget)