
You give your generator’s pull cord a firm, confident pull. Instead of roaring to life, it makes a couple of loud bangs and cuts out. Is it broken? Can you get it working on your own, or are you looking at a costly repair job? We’re happy to report that you can often fix a backfiring generator right in your own garage.
Backfire happens when the mix of gas and air in the engine doesn’t fully combust, or when it ignites at the wrong time. This can cause fuel to spray back into the carburetor or the exhaust system. It’s not only infuriating – it can be dangerous. A bad backfire could ignite the fuel in the carburetor, causing a fire.
The good news is that you can often solve the problem with some basic maintenance. Cleaning the carburetor and spark plug may be enough to get your generator running right again. For more possible fixes, take a look at our list of 6 common reasons why generators backfire.
6 Reasons Your Generator Might Be Backfiring
#1: Choke Valve is Open
Your generator needs the right balance of oxygen and fuel to run properly. That’s why it has a choke valve to let you regulate how much air is entering the engine. This should be closed when you’re trying to start your generator. If it’s open, too much air and not enough gas will enter the engine. Instead of a smooth start, you’ll get a couple of sputtering pops and not much else.
Find the choke lever on your generator. It’s usually on the side, above the air filter. Some models have the lever built into the power knob. Flip it to the “closed” position when you’re pulling the ripcord. After the engine has been running for a few seconds, it should be hot enough that you can switch the choke to “open”.
Remember that the advice above only applies to cold-starting your generator. If you’ve only shut it off for a minute or two, it should still be warm enough to restart with the choke open.
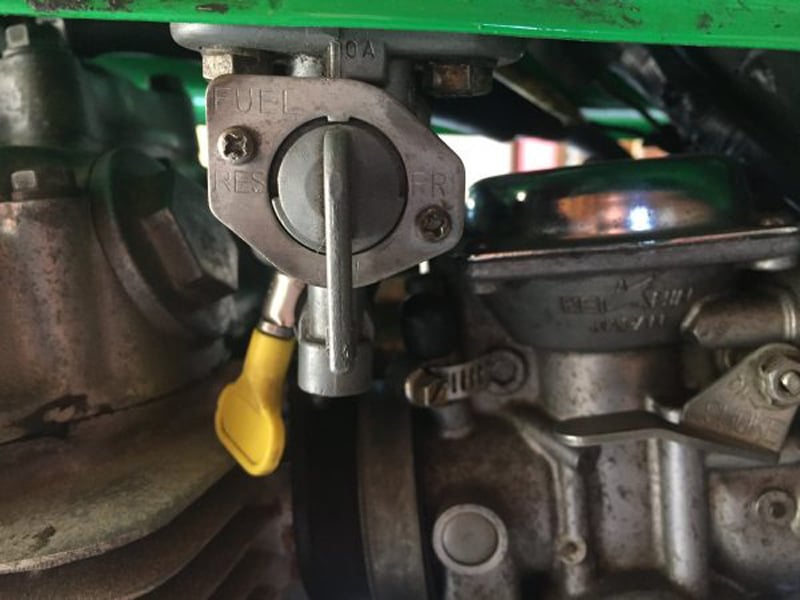
#2: Closed Fuel Valve
You should close the choke valve when starting your generator, but you need the fuel valve open. Did you leave it closed when you last shut off your unit? Don’t feel bad – that’s the right move for maintaining your generator. If you leave the valve open, gas can settle into the engine and degrade the parts.
But when it’s time to start up your generator, you need to open up the fuel valve again. Otherwise, you’re cutting off the flow of gasoline. The engine will try to start using whatever gas it still has in the cylinders. There will be enough to make a bang or two, but not enough to get the motor running.
If that doesn’t do the trick, you could have a clog in the fuel valve. See if there’s a vacuum relief knob on the gas tank and confirm that it’s open. Then get a bucket or gas can ready.
Disconnect the outlet hose from the fuel valve’s intake and try to drain a bit of fuel into the container. If it won’t flow, you might have a clog. The line itself could also be cracked. In that case, you’ll need a replacement.
If you want to get any replacement part – or see how much one would cost – click to enter your model number in the search bar below. Our partners at AppliancePartsPros stock almost every part with free guides on how to install them.

#3: The Fuel is Low or Stale
There’s one other reason that you might not see gas when you unplug the hose: the tank could be empty. We know that’s not exactly a mind-blowing insight. But sometimes even geniuses forget to double-check the basics.
Take a look at the fuel gauge. If it’s empty or close to it, you may be able to solve your problem by refilling the generator. As we noted above, trying to start it up with too little fuel will cause a backfire.
If the tank is full but the gas inside has been sitting there for months, you may still need to refill it.
Take a look at the fuel that comes out of the intake hose. If it looks cloudy or muddy, it’s no good. The smell is an important clue, too. An odor like nail polish remover or varnish means your gas has gone bad. Drain the fuel tank and fill it with fresh gas.
#4: Not Enough Oil
Ever met someone who can’t get going without their morning coffee? That’s how your generator feels about oil. Without lubrication for the fast-moving parts inside, your machine can have a hard time working properly.
If your generator is popping and stuttering when you try to start it, check the oil. Pull the dipstick out, clean it with a rag, then pop it back in. When you take it out again, check whether the oil is above the minimum level marked on the stick.
Pay attention to what the oil looks like, too. Quality is as important as quantity. Over time, engine oil degrades and gets contaminated. Clean oil has a clear golden color. If it’s dark, sticky, or full of grainy bits, you need to change it.
Your generator’s manual should tell you what kind of motor oil you need. You should also take the temperature into account. If you’re running your machine in the winter, you may need cold-weather oil.

#5: Your Carburetor is Clogged
Old fuel can also build up in the carburetor. That’s why experts recommend running your generator every so often whether you need it or not. This helps to cycle out the gasoline before it can go bad. If you’ve let your generator sit for too long, you might need to clean the stale gas out of the carburetor.
It should also be noted that ethanol gas additives tend to varnish/clog the carburetor’s jets. Ideally, use ethanol-free (gasoline), especially if the generator will be sitting idle for a long time.
You can find the carburetor at the back of your generator, behind the air filter assembly. Rubber hoses connect to the air supply and fuel tank. Follow these steps to get it running again:
- Gather Your Tools. You’ll need a small wrench, plus a flat-head and a Phillips-head screwdriver. The exact sizes will depend on your carburetor. You should also have a few clamps, a set of pliers, and a very thin piece of wire. Grab a bucket and some rags to keep everything clean. Finally, get some carburetor cleaner spray and a small brush.
- Turn Everything Off. The last thing you want when cleaning your carburetor is any kind of ignition. Make sure your engine is off. Switch off the fuel valve and take the rubber boot off the spark plug.
- Disconnect the Air Filter. Unscrew the cover on the filter assembly and take out the foam piece inside. Then remove the nuts and rubber hoses that attach the filter to the carburetor. You might need pliers to take the clamps off the hoses. Slide off the filter assembly.
- Remove the Carburetor. Clamp the fuel line and detach it from the carburetor. There should also be a metal rod and a thin wire spring attached to the throttle on top of the carburetor. Slide the throttle to one side and carefully unhook the spring with your pliers. Then detach the connecting rod and slide the carburetor free.
- Drain the Carburetor. Place your bucket beneath the carburetor and undo the small nut at the bottom. This will open the reservoir and let any fuel inside drain out.
- Clean the Outside of the Carburetor. Spray down the nooks and crannies on your carburetor’s exterior with cleaning fluid. Remove any jets and run a small wire down small passageways. Use carb cleaner to assist with this process.
- Disassemble the Carburetor. Set your carburetor down on a clean rag. Make a note of how everything is set up, especially the drain bolt and the solenoid wire. Then use your screwdrivers and pliers to take apart your carburetor. Take your time, laying each piece out on the rag so you don’t lose track of anything.
- Clean All Parts and Connectors. Spray and scrub off your carburetor piece by piece. Use your brush to get the gunk off of surfaces like the inside of the float bowl. Use your wire and some blasts from the spray bottle to clear out the tiny openings. A cotton swab can be helpful here too.
- Reinstall the Carburetor. Wash your hands to make sure you don’t get any grime on the parts you’ve just cleaned. Reassemble your carburetor and attach it to the generator again.
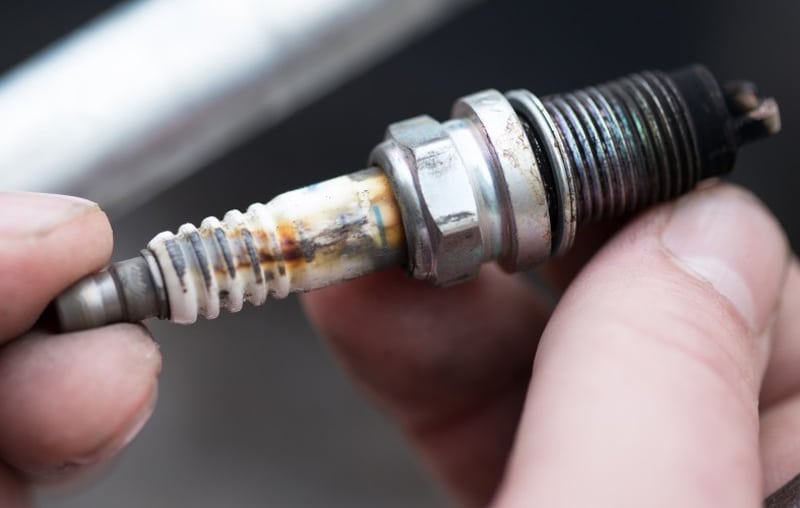
#6: Faulty Spark Plug
Sometimes the spark plug on your generator can get a little overeager. If it ignites the fuel too early, the fuel and air mix can blow back through the carburetor.
Check that your generator’s power is off. Then locate the spark plug above the engine’s valve cover. Take the rubber cap off and unscrew the plug. Most generators come with a special wrench for loosening the plug.
Look for dark or gritty buildup on the spark plug. If you find any, scrub it off with a wire brush. You can loosen it up with the same kind of cleaner we recommended for your carburetor.
Once the spark plug is clean, inspect it for signs of wear and tear. If there are any melted or blackened spots, corrosion, or broken electrodes, you’ll have to replace the plug. If not, try putting it back, but be sure to stick to your manufacturer’s torque specs. Spark plugs are steel that’s being screwed into an aluminum head, so they’re quite easy to over-torque.
What Now?
Hopefully, the steps above have solved your generator’s problem. Otherwise, it might be time to tag out and let a professional take a look at it. The issue is likely due to problems with the engine intake valve or some other internal part.

Conclusion
When dealing with a backfiring generator, don’t overlook simple stuff like checking the oil and closing the choke. If those don’t solve the problem, giving your carburetor a thorough cleaning usually will. Unless there’s a serious defect, the steps above should get your machine running again.
We hope you found this guide helpful! Thanks for reading, and don’t forget to look at our related articles for other great tips on household repairs.


Designing Modern Living Rooms from Iconic Movies

7 Tips for Heating a Room with High Ceilings (On A Budget)