We've independently reviewed this article to make sure it's as accurate as we can make it.
To find out more about our article creation and review process, check out our editorial guidelines.
Stuck trying to figure out why your tumble dryer keeps saying “empty water”?
You’re not alone! Thousands of homeowners face such issues with grumpy dryers every day.
There are a few reasons why your dryer’s empty water light is staying on, and in the following article, I’ll walk you through them and tell you how to solve each one.
If your dryer’s empty water light stays on, there’s a good chance the pump is clogged with lint, or your dryer needs a reset. Cleaning the pump and ensuring the float switch is not stuck can also help solve the problem.
Ready to sort your dryer out? Then let’s dive in!
Why trust us? This article was written by Craig Anderson and Andy Fulenchek.
Craig has helped thousands of other homeowners repair their appliances since 2016.
Andy is one of our resident appliance repair experts with over a decade of experience. He currently runs his appliance repair company with a team of trusted technicians.
Note – this post covers combi washer-dryers which have a water pump and drain. Typically most standalone dryers don’t have a way to handle water nor need it emptied (it all gets dried out!).
Solving A Dryer’s Empty Water Light – Start With The Basics
Before getting into more complex solutions, there are a few simple tricks to empty your condenser dryer and stop it from keeping the empty water light on.
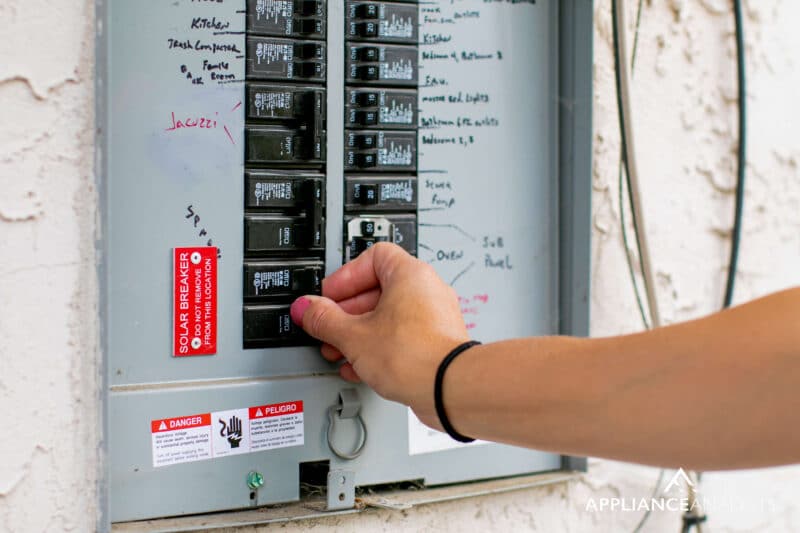
First up, try a simple power reset. Switch off the power to the dryer via your circuit breaker, give it 5 minutes, and turn it on again.
No luck?
No problem, try a software reset. The process for a software reset is different for every dryer model, so check your owner’s manual for specific instructions. Provided you don’t have your manual handy, that’s ok. Please refer to our free resource below.

If you’re still looking to roll your sleeves up and get the issue fixed, read on for some bigger fixes.
Clean the Lint Trap
When the empty water light stays on, you might be wondering how to empty your condenser dryer, and the answer is simple – let the pump do it. There’s a pump inside your dryer responsible for removing water from inside the appliance. However, if the pump is not working properly, some obstructions are likely.
From what I’ve seen over the years, lint is one of the most common culprits when your dryer is overheating or not draining properly.
One of the ways to prevent lint from clogging the pump is to clean the lint trap regularly. You must clean the lint out of the trap frequently. Lint can permeate your entire dryer, clogging the pump and causing various issues.

Cleaning the lint trap frequently will keep your pump clear, and your empty water light should no longer stay on.
How to Clean Out the Pump: 7 Simple Steps
If you have already cleaned the lint trap and the situation stays the same, chances are the dryer pump itself is failing. Below I’ll outline how to access and diagnose pump issues; however, if you feel unsure about the process, please get in touch with a professional technician for help.

Assuming you’ve decided to take matters into your own hands, there are several steps you need to follow if you want to clean your dryer’s pump.
#1 Unplug Your Dryer
Before you start working on any part of your dryer, you need to unplug it to prevent any electrical accidents. You don’t want your dryer to turn on while working on it, and you don’t want to touch a live wire accidentally.
Dryers are heavy, and the outlet they draw power from is typically behind them. If you need to move your dryer to unplug it, my usual advice is to get someone to help you to avoid getting hurt and damaging your floors.
#2 Remove the Rear Panel To Access the Hoses
Every dryer is different, and there’s a chance that to turn the empty water light off, you’ll have to remove the rear panel to access the hoses and the pump. Look at your dryer’s manual for specific instructions for your dryer model.
In my experience, most dryer models will only require a screwdriver to remove the rear panel. Ensure you have the tool handy, and keep an eye on the screws after you’ve removed them to avoid losing them.
Tip: A mechanics magnet tray or typical magnet is a great way to prevent losing the screw and bolts!
#3 Remove and Clean the Hoses
After you have removed the dryer’s rear panel, you should access the drain hoses. You may have to remove the clips to remove the hoses.
To completely clean the hoses, you’ll want to use a vacuum or a blower to remove any dust and debris. You can also use a soft microfiber cloth to clean out the inside of the hoses when you’ve removed all other obstructions.
Please be careful to avoid damaging any plastic or rubber tubes while attempting to clear the blockages.
#4 Remove and Clean the Pump
Next, you will want to remove the dryer pump as well. You should look at the manual to determine which items you are looking at is the pump. Once you remove the pump, you will have an easier time cleaning it.
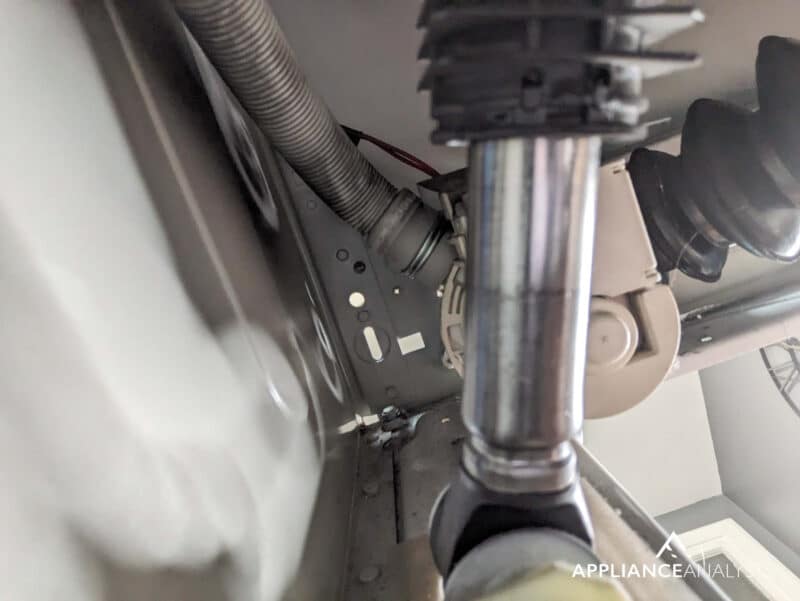
Look at the pump carefully to see what type of debris you notice. You’ll want to use a vacuum, an auger, or a microfiber to clean off the pump, depending on what it looks like.
Use caution to not cause damage to any plastic or rubber tubes while attempting to clear any blockages.
Before you finish, you should also look at the pump reservoir. Ensure the reservoir is clean and functional before you move on.
#5 Check the Float Switch
There’s a chance that the empty water light might be staying on in your dryer because the float switch is stuck.
The float switch is responsible for telling the dryer if there is still water present. If the float switch is stuck in a high position, it’ll think there’s water in your dryer, even when there isn’t.
You’ll need to use a cleaning solution to get the float switch unstuck. Since every dryer is different, I recommend you look at your manual to ensure you don’t damage the float switch during the process.
#6 Take Off the Front Panel
You’ll need to remove the front panel to keep figuring out how to empty your condenser dryer. There are usually two screws on top of the front panel. You will need to undo both screws to free the panel.
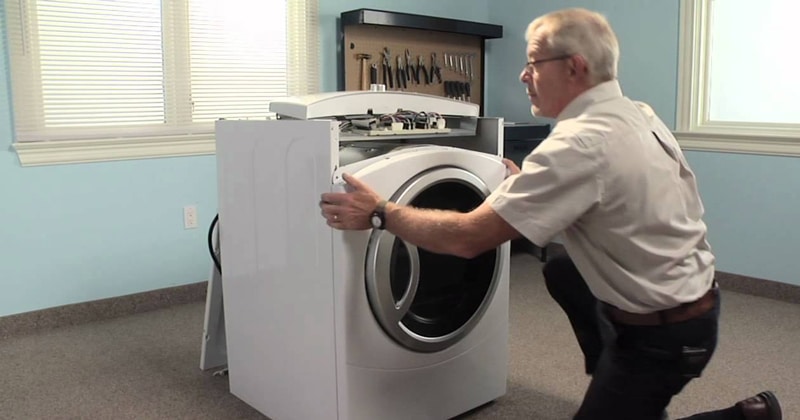
Then, you should lift the front panel up and out to access the condenser, usually located inside the cabinet and near the front of the dryer.
#7 Clean the Condenser
Finally, you should clean the condenser thoroughly when your dryer’s empty water light stays on. The condenser is responsible for regulating the amount of water that is present in the dryer. If the condenser’s clogged, it won’t work properly.
You’ll have an easier time cleaning a condenser if you can remove it from the dryer. You should reach into the condenser chamber as far as you can. Then, pull out any lint that’s present. Lint can be a serious problem that prevents the condenser chamber from working properly.
After you’ve finished all of the abovementioned steps, reassemble your dryer. Then, test the appliance to see if it works properly.
Turning Your Dryer’s “Empty Water” Light Off
Ultimately, there are several reasons why your dryer keeps saying “empty water”. Of course, it is entirely possible that there is still water present in the dryer. So, you should make sure the chamber is empty.
Once you’re sure the chamber’s empty, consider that the pump might be clogged with lint. You should disassemble the dryer and look at the pump to see if anything is getting in the way.
If you’re concerned that one or more of your dryer’s parts are not working properly, you should contact a professional who can help you determine whether replacing the parts or the entire dryer is worth replacing.
If you want to get any replacement part – or see how much one would cost – click to enter your model number in the search bar below. Our partners at AppliancePartsPros stock almost every part with free guides on how to install them.

Thank you so much for reading! If you found this guide helpful, please read our other articles below and consider subscribing to our newsletter.
Good luck!
-Craig.
Frequently Asked Questions
Should I Replace Any Parts That Are Not Working?
If, during the process, you notice one or more parts in your dryer need replacing, getting spare parts is recommended. However, it’s critical to keep costs in mind, as sometimes replacing the dryer is cheaper.
Get in touch with a professional technician that can help you calculate the cost of repair parts and decide which path to take.
How Do I Prevent the Float Switch from Getting Stuck?
First, clean the lint trap after every drying cycle so you don’t have to worry about lint traveling throughout your dryer.
Second, try to limit the amount of fabric softener you use, as it has a lot of oils that can cause the float switch to get stuck.


Designing Modern Living Rooms from Iconic Movies

7 Tips for Heating a Room with High Ceilings (On A Budget)