Anyone with a passion for clear, beautifully cold, and clean water straight from the convenience of their fridge, take note – here’s what you need to know about keeping your fridge water supply clean and constant.
The most important factor in your water quality is the state of your refrigerator’s water filter. So, how do you know if your water filter is clogged, dirty, or not working properly?
Here are some tell-tale signs that your filter needs changing:
- You haven’t changed the filter in 6 months. The recommended lifespan of your filters is 6 months unless you don’t use them very often.
- Your water dispenser is sluggish, and it takes longer to fill a glass.
- Poor Ice Quality/Quantity. The filter needs attention if you’re getting less ice dispensed or your ice is cloudy/dirty/smelly.
- Funny tasting water.
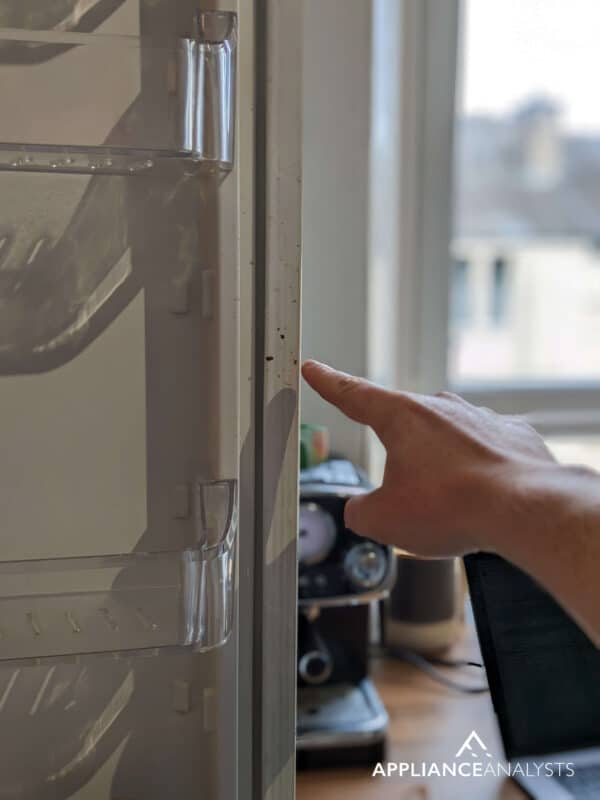
- Build up on your filter’s nozzle.
- Sediment in your glass.
- Your Indicator Light is on. Newer fridge models often have indicator lights that tell you when the filter needs to be changed.
Ready to return to crystal-clear water? Let’s go!
Why trust us? This article was written by Craig Anderson and Andy Fulenchek.
Craig has helped thousands of other homeowners repair their appliances since 2016.
Andy is one of our resident appliance repair experts with over a decade of experience. He currently runs his appliance repair company with a team of trusted technicians.
Cleaning Your Refrigerator’s Water Filter
If you’re wondering how to clean the water filter in your fridge, the answer will depend on many factors, but none are as important as age. Filters are not meant to last forever, and they need constant replacement.
However, I’ve found that sometimes the filter can be ok, and it’s the fridge that’s giving you the wrong readings.
Pro – tip: Often, indicator lights run on a timer, not on water quality. If the indicator light is on, but you’ve checked the filter, and it’s fine, you can reset the water filter indicator by finding the button(s) on the display that controls the filter indicator.
Then, hold the buttons down until the light changes.
Assuming your filter does need changing and you’re wondering what’s the simplest way to do it. Here’s what I recommend.
#1 Find the Filter
The first thing you need to do to clean your fridge’s water filter is to find it!
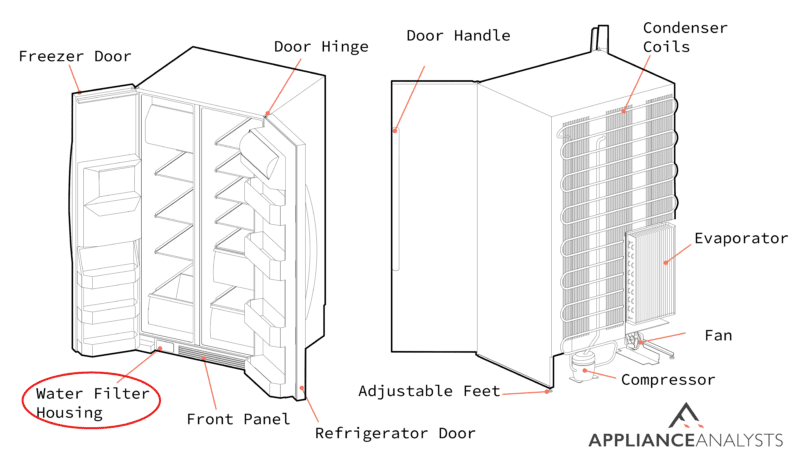
Your fridge filter will be either in the grille of the fridge at the base, in the upper right-hand corner of the interior, or inside the door. There are different models of filters, but most of them look like this:
Grab the top or side of the filter and turn it counterclockwise to disengage it. Then pull the filter out.
#2 Diagnose the Filter
The next step for cleaning your fridge’s water filter is to look at it closely and diagnose it. If you feel the filter is beyond cleaning, you must replace it. While you’re at it, I recommend checking for erosion or cracking to the pipes and connections.
If you want to get any replacement part – or see how much one would cost – click to enter your model number in the search bar below. Our partners at AppliancePartsPros stock almost every part with free guides on how to install them.

#3 Wash the Filter
Provided you determine the fridge’s filter can still be saved, my usual advice is to submerge it in a warm water bath with a gentle cleansing solution. Dish soap or water and vinegar mixture work well, or if you prefer, you can buy solvents specifically for cleaning water filters.
#4 Rinse the Filter
Let the refrigerator water filter soak for 10 – 30 minutes, depending on how soiled it is. Then, rinse under a gentle stream of water until the water comes out clear.
#5 Let the Filter Dry
Let the water filter air dry for a while, and then pop it back into its housing inside the fridge.

The Benefits Of A Working Fridge Filter System
- Your water will taste better, meaning you’ll drink more and thus stay well hydrated.
- Your water will be healthier because contaminants like protozoan parasites and heavy metals like lead and mercury will be removed.
- Household efficiency – a quality water filter will filter over a thousand gallons before it needs replacing.
- Savings – bottled water can be very expensive and unnecessary if you have a home filter.
- Eco–friendly – plastic water bottles and packaging make up a huge share of waste in landfills. Cut down on your household’s waste by using a glass or reusable travel bottle instead.
- Most filters produce ice and dispense water – no more warm drinks served at your parties!
- Quick & Easy! Refrigerator water filters store the filtered water for you on tap; there’s no waiting involved.
Inline Filters. Are They for You?
If you’re not in love with the idea of replacing your fridge’s water filter every 6 months, there are other options at your disposal.
Inline water filters can last up to 5 years with proper care and use, which, in my opinion, is a great advantage for busy homeowners. The price of an inline filter will be higher than that of a regular one, and you’ll need what’s known as a bypass plug to install it in most fridge models.
However, if you’re tired of constant filter replacement, inline filters could be the answer to your prayers.
How to Fully Clean Your Fridge’s Water Line
Now that you’ve given the fridge water filter a good clean, let’s focus on getting the rest of the water line spotless as well, as it can improve your fridge’s performance and the quality of the water it dispenses.
The water line is the line/pipe that delivers water to your fridge. Please note that different fridge models will vary slightly, so always refer to the manufacturer’s manual or helpline.
From what I’ve seen over the years, a fridge water line/ice supply line is typically at the back of the fridge and has a length of ¼ inch piping/tubing, which can be copper, braided copper, colored, or clear in appearance.
Please refer to your fridge’s manual to double-check that you’ve found the right input pipe!

Pro tip: The water line will connect to the closest cold water source, so if the pipe goes to your closest tap, you’ve got the right pipe.
To clean your fridge’s water line, you’ll need:
- A Bucket or large container.
- Towels.
- White Vinegar.
- A Funnel.
- A Screwdriver.
- Clamps
Here are the steps you’ll need to follow to clean your fridge’s water line:
- Unplug the refrigerator and turn the water valve off. Usually, the valve is on the wall behind the fridge. If not, shut off your main water supply valve, likely located in your basement.
- Use the screwdriver to unscrew the water line and leave the dispenser line attached to the door nozzle.
- Take out the reservoir (often found behind the crisper) and empty the water out. Clean the reservoir with 1 cup of vinegar per gallon of water. Flush water through the reservoir several times and then reconnect the tubes by pushing them together until they lock into place.
- Take 3 cups of vinegar and pour them into the ice maker and dispenser lines using the funnel. Let the vinegar sit in the lines for 10 minutes. Clamp the open ends of the lines so that the vinegar doesn’t leak out.
- Drain the ice maker line with clean water and reattach it to the fridge.
- Run the vinegar from the water line through the dispenser and into a bucket.
- Flush both lines with clean water to remove contaminants and vinegar.
- Take the ice maker bin and wash it in warm vinegar water. Rinse and dry, then return the bin to the refrigerator.
- Hook the water line back up to the ice maker, and ensure to dispose of the first batch of ice made.
For your optimal health and to preserve the working looks of your refrigerator, it should be cleaned monthly. Follow the steps above for easy cleaning!
Pro – tip: Schedule your fridge cleaning sessions for when the fridge is emptiest; you’ll have fewer items to remove and replace!
Cleaning A Fridge – A General Scrubdown
If you’ve still got your sleeves rolled up and want to clean the rest of the fridge, I got you covered.
Here are some general fridge-cleaning tips to make yours as good as new.
♦ Unplug your refrigerator. Place any items that will get in the way of your cleaning into a cooler with ice.
♦ Clean the interior with a soft sponge and detergent. Use a soft clean cloth/sponge and mild detergent to clean. Do not use abrasive or textured cleaning agents, and avoid using cleaning tools like steel wool – as they’ll damage your appliance’s finish.
♦ Remove the base grille to find the drip pan under the fridge. If the drip pan’s full of water, mop it up with paper towels, then pull it out and wash it with warm soapy water. If your drip pan’s fixed in place, wrap an absorbent cloth around the head of a long-handled brush soaked in soapy water and clean.
♦ Remove detachable parts like shelves and bins. Allow the parts to warm up to room temperature BEFORE you clean them – if they are directly exposed to warm water, they may get thermal shock and crack or break.
♦ Fridge exterior – wipe the doors down with a cloth moistened with mild soap and water. Please pay special attention to the areas around the door handles, as they’re often full of finger smudges!
For stainless steel fridges, use commercial stainless steel spray and wipe in the direction of the grain, then dry off to prevent streaking.
♦ Clean the door gaskets. The fridge door won’t seal tightly if the gaskets are not kept clean.
Getting Clean Water From Your Fridge’s Filter
Wondering how to clean the water filter in your fridge is normal – especially when you’re getting funny-tasting water and ice cubes.
Luckily, as I hope this piece has helped you better understand, cleaning your refrigerator’s water filter and entire water line is simple. Getting an inline filter can be a wonderful option if you’re tired of constant replacements.
Thanks for reading. If this article was useful and answered your questions, please check out our other resources and free guides below and consider subscribing to our newsletter.
Have a great week!
-Craig.


Designing Modern Living Rooms from Iconic Movies

7 Tips for Heating a Room with High Ceilings (On A Budget)