All you want is to pull a refreshing pint from the new keg you just tapped. But your faucet won’t cooperate – you open it up and nothing comes out. Now that delicious hazy IPA is just sitting in your keg, taunting you. We’ve laid out the 6 most likely reasons why beer isn’t pouring from your tap. And we’ll tell you how to fix each one.
Check the beer lines for blockages like ice, grime, or kinks in the hose. You might also need a replacement seal on part of your keg. Next, make sure there’s gas in the CO2 tank and the regulator is working. Other possible causes include ice in the keg, a faulty coupler, and hop sludge in the dip tube.
Get started with our guide below, and you’ll be filling glasses again before you know it.
The 6 Reasons Your Kegerator May Not Be Pouring
#1: Leaks or Clogs in the Beer Line
We’ll start our troubleshooting at the business end of your kegerator and work backward. Take a look at the beer line that’s carrying your brew to the faucet. It could be kinked, in which case you can fix it by straightening it out.
There might also be a leak, which should be easy to spot. You’ll see dried beer crusted on the outside of the line, or liquid dripping out.
Beer lines can also sometimes freeze if they’re too close to the cooling element in your kegerator. In that case, you may want to raise the thermostat a bit. And if you haven’t cleaned the lines in a while, they may clog up with gunk.
You should disconnect and clean the beer lines even if you don’t see an obvious problem with them. It’s important to rule this issue out. Disengage the coupler first so that you don’t get beer pouring out when you take the lines off. Then wash your lines with a cleaning kit, or use a wire brush and some PBW cleaner.
We’d advise you to disassemble and clean your beer faucet while you’re at it. Blockages here are less common, but still possible.
#2: Keg Leak
When your tap stopped pouring, we’re guessing your first thought was “There’s no way I drank that whole keg already.” You may not have – but you could be running out anyway. A leaky keg can lose both beer and CO2, which can keep it from pouring.
A big puddle of beer in the fridge is an obvious sign of a leak. To check for more subtle breaches, mix a small amount of StarSan or dish soap in a spray bottle. Make sure the keg is pressurized, then spritz your solution over the top. Any spots that fizz and bubble are leaks.
Possible sites for leaks include:
- The o-ring that seals the lid.
- The pressure relief valve.
- The small poppet valves inside the keg post.
- The dip tube seal. A problem here usually causes leaking at the bottom of the post.
- The o-ring at the top of the post.
If this is a keg you own, it won’t cost you much to replace the leaky part. If it’s from a commercial brewery, you may want to ask for a refund.
#3: No Gas
Your beer can’t get to the faucet without pressure from compressed carbon dioxide. When your kegerator won’t dispense, check whether the gas is flowing.
Start with the valve at the top of the tank. If you’ve been fiddling with your kegerator settings, there’s a chance you left it closed. You can just open the valve to pressurize your keg again. We won’t tell anyone you goofed up.
The next step is to see if there’s still CO2 in the tank. Check the tank pressure gauge on your regulator if it’s got one. Do you have gas left? Then pull the pressure relief valve on your keg to see whether CO2 comes wooshing out.
If it doesn’t, and you’ve already ruled out a keg leak, then somehow the CO2 is escaping on its way to the keg. Check for leaks in the line and regulator the same way you did for your keg.
Sometimes the pressure release valve on the regulator can also get sticky and fail to close. Try pushing it back in.
If that doesn’t work, you might need to clean the backflow valve. When this part clogs, it can stop CO2 from passing through. Shut off your CO2 tank and remove the regulator. Unscrew the nut on the outflow nozzle and take out the small tube inside. Soak this in sanitizer and scrub it with a wire brush.
Once you put your regulator back together, you should have a steady flow of gas again.
#4: Coupler Mismatch or Blockage
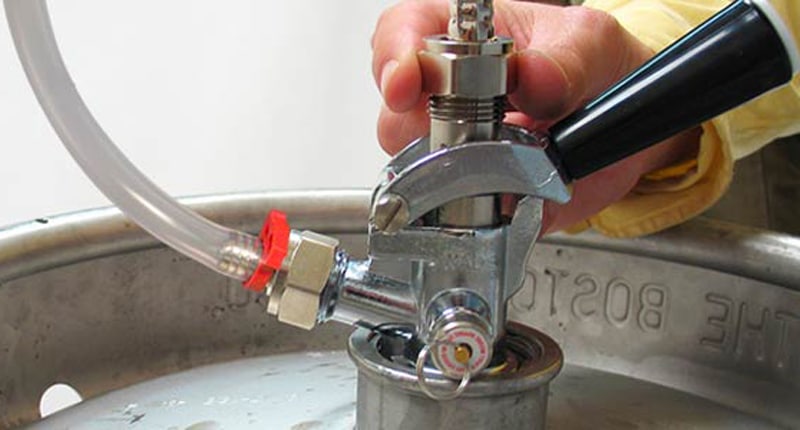
The next thing to look for is a problem with the coupler. That’s the piece that connects your keg, your CO2 input, and your beer lines. There are several different styles of couplers, and different kegs fit different kinds.
Confirm that you have the right type of coupler for your keg. When there’s a mismatch, your beer will pour badly or not at all. For most American-brewed beers, a Sankey D-Style coupler is the right pick.
There might also be an internal blockage. Most couplers have a little plastic marble inside called a check ball. This helps prevent backflow from the lines into the keg. But if the retainer that holds it in place is missing or broken, the check ball will stop the flow in both directions.
Disengage the coupler and unscrew it from the keg. Now remove the beer line and look inside the central tube of the coupler. Is there a little plastic ring inside the top? Or does the check ball roll right out when you tilt it over?
If the ball is loose, you have two options. One is to get a replacement retainer. The other is to get rid of the check ball. This piece can cut down on the mess when you change beer lines, but your draft setup will work fine without it.
#5: Ice in the Keg
If you’re like most Americans, you prefer your beer frosty. So you might have set your kegerator’s temperature as low as it can go.
The problem is that you can sometimes freeze your beer this way. The keg doesn’t need to be frozen solid to cause problems – chunks of ice and slush inside can block the outflow. Try turning up the heat a bit. Many beer styles are best served at temperatures in the low 40s, and even lagers are usually fine around 38 degrees.
#6: Clogged Dip Tube (Homebrewers Only)
Is this a beer you brewed yourself? Did you dry-hop it by putting loose hops right into the keg? In that case, those delicious cones may be blocking your draft pours. A keg’s dip tube extends almost to the bottom of the vessel. That means the sediment from dry-hopping can bunch up at the entrance and block it off.
Release the pressure in your keg and remove the beer post. Take out the dip tube and use a wire brush to clean it out. Make sure you sanitize it before putting everything back.
There are a few strategies you can use to avoid this problem in the future:
- Trim the tube. If you cut off the bottom half-inch or so of the dip tube, it will be less likely to push down into the sediment.
- Add a screen. You can place a screen around your dip tube to block out the hop chunks.
- Use a hop spider. Keep your hops contained instead of letting them float all around the keg. Your options range from a simple nylon bag to a rigid mesh container.
Conclusion
Your beer isn’t doing you any good stuck in the keg. To get it pouring again, make sure your beer lines are clean and your keg isn’t leaking. Then check for issues with the CO2, the coupler, and the dip tube. Thanks for reading, and don’t forget to look at the other articles on kegerator upkeep that we’ve linked below!


Designing Modern Living Rooms from Iconic Movies

7 Tips for Heating a Room with High Ceilings (On A Budget)