Your vacuum cleaner helps you keep your home neat, tidy, clean, and fresh. Without it, what would you do?
Well, you might find out if your vacuum cleaner is making strange noises, smoking, or emitting burning odors. These are signs that your vacuum cleaner is not only overheating but also on its last legs. Your vacuum is simply not operating the way it should—or at all.
After excessive use and/or age, this can happen due to wear and tear on the motor and various other appliance parts. As the motor struggles more and more, it will become hotter and hotter. At some point, it will start to overheat. This is when you start to experience the noises, smoke, and odors.
If you’re lucky, the vacuum will cool down and power back up. However, there are instances when the vacuum will simply refuse to work ever again.
The good news is that there are a few things that you can do yourself to try and repair an overheating vacuum cleaner and keep it from occurring again, so you can have a properly working vacuum cleaner in your home.
How to Fix an Overheating Vacuum Cleaner
When it comes to figuring out how to fix an overheating vacuum cleaner, you essentially must determine why your unit is overheating in the first place. Ultimately, a vacuum overheats because there isn’t sufficient airflow to allow the appliance to cool down. There are several reasons for this, and multiple fixes. Keep reading to find out the steps to follow to get your overheating vacuum back to normal.
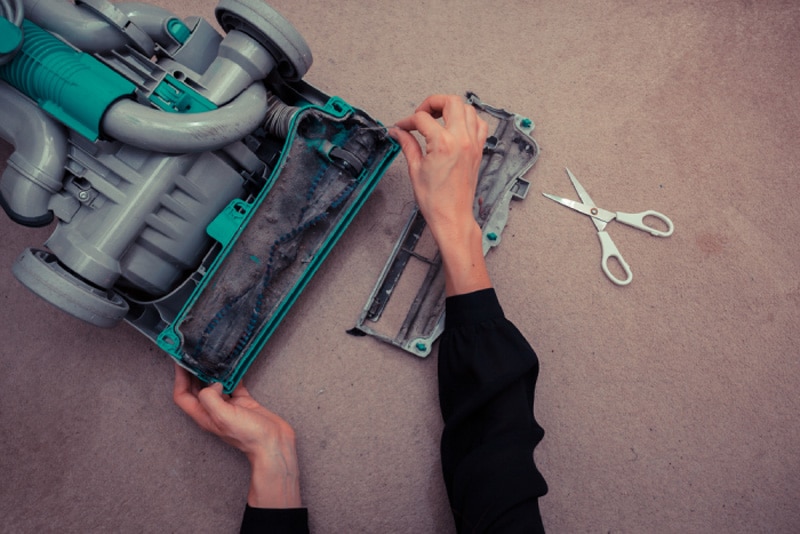
Step 1: Clean Out the Dust Canister or Bag
Ideally, the dust canister should be cleaned out after every use. If your vacuum uses a dirt bag, then it should be changed when it becomes roughly 75 percent full.
Failing to do so can result in the canister or bag becoming too full. When this happens, there is nowhere for the dust and dirt to move around. As a result, it makes its way to the inner parts of the vacuum while also keeping the unit from picking up more particles.
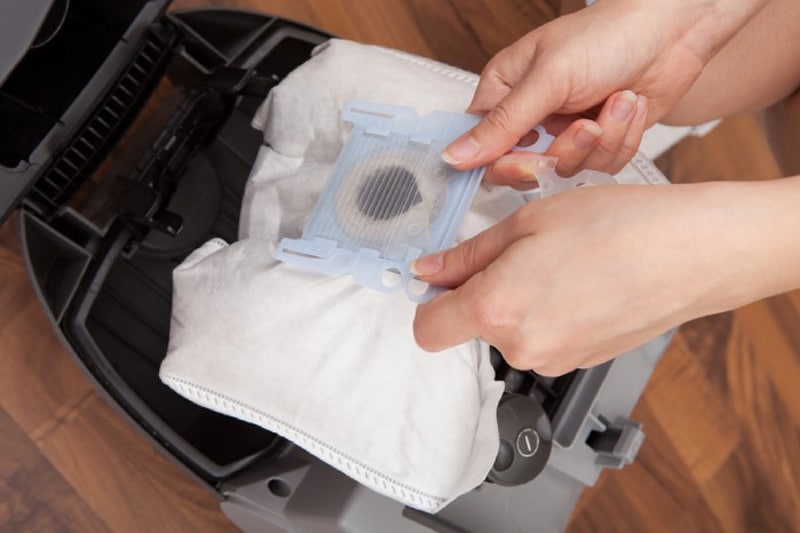
The debris may end up collecting on the motor or clogging the appliance. Eventually, you can expect for the vacuum to end up jamming, overheating, and shutting down.
So, by emptying out the canister or bag, you may be able to quickly and easily get your vacuum working again. If this indeed works, make sure to add this task as part of your routine maintenance when vacuuming to help prevent this problem from occurring again. If this does not work or the canister or bag was not full, proceed to the next step.
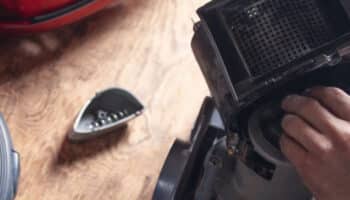
Step 2: Check the Filter
The air filter is designed to clean the air that comes into the vacuum. It also captures dust and dirt particles if they make their way into the appliance. As with other types of air filters, it will become dirty and clogged over a period of time. When this happens, it will become less efficient, resulting in the vacuum motor working harder.
If the air filter is clogged and isn’t changed in a timely manner, the motor is likely to overheat. To solve this issue, use a damp cloth to clean the air filter or replace it, depending on the make and model of your vacuum. Before placing the filter back into the unit, allow it to dry completely.
For the best care instructions regarding your vacuum’s air filter, refer to your owner’s manual. Some filters are non-washable, which means you’ll need to replace them.
Maintaining the air filter will not only prevent overheating in the future, but it will also extend the lifespan of your vacuum.
Step 3: Check for Potential Obstructions
Sufficient airflow is more important than you realize for your vacuum to remain operational. When there is not adequate airflow inside of the vacuum, it could result in the motor overheating.
One reason for insufficient airflow is obstructions. If something has gotten caught in a hose or attachment, it will block air from reaching the necessary parts of the unit.
To check for obstructions, take a close look at all of the hoses, brushes, and attachments. Look for any signs of large pieces of debris, balls of hair, clumped dirt, etc. Pay special attention to the brushes, as carpet piling, hair, string, and threads can get caught in them and keep it from rolling the right way.
Step 4: Check the Condition of the Belt
Since you are already checking for obstructions, make sure to also check the unit’s belt. There is a chance that the belt may have broken, resulting in the motor revving up too much and overheating. This happens because there is no resistance on the motor from the belt and roller brush if the belt is not in its proper place.
Usually, a belt will tear or break as a result of an object obstructing the brush. Of course, it’s also possible for belts to wear out over time due to age and overuse. Regardless, check the state of the belt to determine if it needs to be replaced, as this could solve the overheating issue if nothing has worked up to this point.
If you want to get any replacement part – or see how much one would cost – click to enter your model number in the search bar below. Our partners at AppliancePartsPros stock almost every part with free guides on how to install them.

Step 5: Check for Electrical Issues
If you have had no luck with the previous steps, there may be an electrical issue. First, check the vacuum’s cord. Carefully inspect every inch of the cord for any kind of damage. Look for indentions, breakage, cracks, and wires. If you notice any damage at all, purchase a new cord. Avoid using the vacuum until you’re able to replace the damaged cord with a new one.
If there is not obvious external damage to the cord, and you’ve double-checked the outlet to ensure it is working properly, there could be a bigger issue at play. There could be internal parts of the motor that have broken, impacting its performance. A professional will need to address this problem. If your vacuum happens to still be under warranty, you likely won’t have to pay anything to have it repaired.
Step 6: Let the Vacuum Cool Off
Once you have performed all of the aforementioned steps, it is imperative that you give your vacuum a chance to cool down. When the motor is hot, it won’t operate properly. In fact, if you run a vacuum while it is still hot, you could cause internal damage. This is particularly true if the internal components that are designed to shut the vacuum off when it starts to overheat have suffered damage and aren’t working properly.
Once the vacuum has cooled off completely, try to power it back on. It should hopefully operate normally. If it does, then great! If the vacuum continues to overheat and give you issues, the appliance could be beyond simple DIY repair, requiring professional assistance due to a more serious underlying issue. Contact a vacuum repair specialist near you.
Having a vacuum cleaner that overheats is no fun, but it is usually a relatively simple fix that you can perform yourself. By following the aforementioned steps, you should have your overheating vacuum working for you again in no time at all.
Thanks for reading! When you run into trouble with other appliances, we probably have an article to help you out. Check out some of our other articles below.


Designing Modern Living Rooms from Iconic Movies

7 Tips for Heating a Room with High Ceilings (On A Budget)