
Is it possible to lift a water heater without hurting yourself? Yes, it is! In fact, this article will show you not 1, but 2 methods you can use to get the job done.
Here are 2 ways to lift a water heater
| Method 1 | Method 2 |
|---|---|
| 1. Drain the water | 1. Drain the water |
| 2. Remove any inputs | 2. Remove any inputs |
| 3. Walk the heater onto a ramp | 3. Create a handle to lift the heater |
| 4. Move the heater onto a dolly | 4. Slide two steel bars under the handle |
| 5. Squat to lift it | |
| 6. Slide a dolly under the heater |
Water heaters can weigh hundreds of pounds. This means that it’s really important you find a safe way to lift yours. I’ll explain these two methods in more detail below.
Method 1 – Using a Ramp and a Dolly
No matter how much training you’ve been doing lately, there’s nothing that will prepare you for lifting a water heater. And we’ve all hurt our backs in the past, lifting something we shouldn’t have. So, let’s avoid the weeks of agony and the costly trip to the chiropractors by doing the job right.
Here’s the first method that will help you complete your mission to move a water heater without throwing out your back. This is a great method that only requires a couple of basic tools.
Below is a list of everything you will need to get the job done.
You Will Need
- Garden hose
- Adjustable wrench
- Ramp
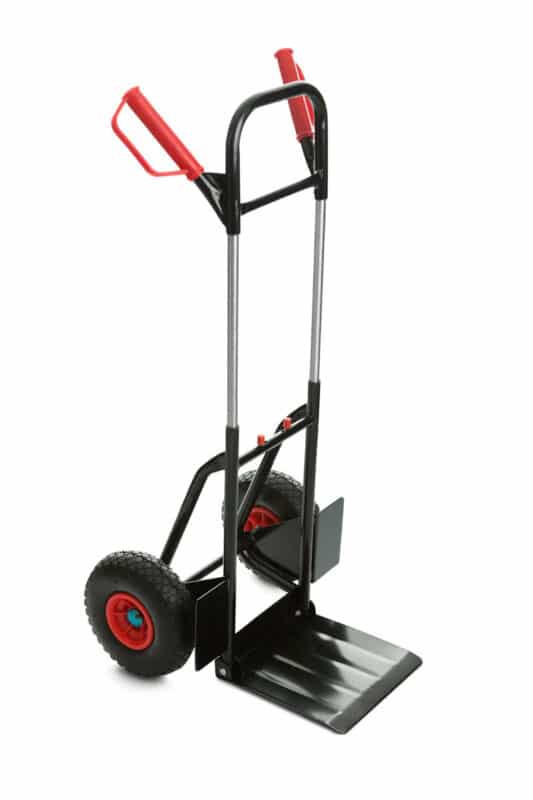
- Dolly
Once you’ve gathered your equipment, meet me at step one.
Step 1 Drain the Water
The water inside your water heater will add hundreds of pounds of unnecessary weight to the unit. So, it’s best to drain the water before you attempt to move it.
To drain your water heater, do the following.
- Switch off any electric or gas power to the water heater
- Shut off the water heater’s water supply
- Connect a garden hose to the drain valve of the water heater
- Run the other end of the hose outside of your home or into a floor drain
- Open the drain valve on the water heater. Once the water stops pouring out of the hose, it is empty.
Step 2 Remove Any Inputs
Before you can move your water heater, you will also need to remove any inputs from the heater. This means anything that is connected to it.
To remove the inputs from your water heater, do the following.
- Disconnect the water heater flexible pipes from the house plumbing. You can use an adjustable wrench for this job.
- Turn off the gas at the water heater and the gas manifold
- Remove any electrical connections
- Remove the exhaust and set it to one side
Step 3 Walk the Heater Onto a Ramp
Now all the preparation work is done, you can finally start moving your water heater. Remember, you should never lift the water heater with your back. Allow gravity to pull it into the place you need it.
Here’s how you can start to walk the water heater onto the ramp.
- Set up a ramp just below the water heater
- Grab the water heater by the water connections on top of it. Tilt it towards you as you step backward. Tilt the water heater onto the ramp. Allow it to slide off the stand onto the ramp.
- Walk the heater slowly down the ramp onto the floor
Ok, but what if you are moving a water heater from the ground up? Then you can use the same method. This time, line the ramp at the base of the water heater. You can then walk it up the ramp using the water connections as levers.
I get it, some things are better seen than explained. So why not take a look at how you can get your water heater up and down a ramp in this tutorial video.
Step 4 Move the Heater Onto a Dolly
You will now need your dolly or hand cart. Make sure you grab a buddy for this step.
- Move the dolly to the base of the water heater
- Hold the water heater by the water connections on top of it. Lean it onto one side and have a friend push the dolly underneath it.
- Use the dolly to wheel the water heater wherever you need it
Method 2 – Using a Handle and a Dolly
Ok, so here is an alternative method that you can use to lift your water heater. This method is great for heaters that are especially heavy that you couldn’t walk up and down a ramp. This time, you will see instructions on how to make a handle for the heater and move it onto a dolly.
Here’s a list of everything you will need for this method.
You Will Need
- Garden hose
- Adjustable wrench
- ¾ inch elbow
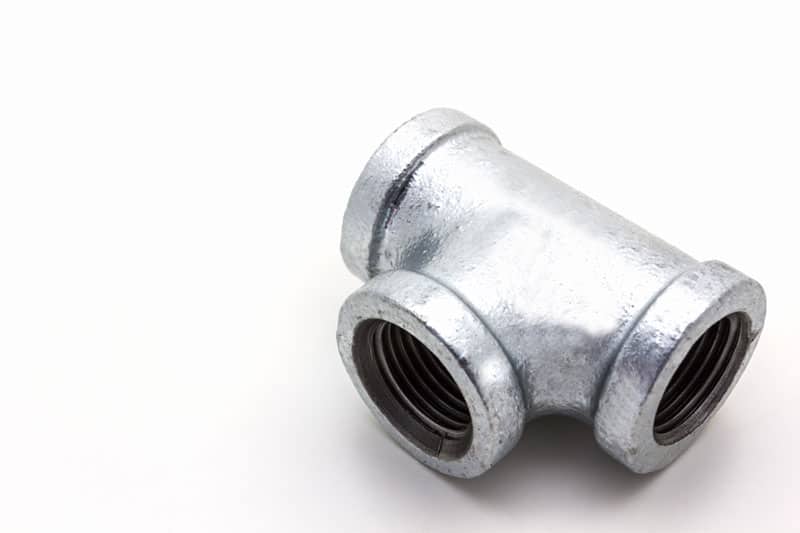
- ¾ inch tee with 3 holes
- ½ inch pipe
- 2 galvanized steel bars
- 8 screws
- 2 blocks of wood
- Power drill
- Dolly
Step 1 Drain the Water
You need to start by draining the water from your water heater. This will make it lighter for you to move.
To drain yours, do the following.
- Connect a garden hose to the drain valve of the water heater
- Run the other end of the house outside of your home or into a floor drain
- Open the drain valve on the water heater. Once the water stops pouring out of the hose, it is empty.
Step 2 Remove Any Inputs
Before you can move your water heater, you will also need to remove any inputs from the heater. This means anything that is connected to it.
To remove the inputs from your water heater, do the following.
- Disconnect the water heater flexible pipes from the house plumbing. You can use an adjustable wrench for this job.
- Turn off the gas at the water heater and the gas manifold
- Remove any electrical connections
- Remove the exhaust and set it to one side
Step 3 Create a Handle to Lift the Heater
The next thing we are going to do is to create a sturdy handle that will assist you with lifting the heater. We will make the handle attach to the two water connections on top of your water heater.
Here’s everything you need to do to make the handle.
- Attach a ¾ inch elbow onto the hot water side of the water connection
- Attach a ¾ inch tee with 3 holes onto the cold water side of the water connection
- Thread a ½ inch pipe through the tee into the elbow to join the two together. Use the wrench to tighten and line up the connection properly. The length of the pipe you need will depend on the size of your water heater.
Step 4 Slide Two Steel Bars Under the Handle
Now you’ve prepared the handle, you are almost all set to start moving the water tank. You will need to grab your 2, galvanized steel bars for the next step. You’ll also need 2 blocks of wood, 8 screws, and a power drill.
With your screws and wood at the ready, here’s what you’ll need to do.
- Drill the screws partially into the wood in a square pattern. Use 4 screws for each block of wood.
- Use the power drill to drive the screws into the backboard behind the water heater. One block should go on either side of the heater. The blocks should be placed at the same width as the inner side of the handle.
- Slide the bars under the handle. One bar on each side of the handle. You will use the bars as a lever. Both bars should rest on top of a block of wood.
Step 5 Squat to Lift It
Before attempting this step, make sure that you’ve got someone to help you. You will need them to slide the dolly under the heater once you’ve lifted it.
With your bars in place on top of the blocks of wood, push up on them while squatting to lift the water heater.
Step 6 Slide a Dolly Under the Heater
While you’re lifting the water heater, slide a dolly under it. You can use the dolly to wheel the heater wherever you need it.
Conclusion
Are you trying to lift a water heater? Then doing so without hurting yourself doesn’t have to be an impossible feat. I’m sure the 2 methods in this article have shown you what you can do to move yours without putting your back at risk.
Has this article been helpful to you? If so, then why not check out some of our other articles and free guides? You could even sign up to our email list.
Have a great day!
-Craig


Designing Modern Living Rooms from Iconic Movies

7 Tips for Heating a Room with High Ceilings (On A Budget)