
Is your ceiling fan stuck humming, but the blades aren’t turning? Stuck fan blades are actually a common problem for ceiling fans, and it can have a variety of causes. If your fan is sitting there just humming, you want to get it fixed as soon as possible.
A broken ceiling fan can cost you a ton of money on energy bills. Your ceiling fan is still one of the best solutions to lower your energy costs when it comes to heating or cooling your home. So, what causes the motor to hum?
The first step in fixing a ceiling fan that hums but won’t turn is to check your circuit breaker as well as the switch that controls the fan. Then, try manually rotating the blades, and if they don’t spin, you know you have a problem with the ball bearings. The last thing you can try is to open the fan’s housing and check to ensure nothing is burnt out or disconnected.
Let’s take a look at what you must do to fix your ceiling fan!
What You’ll Need to Fix Your Ceiling Fan Motor
You’d be surprised by how few tools you need to repair a ceiling fan motor. In most repairs, all you’re really going to need is a screwdriver and replacement parts. Ceiling fans are deceptively simple to work on and repair.
In my experience, the only tricky thing to remember here is the electricity that flows into the appliance. You must always err on the side of caution and cut power to your ceiling fan when working on it. Cutting power to the fan can most easily be done by flipping the circuit on your circuit breaker that controls the room that the fan is in.
Here’s a general guide for the supplies you’ll need to do the repairs and our walkthrough.
- Screwdriver Set.
- A multimeter or a Non-contact Voltage Tester.
- Needle Nose Pliers.
- Ball bearing puller.
- Wire Cutters.
- Replacement Parts as Needed.
Step By Step Guide for Fixing A Ceiling Fan
Let’s start by doing some troubleshooting to find out why the fan isn’t spinning properly.
Troubleshooting Your Fan’s Motor
Troubleshooting your fan’s motor is critical. Let’s walk through a few techniques that can point you in the right direction.
- If your fan has a light built into it, try turning it off and leaving it on. I’ve found that if the light turns on, it’s a clear sign that there’s enough electricity going to the fan to power it. If the light doesn’t turn on, though, you know you have an electrical problem.
- Turn on your fan and manually spin the blades clockwise. If the blades either start spinning or start rotating counterclockwise, you know you have a burnt-out capacitor.
Bad Switches
The problem might not be with the fan itself but with the switch that controls it. Let’s test the switch to ensure that it’s able to work properly.
You can use a multimeter or a non-contact voltage testing tool to ensure electricity is running through the switch that controls your fan. From what I’ve seen over the years, if it turns out that no electricity is running through the switch, you must consider replacing it and checking your circuit breaker.
Here’s how to replace a ceiling fan switch:
- Shut off power to the room that the switch is in.
- Unscrew the broken switch.
- Use your smartphone to take a picture of the wiring so you can rewire it correctly.
- Detach the wires connected to the switch.
- Attach the new switch following the picture you took of the wiring.
- Screw the new switch’s housing back into the wall.
- Turn the power back on.
Now, let’s head into the basement or the garage to check on your circuit breaker.
Check Your Circuit Breaker
A circuit breaker tripping can also explain why your ceiling fan is humming but not spinning. There are a lot of different things that can cause your circuit breaker to trip. The most common is an overload. Your circuit breaker is designed to prevent too much power from running through the electrical wiring in your home, and it trips when it detects too much voltage.
Circuit breakers are typically labeled so that you know which outlets are controlled by which switches. All you need to do is flip the switches for the room you’re looking to control, and power should be restored to the specific room. If your circuit breaker isn’t labeled, please take some time to flip switches and write new labels for what is controlled by which switch.
Check The Direction Switch on Your Fan
The next possible reason your ceiling fan is humming but not spinning is that the direction switch is improperly positioned.
From what I’ve seen on almost every fan model, there’s a small switch on the side of the fan itself. The switch changes the direction in which the blades rotate. One direction will cause the blades to rotate counterclockwise, and the other direction will cause the blades to rotate clockwise.

You change the direction in which your fan’s blades rotate to adapt to the seasons. In the summer, set your ceiling fans to rotate counterclockwise, which creates a cooling downdraft. In the winter, set your fan blades to rotate clockwise, which helps to move hot air through your home.
If the direction switch is stuck in the middle, it can cause your fan to hum while the blades don’t rotate. Certain fan models have switches that can get stuck in the middle, sending mixed signals to the fan’s motor. You must check the directional switch on your fan to avoid burning out the motor.
Does Your Fan Have a Dimmer Switch?
A faulty dimmer switch can also explain why your ceiling fan is humming but not spinning.
It’s rare to find a dimmer switch on your wall that can control your fan’s motor. In fact, dimmer switches on walls are designed almost exclusively for lighting and do not have enough power to control fan motors. However, some dimmer switches are wired into fan motors, which can lead to problems controlling your fan.
If you have a dimmer switch connected to a ceiling fan, try cranking the dimmer switch to its maximum setting. The process should deliver enough electricity for the fan’s motor to kick in and stop humming. However, cranking the dimmer is only a temporary solution.
Please follow the instructions in our second tip to replace the dimmer switch with a proper switch for controlling your fan.
Replacing a Dead Capacitor
A dead capacitor is a common cause for a ceiling fan motor that hums but doesn’t spin. You can tell if a capacitor is burnt out because it will often be visibly charred or cracked open. Here’s how you can quickly get your capacitor replaced:
- Cut power to your ceiling fan by flipping the corresponding switch in your circuit breaker.
- Unscrew your fan from the ceiling mounting and slowly lower it.
- Disconnect any wire harnesses that keep it connected to the ceiling.
- With your fan safely on the ground, disassemble the top motor housing.
- Use wire cutters to cut the red and white wires that connect to the capacitor.
- Unscrew the old capacitor.
- Screw the new capacitor in.
- Strip the red and white wires using the wire cutter.
- Attach the wires red to red and white to white and wind them together.
- Use a wire nut and electrical tape to attach the wires safely.
- Reassemble your fan’s motor housing.
- Safely reinstall your fan.
- Turn the power back on and enjoy the fresh air.
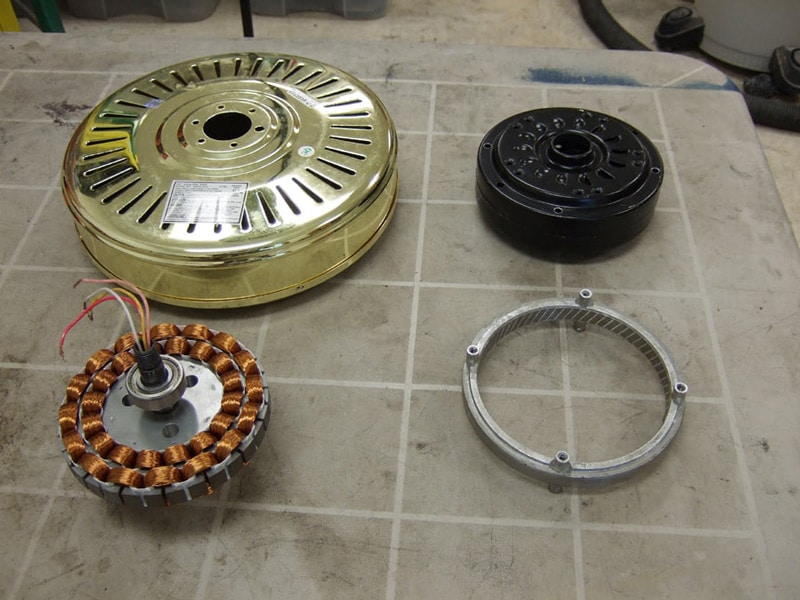
Ball Bearing Problems
If your ceiling fan is still humming but not spinning or makes a grinding noise when you manually move the blades around, you’ve probably got some worn-out ball bearings.
Fixing your ceiling fan’s ball bearings is one of the most challenging repairs you can do on your fan. In fact, most people would recommend simply buying a new ceiling fan if the ball bearings are worn out. Certain ceiling fan models have difficult-to-repair ball bearings that aren’t worth the struggle.
Here’s a general guide for replacing worn-out ball bearings on a ceiling fan.
- Cut power to the ceiling fan by flipping the corresponding switch on your circuit breaker.
- Unscrew the ceiling fan from its mounting.
- Slowly lower the ceiling fan and support its weight.
- Disconnect the wire harness so that you can set your ceiling fan down on a table.
- Disassemble your ceiling fan motor. The process will vary based on manufacturers, but there should be a series of screws you can unscrew to reach the ball bearings.
- Use a ball-bearing puller to remove the old bearings.
- Install the new bearings.
- Reassemble your fan motor.
- Reconnect the wire harness.
- Securely reinstall your ceiling fan back into its housing in your ceiling.
- Restore power and enjoy a refreshing breeze.
Getting Your Ceiling Fan to Stop Humming and Spin
That about covers it!
When your ceiling fan is humming but not spinning, you can quickly start getting worried about the appliance being broken and the cost of repairs that entails.
Luckily, as I hope this piece has helped you better understand, addressing the most common causes behind a ceiling fan that’s humming but not spinning is easy and quick. More often than not, checking the position of the fan’s switches and observing the dimmer switch closely will do the trick.
Thanks for reading. If this article was useful and answered your most burning questions, please check out our other resources and free guides below and consider subscribing to our newsletter.
Have a great day!
-Craig.


Designing Modern Living Rooms from Iconic Movies

7 Tips for Heating a Room with High Ceilings (On A Budget)