We've independently reviewed this article to make sure it's as accurate as we can make it.
To find out more about our article creation and review process, check out our editorial guidelines.
Does your dryer lack an outside vent?
Ensuring your dryer can vent safely is crucial to keep it from overheating, care for your clothes, and prevent fire hazards.
Luckily, you’ve come to the right place for answers.
If you can’t vent your dryer outside, use an indoor vent kit. However, it’s crucial to remember that you should never vent a gas dryer indoors, as it could lead to carbon monoxide poisoning. Use the indoor dryer vent kit only with electric dryers that are compatible with it.
Read on to learn more about how to vent a dryer without outside access!
Why trust us? This article was written by Craig Anderson and Andy Fulenchek.
Craig has helped thousands of other homeowners repair their appliances since 2016.
Andy is one of our resident appliance repair experts with over a decade of experience. He currently runs his appliance repair company with a team of trusted technicians.
Vent Your Dryer Indoors In 4 Simple Steps
If your dryer doesn’t have an outside vent and you want to vent your dryer indoors, don’t worry. All you need is an indoor dryer vent kit.
Commercial kits already come with supplies you can use to overcome some of the dangerous safety issues associated with venting your dryer inside.
Before you purchase an indoor dryer vent kit and try to use it, you must ensure it is compatible with your dryer. If you are unsure whether that kit will work for you, I recommend reading a few reviews or contacting the company directly.
Remember that indoor venting kits should never be used with gas dryers, as they can pose a health threat to your family.
Before we get started, it’s worth checking your dryer’s user manual to find out how many feet your dryer is rated for vent-length wise. Keep in mind that any kinks, bends, or restrictions in the vent will deduct from this rating.
Don’t forget to consult with your local building department to understand the specific requirements for safely venting your dryer indoors.

Please follow the next steps once you’ve got your inside dryer vent kit.
#1 Find a Good Location for the Vent Kit
If there’s no outside vent for your dryer and you purchased an indoor vent kit, you’ll need to find a good location for it.
Keep in mind that you will need to access the vent to perform regular maintenance. So please ensure you can get into the vent kit when necessary.
You also don’t want the exhaust to leak into an attic, a ridge vent, a crawl space, or a soffit.
When determining where you want to hook up the vent kit, remember to place the connection at the rear of the dryer. You want to use metal fittings that keep the vent kit to two 90-degree turns at most, which is a last resort. Keep kinks and turns to a minimum.
#2 Mount the Vent Kit
The next step to vent your dryer indoors is to mount the vent kit.
The process of mounting the vent kit will vary depending on the specific model you own. Therefore, you should always read the product’s manual.
Ensure your vent kit is steady against the chosen wall. Mark where the screws will go and use a power drill to drill a hole at the screw locations.
Then, use a hammer to tap the plastic anchors into place. Depending on your kit type, you can have more or fewer anchors to place. When finding suitable locations for your screws, remember that you do not want to drill into sheetrock.
Finally, once you have the screws in place, you can position the kit against the wall. Screw it in place to make sure it does not come loose.
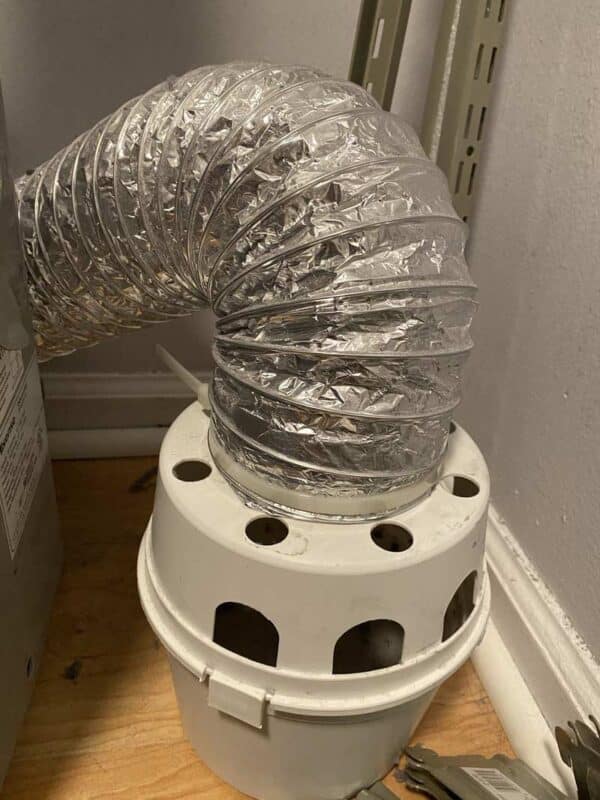
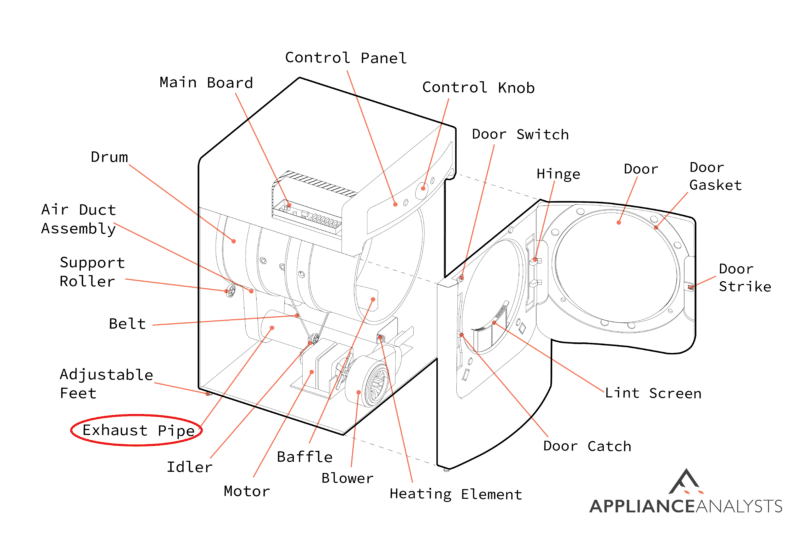
#3 Install the Exhaust Line
Now, to install your inside dryer vent kit, you’ll need to mount the exhaust line.
When installing the exhaust line, I usually advise finding a position that creates the shortest path between your dryer and the vet kit itself, with as minimal kinks and bends – especially 90 degree turns – as possible.
Once you have found a suitable location for the dryer exhaust line, you will need to stretch out the flexible portion of the duct and connect the exhaust line to the dryer. Remember that you’ll need to use a secure connection, clamping the hose into place.
Finally, once you have attached the exhaust line to the dryer, you’ll need to connect it to the vent kit as well. Again, you need to ensure the exhaust line has been secured properly to the vent kit.
#4 Calibrate the Exhaust Flap
When venting a dryer indoors, you need to calibrate the exhaust flap of your vent kit.
The exhaust flap makes maintenance easier. The goal of the flap is to open when the screen is due for cleaning. It will stay open until you have properly cleaned and reset it.
Every vent kit is different, but from what I’ve seen, many exhaust flaps are calibrated with magnetic weights. To use them, follow the next steps:
- Clean the filter screen.
- Place a magnetic strip on the underside of the flap and turn on your dryer.
- If the flap opens, turn your dryer off and place another magnetic strip on the top of the exhaust flap.
- Test the flap again. You can use cardboard to mimic the dryer vent getting full. Continue making adjustments until the flap opens. You’ll want to set the vent flap to open when it’s 80% full.
Once you’ve calibrated the exhaust flap, you can use your dryer normally. Don’t forget to perform regular maintenance to prevent different performance issues!
The Golden Rules of Indoor Dryer Venting: Do’s and Don’ts
When using a vent kit to vent your dryer indoors, it’s important to consider a few do’s and don’ts, such as:
- You should never vent a gas dryer to the inside of your building. The biggest risk of venting a gas dryer to the interior is carbon monoxide poisoning, a dangerous gas. You need to make sure all carbon monoxide gas goes outside.
- You should always follow the recommended maintenance schedule associated with an indoor venting kit. If you do not maintain your vent kit on time, dust and debris will build up and prevent your dryer from venting properly, causing it to overheat.
- Watch for mold and mildew. The air coming from a dryer is incredibly humid. It’s not unusual for mold and mildew to become a problem, particularly around the area where the dryer is being vented. You should sweep the area regularly, looking for signs of moist spots around the dryer. If you see wet areas, clean them up as quickly as possible.
- Do not overlook asthma and allergies. If you vent your dryer indoors, it could worsen chronic respiratory conditions, such as asthma. It’s worth thinking carefully about the indoor air quality in your building and considering the people who live with you so you do not endanger their health.
Keep in mind that venting a dryer indoors is not as effective as venting it outdoors.
Venting your dryer indoors will redirect the hot air into the interior, leading to increased indoor humidity, higher temperatures, and potential mold growth. So, when possible, please vent your dryer outdoors.
Wrapping Up: Your Guide to Safe and Effective Indoor Dryer Venting
Hopefully, now you know how to vent a dryer without outside access.
Remember, to vent your electric dryer indoors, you’ll need to purchase a compatible indoor dryer vent kit at any home improvement store. Then, follow the product’s instructions to install it and run your dryer safely.
Thank you so much for reading! Please check out our related posts below if you found this article helpful.
Good luck!


Designing Modern Living Rooms from Iconic Movies

7 Tips for Heating a Room with High Ceilings (On A Budget)