
We've independently reviewed this article to make sure it's as accurate as we can make it.
To find out more about our article creation and review process, check out our editorial guidelines.
This page is part of our Appliance Challenge – helping our readers save thousands of dollars in just one day’s effort. Click here to return to the challenge homepage.
Wondering how to extend your dryer’s lifespan?
In this best practices guide, I’ll walk you through the best dryer maintenance tips while highlighting common mistakes to avoid.
From heating issues to damaged clothes, a malfunctioning dryer can be super annoying.
Thankfully, dryers are pretty easy to maintain. Just a little bit of effort can save you hundreds in electricity bills while adding years to your dryer’s working life.
In fact, I’ve worked out that the tips in this guide could save you up to $450 in lower energy costs and increased dryer lifespan!
Are you ready? Let’s dive in!
Dryer Health Check – Essential Tips
I’ll start this dryer best practices guide with ‘essential tips’ since they are the easiest to follow but impact your dryer’s health the most.
Before trying any of the tips provided in this article, please read the manufacturer’s manual.

#1 Make Sure It’s Properly Installed
The first recommendation in this best practices guide is to ensure your dryer is properly installed to avoid sudden breakdowns and associated repair costs.
Keep in mind that it’s always best to have your dryer machine installed by a professional to avoid fire hazards.
Please check the following components to make sure your dryer is properly installed:
- Ensure the dryer’s connection hose and exhaust duct are not damaged and are well placed.
- Check that the exhaust duct is as straight and short as possible.
- Dryer venting must be independent of other systems, such as chimneys.
- Don’t choose a plastic or vinyl duct (they are flammable materials).
- Make sure the outdoor vent is not blocked.
- Use a dedicated circuit.
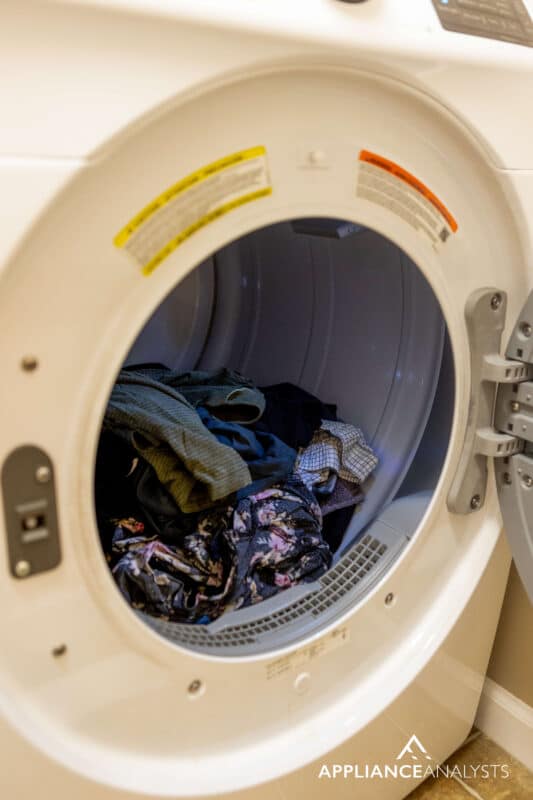
- Please make sure the lint filter is inside your dryer before using it.
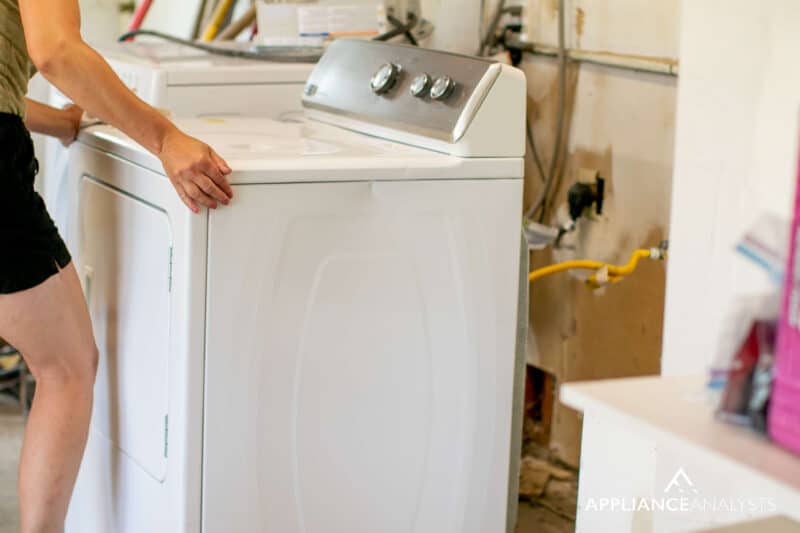
#2 Make Sure It Is Level
Ensuring your dryer is level is one of the best practices I often advise homeowners.
When a dryer is not level, it won’t be able to dry the clothes properly, and it can vibrate or make noises.
Unfortunately, if your dryer moves around the laundry room, it can also damage your floor.

To ensure your dryer’s effectiveness, please make sure it’s level. Here’s how to do it:
- Empty your dryer.
- Use a leveling app on your phone or a carpenter’s bubble level. I recommend the latter because it’s usually more reliable.
- Place the level on top of your dryer, pointing side to side.
- If the bubble isn’t centered, use an adjustable wrench and turn it clockwise to raise the dryer or counterclockwise to lower it.
- Ensure that the four feet are in firm contact with the floor, and use the bubble level again to check that the dryer is level.
#3 Ensure “Breathing Room”
Your dryer needs to have enough breathing room to ensure its effectiveness.
You see, all dryers have a heating element responsible for heating the air to dry your clothes.
The heating element is usually located in the back of your appliance. So, if there’s not enough “breathing room”, heat can build up.
In my experience, ensuring enough breathing room can keep your dryer from overheating, prevent lint fires, control humidity, and avoid mold. It can also keep the hoses from bending or kinking.
Try leaving at least 6 inches (ca. 15 cm) of space between the back wall and your dryer for the hoses. Don’t forget to leave at least 2 inches (ca. 5 cm) of extra room between your dryer and washer.
You’ll also need to ensure you can fully open the door and remove your clothes.
#4 Deep Clean the Lint Screen
The next tip in this dryer best practices guide is to clean the lint screen regularly.
I tend to find that a clogged lint screen blocks airflow and makes the dryer run for longer, resulting in overheating issues and a damaged motor.
I recommend deep cleaning your dryer’s lint filter every two to three months. Here’s how to do it:
- Carefully remove the lint screen from your dryer and wipe away the lint.
- Fill a large bowl with warm water and a few drops of dish soap.
- Soak the lint screen in the soapy water for at least 10 minutes.
- Scrub it with a sponge or soft brush (you can use an old toothbrush).
- Rinse with clean water and dry the lint screen.
- Allow it to dry completely before putting it back into your dryer.

Once you’ve completed the steps above, it’s very important you clean the space where the dryer filter sits since lint can be trapped there. You can use a vacuum or a small and soft brush.
Bear in mind that you should remove the lint from the screen after every load.
According to the U.S. Fire Administration, dryers that haven’t been cleaned cause more than 980 fires yearly and $11.9 million in property loss.
But don’t worry. You’ll be safe by checking the lint screen regularly and cleaning your dryer’s vent system at least once a year.
#5 Clean Your Dryer’s Interior
It’s also important to clean the interior to ensure your dryer’s effectiveness.
Sometimes residue from dryer sheets or fabric softener can build up over time. And, if you tend to leave the door open, dust can also accumulate.
By cleaning your dryer’s interior every two months, you’ll ensure your clothes remain clean and avoid having to wash them again.
You can easily clean your dryer’s drum with an all-purpose or natural cleaner. If you prefer the latter, I recommend mixing one part of white vinegar with two parts of warm water in a spray bottle.
Vinegar can easily break down grime due to its acidity. It also has antibacterial and antifungal properties.
Then, unplug your dryer, lightly spray the cleaning solution all over the drum and let it sit for a couple of minutes. Use a microfiber cloth to wipe it up, and leave the door open until it dries completely.
Note: Don’t forget to clean the lint screen as well.
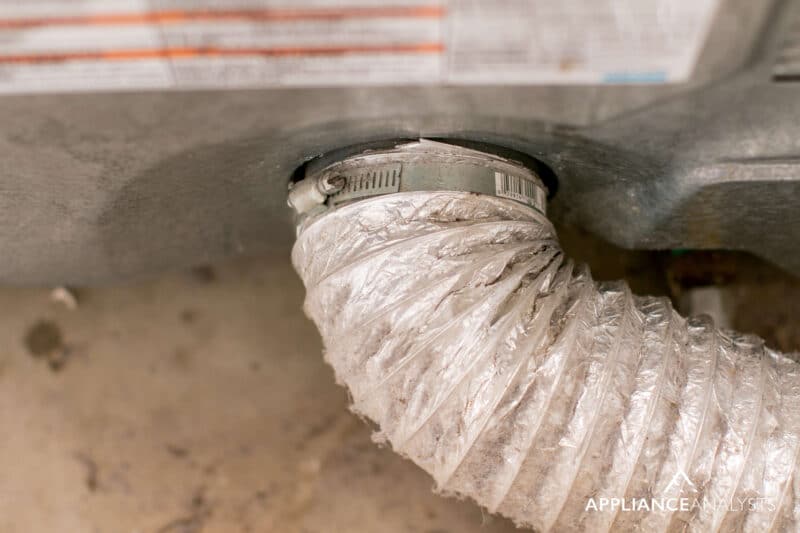
#6 Make Sure the Dryer Ducts Are Made of Metal
Now, in this best practices guide, I also want to cover dryer duct safety.
When you put your clothes in the dryer, they get tumbled in hot air. Then, the remaining moisture and heat are vented outside through the duct.
Bear in mind that if your dryer ducts are made of plastic or vinyl, you should replace them immediately. Most building codes do not allow plastic and vinyl, as they can easily collect lint, overheat, and cause fires.
Try using a metal duct instead. Metal is extremely durable and better for airflow.
Please note that the joints should also be secured with metal tape. Don’t use screws in the joints.
Healthy Habits for a Long-Lasting Dryer
Now, let’s cover some healthy habits that will extend your dryer’s lifespan. The following five tips are simple changes you can make in your laundry routine.
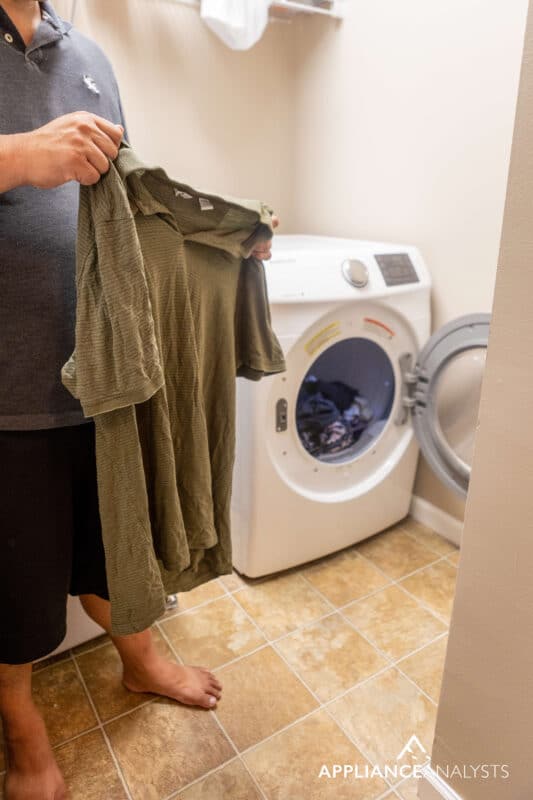
#1 Choose the Right Cycle
Choosing the right cycle on your dryer is one of the best practices I recommend.
You see, failing to select the right cycle can damage your clothes and affect your dryer’s performance.
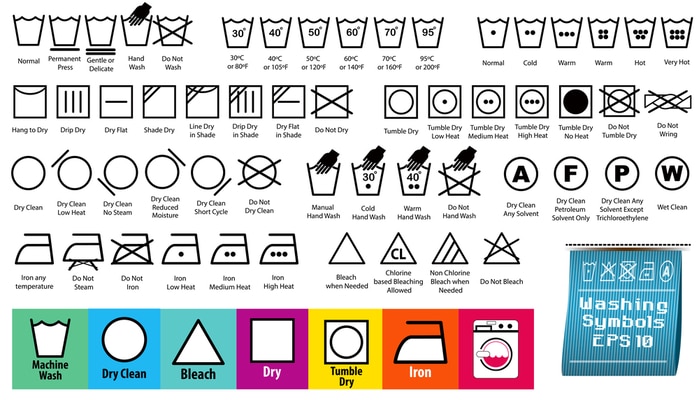
You should always read the care labels on your clothes before putting them in the dryer to select the right setting and temperature and get the best results from your dryer.
Look at the following image to learn what the symbols on the care labels mean.
#2 Don’t Overload or Underload Your Dryer
Another habit you should incorporate into your routine is to load your dryer correctly.
I find that clothes will take much longer to dry if you overload your dryer because airflow will be restricted. Since your dryer will have to work harder, you can damage its motor.
The cost of a new dryer motor ranges from $40 to $120, and this price doesn’t include installation. If you want a professional to help you replace the motor, you’ll spend an extra $125-$300.
Avoid damaging your dryer’s motor and save up to $420 by making sure your dryer is not more than 3/4 full.
Underloading your dryer isn’t a good idea either. Your clothes won’t dry properly because the sensors won’t detect them. Not to mention that it’s a waste of energy (and money!).
If you’re going to dry a small load, ensure your dryer is 1/3 full.
Try separating heavyweight fabrics from lightweight ones to help your clothes dry faster.
#3 Don’t Put Dirty Clothes in Your Dryer
You should never put soiled clothes in your dryer because some materials can clog and damage it.
Soiled clothes will also get your dryer dirty, and you’ll need to clean it before drying a new load. Otherwise, you’ll need to wash your clothes again.
Ensure you’re only drying clothes that have just been washed in the washing machine.
#4 Don’t Add Wet Clothes to a Dry Load
The next healthy habit or best practice I always suggest is not to add wet clothes to a dry load.
If you forgot to put certain items in your dryer, wait until the current load is fully dried.
You see, adding wet items to a partially dry load can throw off the moisture detector, resulting in over or under-dried clothes. It can also make your dryer work harder and increase your electricity bills.
#5 Make Sure Your Clothes Aren’t Dripping Wet
If you want to make the most out of your dryer and extend its lifespan, ensure your clothes aren’t dripping wet.
You should never put soaking clothes in your dryer because the extra water can leak from the drum and damage your appliance.
Additionally, your dryer will not get your dripping wet clothes dry, and they can smell musty or develop mildew.
Putting dripping wet clothes on your dryer will also make it work harder, overwhelm its bearings, and damage the motor. Not to mention that you’ll be paying a fortune on electricity bills.
So, if your washing machine is not working correctly and is leaving your clothes soaking wet, my advice is to air dry them a little before putting them in the dryer.
Dryer Health Check – Regular Maintenance
Dryer maintenance will help you avoid breakdowns and extend your appliance’s lifespan. It will also help you care for your clothes, prevent fire hazards, and save money.
Try following these four simple tips to take care of your dryer:
#1 Clean Behind
The first maintenance tip I recommend is to clean behind your dryer every six months.
You see, dust, dirt, and lint can accumulate behind your dryer and cause multiple issues. Also, laundry rooms usually have excess moisture, leading to mold.
Here’s how to clean behind your dryer:
- Pull the dryer forward, and be careful not to scratch the floor. Try asking a friend for help since dryers can be heavy.
- Remove all dust and lint from the floor. Try using a vacuum.
- Use an all-purpose cleaner and a rag to wipe the floor, dryer, and walls.
- Allow the area to completely dry.
- Slide the dryer back in place.
Pro tip: To make sliding large appliances easier, consider spraying glass on the floor before moving them!
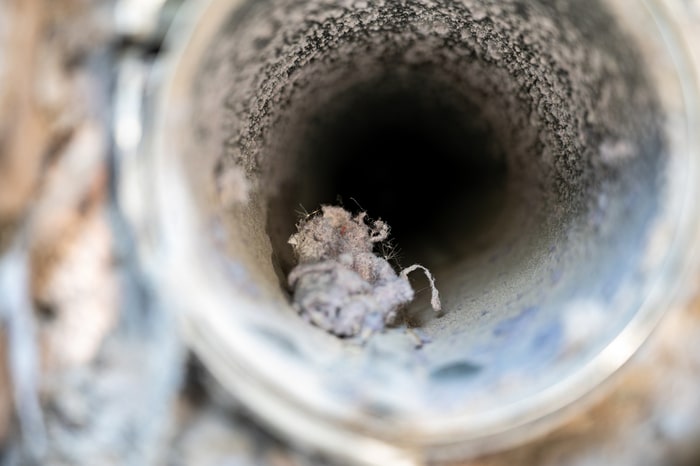
#2 Inspect and Clean the Venting System
In my opinion, the best dryer maintenance tip is to inspect and clean the venting system at least once a year, as lint and other fibers can get past the lint trap and land in the dryer duct.
A clogged venting system not only affects your dryer’s performance but can also prevent hot air from escaping, leading to a fire hazard.
If you call a professional, dryer vent cleaning costs $138 on average. Luckily, you can save this money and clean it on your own*.
*Bear in mind that if you don’t feel comfortable cleaning the dryer vent, we strongly recommend calling a professional.
Here’s how to clean and inspect the venting system:
- Pull your dryer away from the wall and carefully unplug it. If your dryer runs on gas, turn the supply valve off.
- Locate the vent behind your dryer and the exhaust vent on your home’s exterior.
- Remove the vent from the back of your dryer. You’ll need to use a screwdriver to undo the clamp.
- Remove lint from the duct by hand and then use a vacuum to clean the inside of the dryer duct. If you don’t have a vacuum, please ask a friend if you can borrow theirs.
- Go outside and remove the exterior vent cover with a screwdriver. Then, use a brush or a vacuum to remove the remaining lint.
- Before reconnecting the ducts, ensure they’re not damaged. If they’re, please call a professional because you’ll need to replace them.
- Reattach the ducts and vent cover.
- Push the dryer back into place and plug it back in or turn the gas valve back on.
- Test the dryer by running it for 20 minutes on the air-dry setting. Ensure all the connections are strong.
By cleaning the vent once a year, your dryer won’t have to work as hard, which can help you save money on utility fees.

#3 Check the Door Seal
My go-to dryer maintenance tip is to check the door gasket regularly.
You see, if the seal is damaged or dirty, your dryer won’t be able to maintain the heat level needed, and it can take longer to dry your clothes.
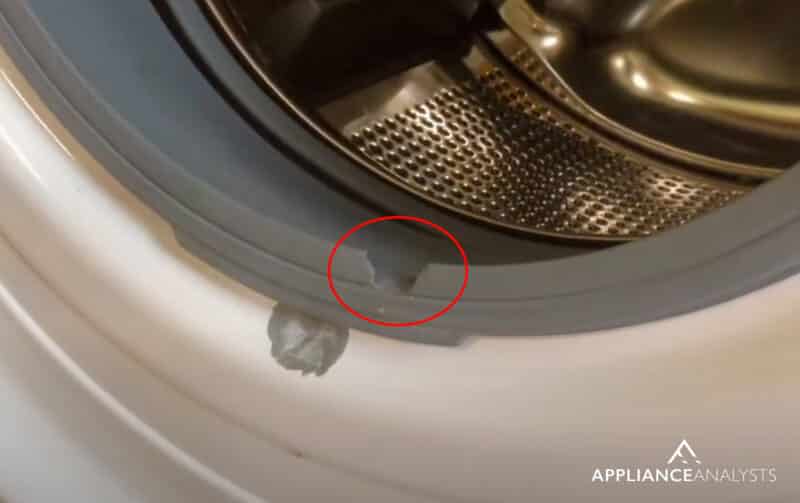
Mold can also grow in rubber seals, so check and clean them regularly.
Follow these simple instructions to clean the door seal:
- Fill a large bowl with equal parts of warm water and white vinegar.
- Soak a soft sponge in the cleaning solution.
- Clean around the door gasket. For more precision, you can also use a cotton swab or an old toothbrush.
If you notice that the door seal is damaged, please replace it.
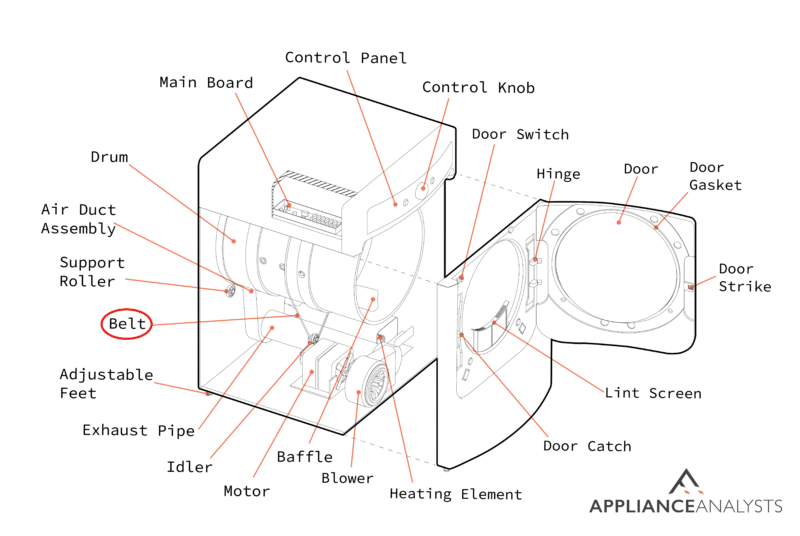
#4 Inspect the Belt
The last maintenance tip in this dryer best practices guide is to inspect the belt in charge of rotating the drum.
If the belt breaks or becomes worn, the drum won’t rotate, your dryer won’t turn on, and your clothes won’t dry.
You can easily inspect your dryer’s belt by opening the door and trying to spin the drum with your hand. If you feel resistance, then the belt is not damaged. However, the belt is probably broken if you can turn the drum easily.
You can also check the belt by disconnecting your dryer from the power source and removing the top panel. Then, inspect the belt and replace it if it’s damaged.
Bear in mind that the replacement process will vary depending on your dryer’s brand and model.
Wrapping Up: Dryer Best Practices
You made it! If you followed this dryer best practices guide, you saved yourself $450 or even more.
I hope you can agree that none of these maintenance tips were complicated. Sure, we need a bit of elbow grease and some determination, but it’s all pretty straightforward.
With your effort today, I’m sure you’ve just greatly reduced your energy bills and added YEARS of good working life to your dryer – delaying the need to buy a whole new one anytime soon.
If you found this guide helpful, check out the rest of our appliance challenge. In total, our guides can save you over $1,000 a year by just following simple walkthroughs like this one!
Make sure to also sign up to our email list below – and we’ll let you know more money-saving appliance tips and advice.


Designing Modern Living Rooms from Iconic Movies

7 Tips for Heating a Room with High Ceilings (On A Budget)


![LG Dryers: How to Change the Temperature [Easy Guide]](https://applianceanalysts.com/wp-content/uploads/2022/11/Featured-LG-Dryers-How-to-Change-the-Temperature-350x200.jpg)